Grand LeMoyne Star Quilt
Finished quilt: 67 67
Heres a twist on a classic block. When working with fabulous prints, I like to make big graphic quilts. Let the fabrics shine by creating this striking quilt that is not only easy to make but can also be finished in a weekend! You only need to pick five of your favorite prints to get started! It goes together simply with raw-edge appliqu using fusible web.

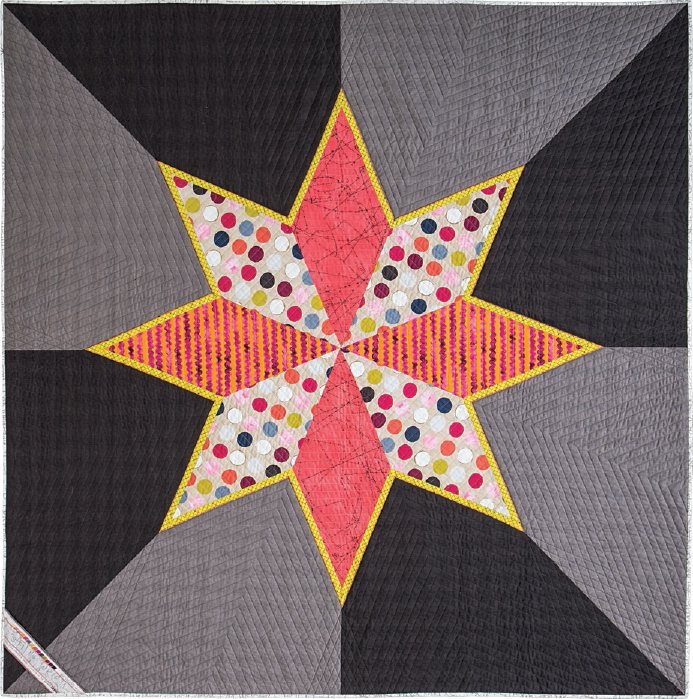
Quilted by Terri Carpenter
MATERIALS
Yardage is based on 42-wide fabric.
Big polka dot : yard
Coral print : yard
Orange and pink rickrack stripe : yard (or yard to fussy cut the stripe like I did)
Citron plaid : yard
Fusible web tape : 7 yards of wide (I used Pellons Lite EZ-Steam II Tape.)
Gray : 2 yards (I used my yarn dye fabric.)
Black : 2 yards (I used my yarn dye fabric.)
Binding : yard
Backing : 4 yards
Batting : 75 75 (I used a lightweight 100% cotton batting.)
NOTE
You can fussy cut the star diamonds for a really special look; be sure to allow extra fabric.
CUTTING
Big polka dot
Cut 2 strips 9 width of fabric; use the 45 line on a ruler to subcut 2 diamonds 9 wide from each strip, for a total of 4 diamonds.
Coral print
Cut 1 strip 9 width of fabric; use the 45 line on a ruler to subcut 2 diamonds 9 wide.

Orange and pink rickrack stripe
Cut 1 strip 9 width of fabric; use the 45 line on a ruler to subcut 2 diamonds 9 wide.
NOTE
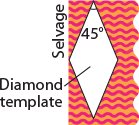
To cut fabric with a crosswise stripe so that the stripe runs across the width of the diamond, make a template. Use it to fussy cut the stripe (or any big print). All the diamond edges may end up on the bias, so handle carefully to avoid stretching the shape.
Citron plaid
Cut 1 strip 12 width of fabric; subcut 16 strips 1 wide on the bias (using the 45 line on a ruler).
Gray
Cut 2 strips 34 width of fabric; trim each strip into a square 34 34. Cut each square in half diagonally to create 4 half-square triangles.
Black
Cut 2 strips 34 width of fabric; trim each strip into a square 34 34. Cut each square in half diagonally to create 4 half-square triangles.
Binding
Cut 7 strips 1 width of fabric.
Construction
Seam allowances are unless otherwise noted.
Make the Pinwheel Background
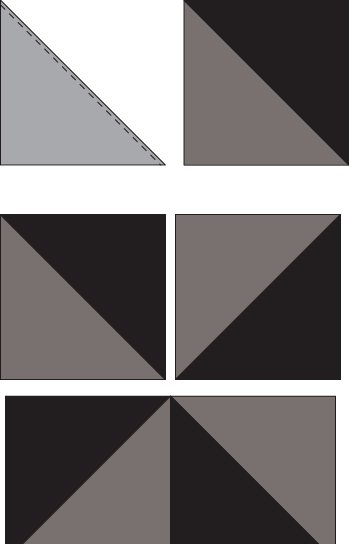
Sew a black triangle to a gray triangle on the long sides to create a large half-square triangle unit. Repeat this step 3 more times, for a total of 4 units. Press the seams toward the darker fabric.
Sew all 4 half-square triangle units together as shown to form a large pinwheel for the background.
Make the LeMoyne Star
BIAS STAR BORDER
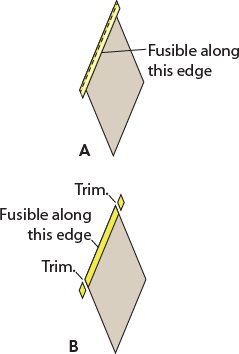
Follow the manufacturers instructions to fuse the -wide fusible web tape to the wrong side of the bias strips, aligning the tape with one long edge of each bias strip. (The fusible web will end up on the outer edge of the big star to help adhere it to the background.) Leave the paper backing in place.
Sew a bias strip to the left side of a diamond, right sides together. Make sure the fusible web is toward the center of the diamond, so that it will be on the outer edge when the border is pressed open. Press the strip open.
Trim the bias strip even with the edges of the diamond. Figures A and B
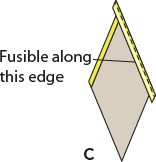
Repeat Steps 2 and 3 to sew a bias strip to the right side of the diamond. Figure C
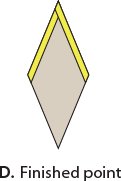
Repeat Steps 24 to add bias borders to all 8 diamonds. Figure D
ASSEMBLE THE STAR
Lay out the diamonds in a star shape to determine color placement.
Sew the diamonds together in pairs according to your arrangement. Press the seams in each pair in the same direction.
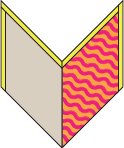
Sew the pairs into halves and press the seams in the same direction as in Step 2.
Sew the halves together to create a big LeMoyne Star. Press all the seams in same direction, carefully pressing the center point so it lies flat.
APPLIQU THE STAR TO THE BACKGROUND
Remove the paper backing from the fusible web and gently position the star onto the pinwheel background, right side up for both the star and the background. Match up the points on the seams and float the star in the center. (The points of the top, bottom, and side diamonds should be roughly 8 from the edges of the quilt.) Adjust as necessary. Once you are satisfied with the look, fuse in place.
NOTE
Since Pellons Lite EZ-Steam II is sticky and repositionable, you can play with the positioning before committing to the placement.
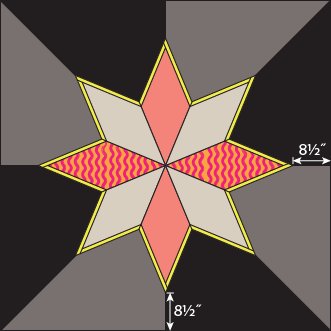
Quilt assembly
Machine appliqu the star to the background with a blanket stitch (or your choice of stitch).
Important: Cut out and remove the pinwheel background underneath the center of star, leaving a seam allowance. Trimming away the background fabric allows the quilt top to lie flatter.
Finishing
Layer, baste, quilt, and bind as desired. I chose to use a narrow, light-colored binding for framing the image and to spark the white polka dots in the center. Also, personalize your quilt by putting a unique, creative quilt tag or label on the front of your quilt, just like artists who sign the front of their paintings!
Publisher: Amy Marson
Creative Director: Gailen Runge
Art Director/Designer: Kristy Zacharias
Editor: Liz Aneloski
Technical Editor: Alison M. Schmidt
Production Coordinator: Zinnia Heinzmann
Production Editor: Alice Mace Nakanishi
Photo Assistant: Mary Peyton Peppo
Style photography: Nissa Brehmer
About Jennifer Sampou
Jennifer Sampou studied textiles and surface design at the Fashion Institute of Technology in New York City and was creative director for P&B Textiles before opening Studio Sampou. She currently designs fabrics exclusively with Robert Kaufman Fabrics.

jennifersampou.com
Follow Jennifer on Instagram, Facebook, and Pinterest.
If you love quilting, sewing, fiber arts & morejoin our email list for updates, special offers and discounts, author news, and the latest links to great freebies and giveaways! (Dont worry, we wont share your info with anyone.)
Next page

