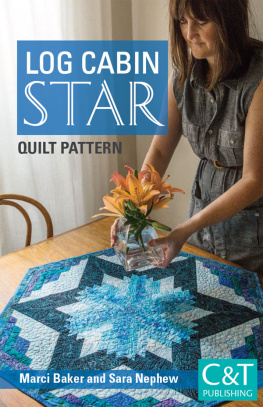
Baker Marci - Log Cabin Star Quilt Pattern
Here you can read online Baker Marci - Log Cabin Star Quilt Pattern full text of the book (entire story) in english for free. Download pdf and epub, get meaning, cover and reviews about this ebook. City: Concord, year: 2016, publisher: C&T Publishing, genre: Home and family. Description of the work, (preface) as well as reviews are available. Best literature library LitArk.com created for fans of good reading and offers a wide selection of genres:
Romance novel
Science fiction
Adventure
Detective
Science
History
Home and family
Prose
Art
Politics
Computer
Non-fiction
Religion
Business
Children
Humor
Choose a favorite category and find really read worthwhile books. Enjoy immersion in the world of imagination, feel the emotions of the characters or learn something new for yourself, make an fascinating discovery.

- Book:Log Cabin Star Quilt Pattern
- Author:
- Publisher:C&T Publishing
- Genre:
- Year:2016
- City:Concord
- Rating:5 / 5
- Favourites:Add to favourites
- Your mark:
Log Cabin Star Quilt Pattern: summary, description and annotation
We offer to read an annotation, description, summary or preface (depends on what the author of the book "Log Cabin Star Quilt Pattern" wrote himself). If you haven't found the necessary information about the book — write in the comments, we will try to find it.
Baker Marci: author's other books
Who wrote Log Cabin Star Quilt Pattern? Find out the surname, the name of the author of the book and a list of all author's works by series.


Log Cabin Star Quilt Pattern — read online for free the complete book (whole text) full work
Below is the text of the book, divided by pages. System saving the place of the last page read, allows you to conveniently read the book "Log Cabin Star Quilt Pattern" online for free, without having to search again every time where you left off. Put a bookmark, and you can go to the page where you finished reading at any time.
Font size:
Interval:
Bookmark:
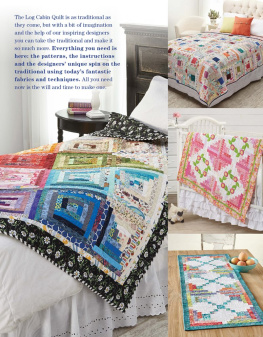
Publisher: Amy Marson Creative Director: Gailen Runge Editor: Liz Aneloski Technical Editors: Priscilla Read and Alison M. Schmidt Design Direction: Kristy Zacharias Cover Designer: Kristen Yenche Page Layout Artist: Casey Dukes Production Coordinator/Illustrator: Tim Manibusan Production Editor: Alice Mace Nakanishi Style photography: Page + Pixel Studio photography: Diane Pedersen, unless otherwise noted Published by C&T Publishing, Inc., P.O. Box 1456, Lafayette, CA 94549 Log Cabin Star Finished size: 36 31 This stunning Log Cabin table topper/wallhanging is made from two simple blocks with no set-in seams, so any level of quilter can make one. The blocks are created starting with a diamond or a triangle and then adding strips to the sides, in order. If you are unfamiliar with the concept of Log Cabin style, make one diamond block and one triangle block to see how simple it is. 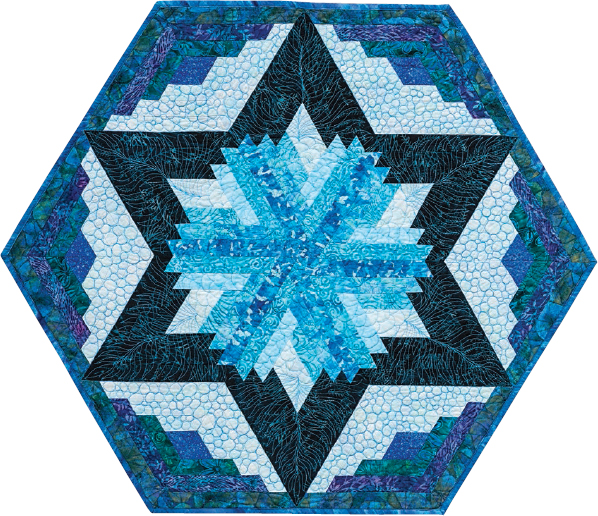
 60 Ruler This project requires a Clearview Triangle 60 Acrylic Ruler10 (from C&T Publishing).
The 10 is the perfect size for these blocks. If you already own the Clearview 8 or the Clearview Super 60, you can use them but will need to add another ruler when cutting the largest shape for each block. Caution:If you use another manufacturers 60 ruler, especially one with a flat top, youll need to adjust which ruler line is used.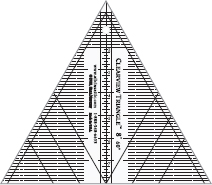 Fabric Selection If you look at these different samples, you will notice that for some, the star stands out dramatically; others have a pinwheel or a blossom in the middle. Here is how these special effects happen. For the star to stand out significantly, there has to be a high contrast in value between the star outline and the fabric behind it. The greater the difference in value, the more vivid the star.
Figure A 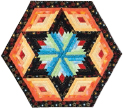 Quilt by Amy Hart The light and medium in the center of the star, as designed by Sara, creates a pinwheel effect. Figure B
 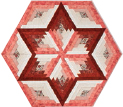 Quilt by Libby Smith If the values vary inward, you get a starburst effect. Figure C
 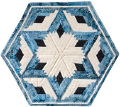 Quilt by Dot Kuffel Notice also that the chimneys can match either the star or the center. Coordinating with the star (Figure D), the center has more round appearance. If the chimney blends with the center, there is a secondary star pattern happening. Figure E
 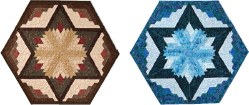 Quilts by Lynn McCamant (left)
and Marci Baker (right) On the red and cream star, the quilter changed the values outside the star to create a chain of diamondsa wonderful Christmas table topper.
Figure F 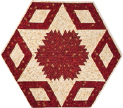 Quilt by Sharon McNancy Cleary Knowing these subtleties, select your own fabrics, and create a unique design all your own.
 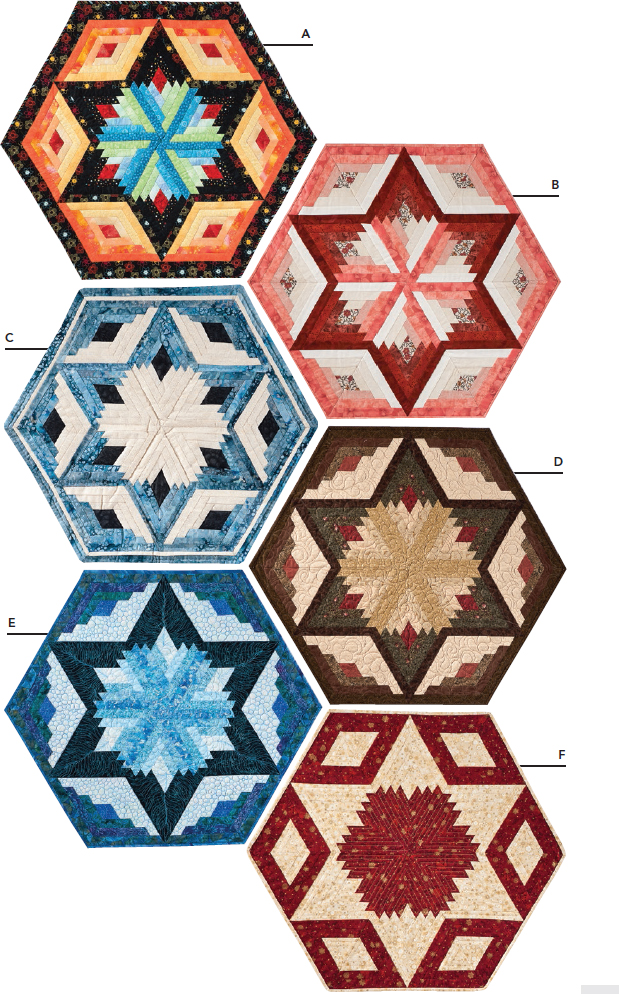 Photos by Steve Hays MATERIALS Yardage is based on 42-wide fabric. Using the photos in the previous section and the diagrams that show the blocks in the finished quilt, decide where the colors and values will be in your project. The yardage given is for 17 different fabrics, as shown in the diagrams. Gather your choices based on yardages shown here.
 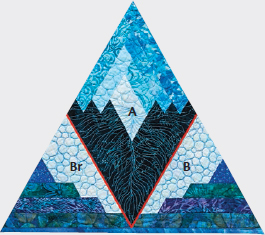 Placement of Diamond (A), Triangle (B), and Reverse Triangle (Br) NOTE All yardages provide enough fabric for an extra cut and shrinkage and straightening of the fabric except the yard. They do not allow for an extra cut.
If you prefer that extra amount, increase all from to yard. DIAMOND (STAR) Chimney 1: yard Light 1: yard Light 2: yard Light 3: yard Medium 1: yard Medium 2: yard Medium 3: yard Dark 1: yard Dark 2: yard Dark 3: yard TRIANGLE (SURROUNDING STAR) Chimney 2: yard Light 4: yard Light 5: yard Light 6: yard Medium 4: yard Medium 5: yard Medium 6: yard FINISHING Corner fabric (optional): yard (for Optional: Squaring the Design) Backing: 1 yard Batting: 36 42 Binding: yard  Diamond color placement
 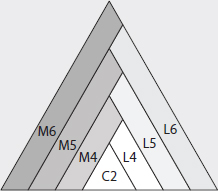 Triangle color placement CUTTING WOF = width of fabric Cut the strips listed below, noting that the chimney strips are cut to the width specified and all other strips are cut 1 WOF. DIAMOND (STAR) Chimney 1: 1 strip 2 WOF strips 1 WOF strips: Light 1: 1 strip Light 2: 1 strip Light 3: 2 strips Medium 1: 1 strip Medium 2: 1 strip Medium 3: 2 strips Dark 1: 2 strips Dark 2: 3 strips Dark 3: 3 strips TRIANGLE (SURROUNDING STAR) Chimney 2: 1 strip 2 WOF 1 WOF strips: Light 4: 1 strip Light 5: 2 strips Light 6: 3 strips Medium 4: 2 strips Medium 5: 2 strips Medium 6: 3 strips Diamond Block Cutting the Shapes Refer to the diamond block layout and the following instructions to cut the shapes and for piecing order. You need 6 of each shape to make the 6 diamonds in the project. As you cut the shapes, lay them out in this design, so you can see it come together. This will also make sewing each block together easier.
 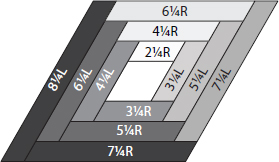 Diamond block layout CHIMNEY 1 Using a 2 strip, position the ruler at the right end of the strip, with one side along one edge of the strip.
Cut the end of the strip to a 60 angle. Figure A 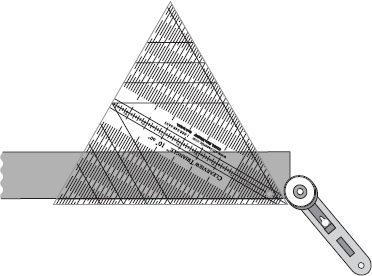 A Rotate the strip so the cut end is to the left. Place the ruler so the tip is at one edge of the strip, the 2 line (or the line the size of the diamond) is along the other edge, and the edge of the ruler is at the corner of the cut end. Figure B
 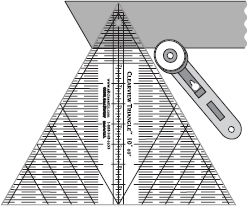 B Rotary cut only along the side opposite the first cut. (Check the size using the Chimney 1 pattern.) Continue moving the tool along the same side of the strip, lining up the cut edge and the side of the tool, as shown, to cut the required number of Chimney 1 pieces. DIAMOND LOGS (A.K.A. DIAMOND LOGS (A.K.A.
LONG DIAMOND) Diamond logs have a right leaning and left leaning shape. Check carefully to be sure you are cutting them in the direction required by the pattern.
Next pageFont size:
Interval:
Bookmark:
Similar books «Log Cabin Star Quilt Pattern»
Look at similar books to Log Cabin Star Quilt Pattern. We have selected literature similar in name and meaning in the hope of providing readers with more options to find new, interesting, not yet read works.
Discussion, reviews of the book Log Cabin Star Quilt Pattern and just readers' own opinions. Leave your comments, write what you think about the work, its meaning or the main characters. Specify what exactly you liked and what you didn't like, and why you think so.