Segmented Turning: An Illustrated Guide
Ralph S. Buckland
Text copyright 2013 Ralph S. Buckland
All Rights Reserved
Since woodworking involves risks of injuries or damage, this book cannot guarantee that the projects are safe for everyone. This book is sold without guarantees of any kind implied or expressed by the author. The author disclaims any liability for injuries, loss or damage of tools and materials. The author suggests that the woodworker thoroughly understand woodworking techniques and the manufacturers safety guidelines. In many of the photos the safety guard has been removed to have a better view of the operation. I strongly recommend using safety guards.
Dedication
This book is dedicated to my wife, Kathy. I would also like to thank Paul Hershberger, Larry Lance and Merle Mast, of Keim Lumber in Charm, Ohio, for the use of their wood species photographs and helping to select various woods used in the book. Also I would like to thank Craig Jackson and Robert Q. Smith at Easy Wood Tools in Lexington, Kentucky for the use of the photographs of their lathe tools.
Preface
Segmented turning offers a realm of design possibilities. Add this to the creative freedom offered by lathe work and an endless adventure begins. I prefer to work with wood while others express their designs with a variety of other materials. Whether you are a novice or a professional woodworker, I hope you will find new and meaningful advice in this guide.
Always follow the manuf acturers safety instructions. Taking advantage of woodworking classes and seminars is encouraged. As you explore segmented turning as well as other woodworking endeavors, make safety your first priority. I have included some safety tips and advice I use which I think you will find useful.
Table of Contents
- Project Designs
- Projects



Chapter I Introduction
Segmented turning involves cutting small pieces of wood called segments at a predetermined angle to form a wooden circular ring. Various colors of wood can be used for each segment thus creating a colorful ring. Rings are stacked and glued together to form an object, such as a bowl, box, vessel, lamp and sculptured pieces. Some individual segments may be made up of smaller pieces of wood. Its not unusual for one segment to have 25 or 30 pieces of wood. A ring with segments of multiple pieces of wood may have three or four hundred pieces. These rings that are more complex are often called featured rings or design rings 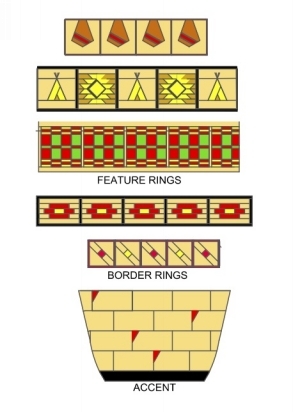 . Other rings that are less involved and have a lesser number of features can be called border rings. Accent rings, such as the triangle shape, are often added randomly to spruce up a project.
It is not uncommon for a segmented project to have several hundred or even several thousand pieces of wood.
This book will provide guidance and information for designing your own project, angles and sizes of commonly used rings, feature rings, border rings, accent rings, designs for the top and bottom of a project, masonry as well as silhouette designs. Techniques and processes are discussed in chapter II.
Some of the common tools used in segmented turning are: wood lathe, radial arm saw, table saw, band saw, table jig saw or scroll saw, a belt sander, a drum sander, a disc sander, orbital sander, segmented presses, various measurement tools, la the tools, workbench or table, Forstner bit, twist bit, router, drill press, faceplate and various lathe accessories, a good collection of woodworking hand tools and a rotary power carver. Buying tools seems like a neverending event, seems like there is always something I would like to have.
Needless to say segmented turning requires preparatio n, a good plan and also a lot of time to complete. The rewards from all this are great in the completion of a beautiful project that may take days, weeks or even months to complete.
I hope this guide will be thorough in its content and help you to accomplish a rewarding project while having a safe experience.
A. Cutting Segments
Segments can be made two ways. First, staves are made with the grain running vertically and would be a similar process as used in drum or barrel construction. When looked at from the top it would have the same general shape as a segment in segmented turning. 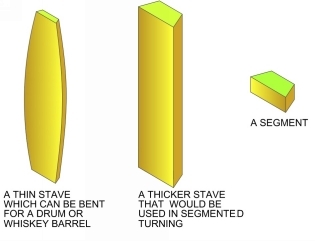 Segments are smaller in height and are usually from an 1/8 inch to about 4 in height. The face of the wood is always facing outward, that is, with no end grain showing.
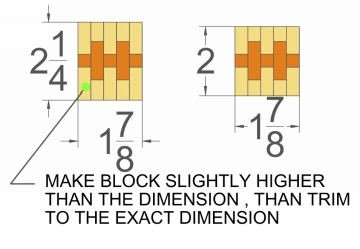
 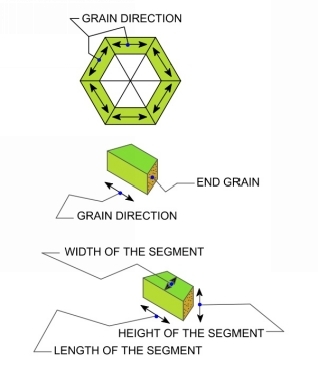 The grain can run vertically, horizontally or at an angle. Often when segments are made, they are made a little taller than necessary and can be turned down to the correct size as you flatten the ring.
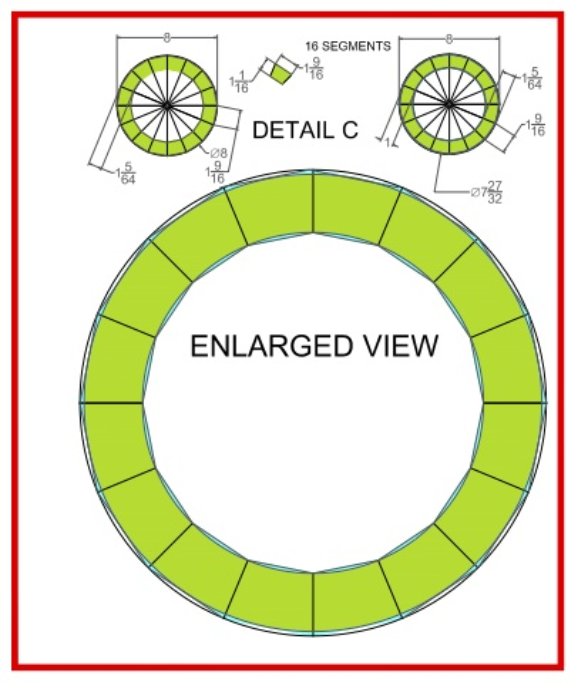
Listed are commonly used rings sizes as well as the correct segment size and angle for the rings being shown. I have included ring sizes from 16 in diameter thru 2 in diameter. The rings will vary in size every 1/2. The rings are shown with commonly used number of segments. The first consideration in designing or turning a project is to know the largest diameter your lathe is capable of turning. For example, if there is 5 from the center of your spindle to the bed of the lathe than you can only turn a 10 diameter. Keeping this in mind I will call this outside diameter the point to point distance. 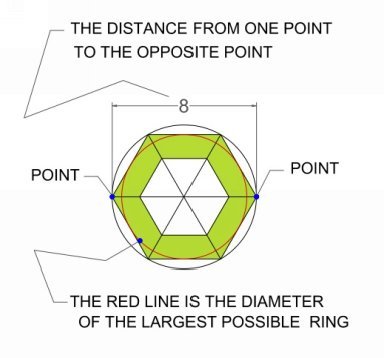 The red line shows the largest diameter you can turn from this 8 point to point ring. Detail A shows a ring with four segments.
 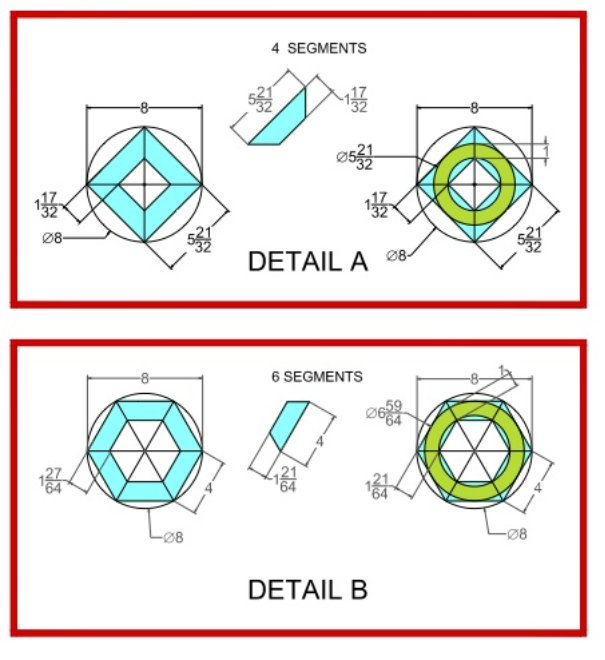 The point to point distance would be 8. After this is turned, you can only achieve a 5 21/32 diameter. The blue area on the outside of the drawing is wood that will be turned off and wasted. Now look at detail B. This diagram shows the same 8 point to point ring but with more segments, six in this case. Using more segments, you will be able to get a larger ring, in this case almost 7, its actually 6 59/64. In detail C an 8 ring is shown with 16 segments.














 . Other rings that are less involved and have a lesser number of features can be called border rings. Accent rings, such as the triangle shape, are often added randomly to spruce up a project.
 Segments are smaller in height and are usually from an 1/8 inch to about 4 in height. The face of the wood is always facing outward, that is, with no end grain showing.
  The grain can run vertically, horizontally or at an angle. Often when segments are made, they are made a little taller than necessary and can be turned down to the correct size as you flatten the ring.
 The red line shows the largest diameter you can turn from this 8 point to point ring. Detail A shows a ring with four segments.
  The point to point distance would be 8. After this is turned, you can only achieve a 5 21/32 diameter. The blue area on the outside of the drawing is wood that will be turned off and wasted. Now look at detail B. This diagram shows the same 8 point to point ring but with more segments, six in this case. Using more segments, you will be able to get a larger ring, in this case almost 7, its actually 6 59/64. In detail C an 8 ring is shown with 16 segments.