1.1 Connecting the Router
In order to configure the Cisco router to perform the network operation desired, the first thing to do is to connect the router through console connection. This connection is used to configure the router and it does not carry user data.
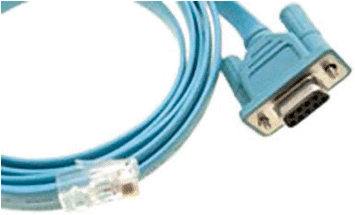
Most routers come with console cable that has one DB-9 end and the other end is RJ-45 connecter. These connectors can be seen in Fig.. The cable is usually a slim ribbon that looks different from the regular LAN twisted pair cables.
Leave the router off and connect the RJ-45 end of the cable to the port of the router labelled console. The other end, the DB-9 one, should be connected to the computer serial port. Most of the modern laptops do not have the legacy DB-9 serial port. Instead of the DB-9 serial port, a USB port can be used. This would require the use of a USB-to-DB9 adapter.
Some older routers come with console cables that have RJ-45 connectors in both of their ends. These cables come with RJ-45-to-DB9 adapters.
After connecting the console cable to the computer, using the DB-9 connecter or the USB, software for terminal emulation is required.
The first choice is HyperTerminal if you are using Windows XP. If you are using Windows Vista or Windows 7, there are several free alternatives such as PuTTY or Tera Term. If you are using Linux, you can use MiniCom or CuteCom.
For Mac, you can use MiniCom and ZTerm.
The basic settings that need to be done in the terminal emulation software are the following:
Bits per sec: 9600
Data bits: 8
Parity: none
Stop bits: 1
Flow control: none
After connecting the cable and configuring the settings on the terminal emulation software, turn the router power on.
The screen should show the router boot-up process and information such as the IOS version, amount of memory available, and types of interfaces.
Eventually, you will end up at the user EXEC mode with the prompt Router> .
If the router was configured before and it has console password configured in it, you will be asked to input the password before getting to the user EXEC mode.
1.3 Interfaces Configuration
Before we dive into the interfaces settings, we need to understand the difference between an Interface and a Line. In the simplest distinction, interfaces are designed to carry user and routing data while lines are used for configuration purposes.
1.3.1 Configuring IPv4 Addresses
Assign IPv4 addresses to interfaces you plan to use:
Router(config)# interface interface - type interface - number
Router(config-if)# ip address interface - ip - address subnetmask
where,
interface - type is the interface type such as ethernet, FastEthernet, or serial.
interface - number is the interface number like 0, 0/0, or 0/1/0.
interface - ip - address is the IPv4 address you want to assign to this interface.
subnetmask is the subnet mask of the network this interface is connected to.
By default, all router interfaces are shutdown. To turn on an interface, use the following command in the interface configuration mode:
Router(config-if)# no shutdown
Repeat steps 1 and 2 for each interface you need.
1.3.2 Configuring IPv6 Addresses
Assign IPv4 addresses to interfaces you plan to use:
Router(config)# interface interface - type interface - number
Router(config-if)# ipv6 address ipv6 - address/prefix - length
where,
interface - type is the interface type such as ethernet, FastEthernet, or serial.
interface - number is the interface number like 0, 0/0, or 0/1/0.
Ipv6 - address is the IPv6 address you want to assign to this interface.
Prefix - length is the IPv6 prefix length of the network this interface is connected to.
You can use the following parameters for special settings:
- a.
Router(config-if)# ipv6 address ipv6 - address/prefix - length eui-64
The EUI-64 parameter is used to tell the router to complete the rest of the IPv6 address using the EUI-64 rules. In this case, you need to give only the prefix instead of the ipv6 - address .
- b.


![Sagar Ganatra [Sagar Ganatra] - React Router Quick Start Guide: Routing in React Applications Made Easy](/uploads/posts/book/119450/thumbs/sagar-ganatra-sagar-ganatra-react-router-quick.jpg)


