Excel VBA:
The Ultimate Intermediate's Guide to Learn VBA Programming Step by Step.
David A. Williams
Table Of Contents
Introduction
Excel is the most popular spreadsheet software in the world today. It was developed by the giant software company Microsoft Inc. and is the single most widely used spreadsheet program in businesses, government, schools, universities, and other institutions.
While there are many different spreadsheet programs available, Excel remains number one. It has continued to enjoy widespread use and massive growth over the past three decades. There have been numerous upgrades and new features introduced over the years.
Excel finds application in many different fields, including business intelligence, finance, statistics, analysis, forecasting, billing, inventory, data management, and so much more. This is why numerous employees and workers are required to learn how to use this application if they are to be effective in the workplace.
Most employers view Excel as an essential end-user computing tool, especially those in the fields of accounting, information systems, and business in general. It is widely used to carry out daily functions at the workplace.
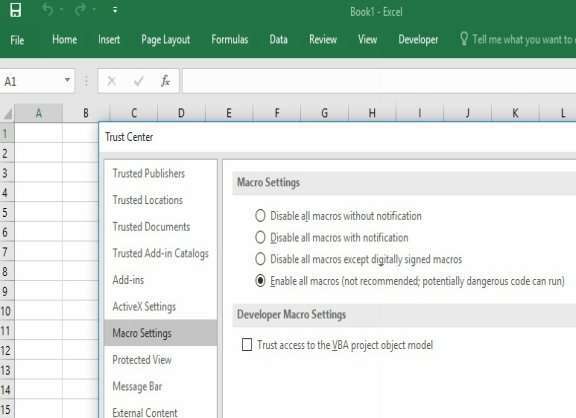
The first thing to check when preparing to use VBA for Excel is whether macros have been enabled in the Excel version being used. To do this, go to the developer option on the toolbar and click on Macro Security and enable the usage of Macros.
Notice the above screenshot is for Excel 2016. This feature can be turned off after practicing the parts of this book.
Now that the macros are enabled to get familiar with when programming with Excel is the Visual Basic Interface/ Editor.
This can be opened in Excel 2016 by again clicking on the Developer option on the main toolbar and choosing Visual Basic on the extreme left corner.
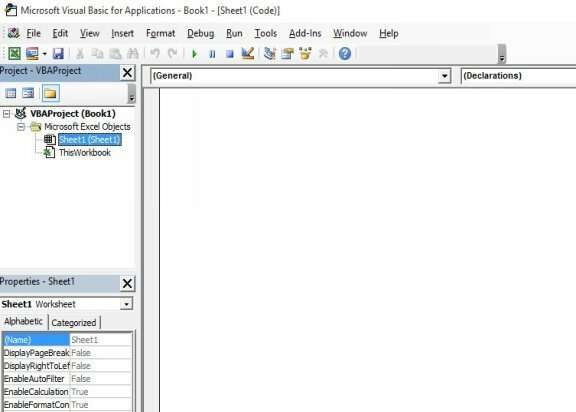
Clicking this option will lead to the following screen/editor, as shown in the picture below.
The white area on the right will become visible when clicking on sheet one on the left-hand side. This is the default level, and many sheets can be created depending on the project.
In this screen, the code for each sheet and object on the sheet will be written on the right-hand side white area.
The various properties of the sheet and of objects will be shown on the lower left. This is similar to that in Visual Basic.
One can select the properties and give it values through this segment of the editor; however, the same can be done in code. The more professional way is the latter.
On the top of the toolbar, the features that are needed the most are debugged and run. Run makes the code run if every line of code is okay. Keep in mind that logical errors are not checked by the debugger.
On running the code, a name for the new macro will be requested. Enter the first macro for now and hit create. This macro will be a blank macro as no code has been added to it.
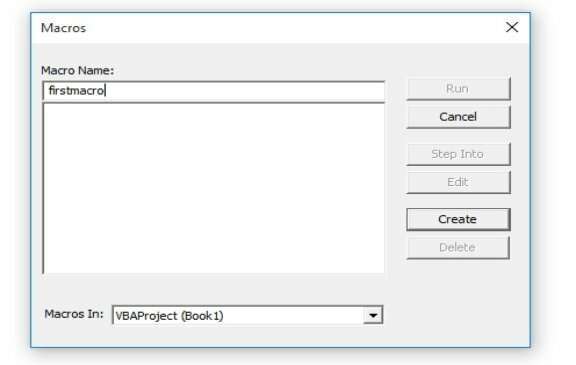
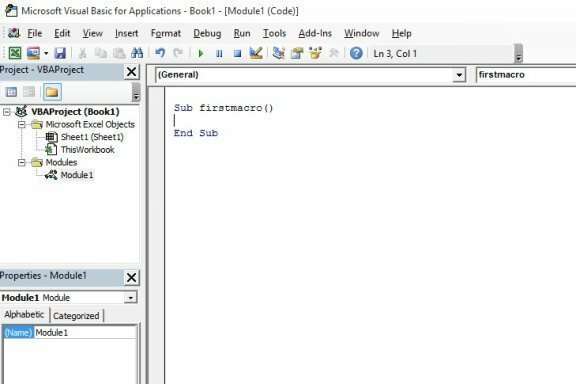
A subroutine called the first macro will be created on the right-hand side of the editor as follows.
Note that module1 has been added to the left-hand side of the editor's top and bottom.
To display the words Hello World write the following on the right-hand side within the subroutine first macro as follows:
Sub firstmacro()
Msgbox(Hello World)
End Sub
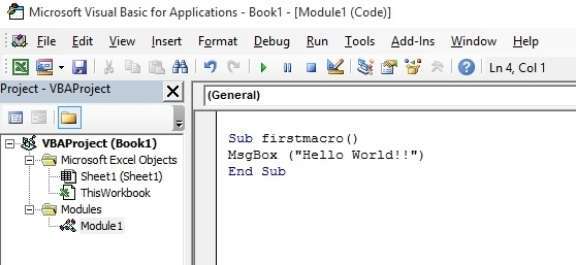
Now run the program using the green > arrow on the top of the code on the sub toolbar or the run option on the toolbar. The following will be the result.
This is the starting point of writing VBA. The steps that have been done so far will be repeated again and again in the parts that follow.
Chapter 1. VBA Integrated development environment
Getting into IDE
The Visual Basic Applications for computer programs are consolidated inside all parts of the Microsoft Office suite for projects like Excel. Initiating the VBA advancement programming sets the programming condition for the IDE, which allows tools for use in working up the venture. The speediest way into the VBA IDE is to click on Alt+F11 within the essential Excel window.
It is similarly possible to confer from the standard Excel menu through tools, at that point, Macro and afterward, the Visual Basic Editor. In the wake of initiating the IDE, a window for the outlining of the VBA IDE and a segment of the tools utilized for the production of projects will be created. In numerous applications, there happens to be a menu bar over the highest point of the window. You may simply see a few things that exist inside the menu, and these will become evident as you proceed through the manuscript.
One of the essential things would be the explorer window as showed up on the topmost left area of the IDE window. The toolbar explorer records the projects that are right by and by open, including the ones accessed via Excel amidst the startup.
Besides that, the endeavor explorer records parts of any of the accessed projects in the running with the figure; there is an outline of one envisions known as Book 1. In the wake of opening it, it contains four Excel objects that are sheet 1, 2, 3, and this workbook 1.
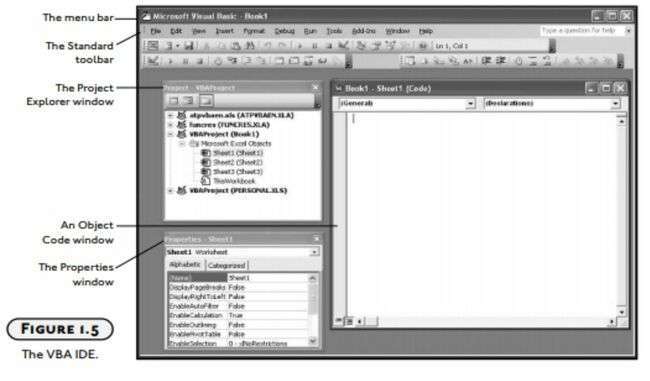
Just under the venture explorer window, as showed up in the above figure, refers to the properties setting. The latter shows a quick overview of the highlights or elements of the fundamental object found in the project. These characteristics are needed to control the manifestation of the question where they have a place.
The elements of sheet 1 appear in the above figure as picked inside the undertaking explorer. Confirmation of some other object will allow understanding of a properties list inside the properties window. Few parts of the objects have relative properties. The main thing inside the control of properties is to open another workbook and set the names.
In the event the undertaking explorer and the properties windows are not starting at now demonstrated, then one can get to them by techniques for the view menu. You may also use the keystrokes F4 and CTRL + R with a specific target to get to the undertaking explorer and properties windows. At the time that the undertaking explorer window is displayed, discover the venture, which is illustrative of the workbook opened while in Excel. If the workbook portions opened are not set, then click the + sign, which is close by Microsoft Excel objects organizer that is under the undertaking name.
Then, consider the object that is named sheet one and a short time after selecting it by then look towards the properties window. The subsequent stage would be to consider down the properties window until the point, and one would arrive at Name property, which is the one without the segment.


 Now run the program using the green > arrow on the top of the code on the sub toolbar or the run option on the toolbar. The following will be the result.


