Thank you for purchasing this Popular Woodworking eBook.
Sign up for our newsletter and receive special offers, access to free content, and information on the latest new releases and must-have woodworking resources! Plus, receive a coupon code to use on your first purchase from ShopWoodworking.com for signing up.
or visit us online to sign up at
http://popularwoodworking.com/ebook-promo
Contents
JOINERY
TECHNIQUES
PROJECTS
JOINERY
Four Good Ways to Cut Rabbets
BY BILL HYLTON
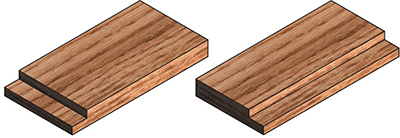
L-shaped cuts made with or across the grain are called rabbets whether they are on the end or along the edge of the stock.
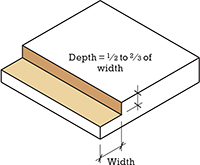
The rabbet joint surely is one of the first ones tackled by new woodworkers. The rabbet is easy to cut, it helps locate the parts during assembly and it provides more of a mechanical connection than a butt joint.
I vaguely remember thinking, back when I was tackling my first home-improvement projects, that with practice Id outgrow rabbet joints. Well Im still cutting rabbets because woodworkers never outgrow them.
The most common form is what I call the single-rabbet joint. Only one of the mating parts is rabbeted. The cut is proportioned so its width matches the thickness of its mating board, yielding a flush fit.
The depth of the rabbet for this joint should be one-half to two-thirds its width. When assembled, the rabbet conceals the end grain of the mating board. The deeper the rabbet, the less end grain that will be exposed in the assembled joint.
In the double-rabbet joint, both the mating pieces are rabbeted. The rabbets dont have to be the same, but typically they are.
The rabbet works as a case joint and as an edge joint. Case joints generally involve end grain, while edge joints involve only long grain. In casework, you often see rabbets used where the top and/or bottom join the sides (end-grain to end-grain), and where the back joins the assembled case (both end-to-end and end-to-long). In drawers, its often used to join the front and sides.
Because end grain glues poorly, rabbet joints that involve it usually are fastened, either with brads, finish nails or screws concealed under plugs. (OK, in utilitarian constructions, we dont sweat the concealment.)
We dont necessarily think of the rabbet as an edge-to-edge joint, yet we all know of the shiplap joint. Rabbet the edges of the mating boards and nest them together. Voila!
Its also a great right-angle edge joint. We see this in the case-side-and-back combination, but also in practical box-section constructions such as hollow legs and pedestals. Long-grain joins long-grain in these structures. Because that glues well, you have a terrific and strong joint.
You can gussy up the joints appearance by chamfering the edge of the rabbet before assembly. When the joint is assembled, the chamfer separates the face grain of one part from the edge grain of the other. Because the chamfer is at an angle to both faces, it wont look inappropriate even though its grain pattern is different.
One important variant is the rabbet-and-dado joint. This is a good rack-resistant joint that assembles easily because both boards are positively located. The dado or groove doesnt have to be big; often its a single saw kerf, no deeper than one-third the boards thickness. Into it fits an offset tongue created on the mating board by the rabbet.
The rabbet-and-dado joint is a good choice for plywood casework because its often difficult to scale a dado or groove to the inexact thickness of plywood. Its far easier to customize the width of a rabbet. So you cut a stock-width dado, then cut the mating rabbet to a custom dimension. An extra cutting operation is required, but the benefit a big one is a tight joint.
There are lots of good ways to cut rabbets. The table saw, radial-arm saw, jointer and router all come to mind. The most versatile techniques use the table saw and router.
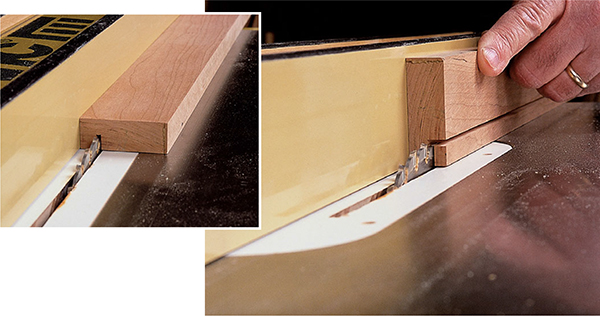
Saw a rabbet on the table saw in two steps. Set the blade elevation and fence position first to cut the shoulder (above) then adjust either or both as necessary to cut the bottom.
Rabbeting on the Table Saw
Rabbets can be cut at least two different ways on the table saw. Which method you choose may be influenced by the number of rabbets you have to cut, as well as the sizes and proportions of the workpieces.
Its quickest to cut the rabbets using whatever blade is in the saw. Two passes are all it takes. But if you have lots of rabbets to cut, or if the workpieces are too big to stand on edge safely, then use a dado cutter. (The latter is especially appropriate if your job entails dados as well as rabbets.) Lets look at the quick method first.
The first cut forms the shoulder. To set it up, adjust the blade height for the depth of the rabbet. There are a variety of setup tools you can use here, but its always a good idea to make a test cut so you can measure the actual depth of the kerf.
That done, position the fence to locate the rabbets shoulder. This establishes the rabbet width, so you measure from the face of the fence to the outside of the blade.
The cutting procedure is to lay the work flat on the saws table, then run the edge along the fence and make the shoulder cut. If you are rabbeting the long edge of a board, use just the fence as the guide. When cutting a rabbet across the end of a piece, guide the work with your miter gauge and use the fence simply as a positioning device. It is easy to set up, and the miter gauge keeps the work from walking as it slides along the table saws fence. Because no waste will be left between the blade and the fence, you can do this safely.
Nevertheless, if you feel uneasy about using the miter gauge and fence together, use a standoff block. Clamp a scrap (your standoff block) to the fence near the front edge of the saws table. Lay the work in the miter gauge and slide it against the scrap. As you make the cut, the work is clear of the fence by the thickness of the scrap. (Try using a 1"-thick block to make setup easier.)
Having cut the shoulders of all the rabbets, you next adjust the setup to make the bottom cut. You may need to change the height of the blade or the fence position. You may need to do both.
Adjust the blade to match the width of the rabbet. Reposition the fence to cut the bottom of the rabbet, with the waste falling to the outside of the blade. Make that cut with the workpiece standing on edge, its kerfed face away from the fence.
When the workpieces are so large as to be cumbersome on edge cabinet sides, for example you want to cut the rabbets with a dado cutter. That way you can keep the work flat on the saws table. Control the cut using a cutoff box or the fence. Its very easy to set the width of the cut with this approach.


