Contents
Guide
Simple & Stylish
Woodworking
20 Projects for Your Home
EDITED BY SCOTT FRANCIS

CINCINNATI, OHIO
popularwoodworking.com
Contents
One
Sunburst Wall Clock
Two
18th-Century Mahogany Mirror
Three
Isaac Youngs Wall Clock
Four
Greene & Greene Frame
Five
Falling Water Table Lamp
Six
Kumiko Lamp
Seven
Bright Idea Lamp
Eight
Stickley Mantel Clock
Nine
Voysey Mantel Clock
Ten
Tusk-Tenon Bookrack
Eleven
Traditional Hanging Shelves
Twelve
Bent Lamination Shelves
Thirteen
Corner Shelf
Fourteen
Wine Rack
Fifteen
Shaker Oval Boxes
Sixteen
Silverware Tray
Seventeen
Japanese Sliding-lid Box
Eighteen
Outdoor Lantern
Nineteen
Mirrors
Twenty
Heirloom Album
On the Wall
One
Sunburst Wall Clock
by ANDY BROWNELL
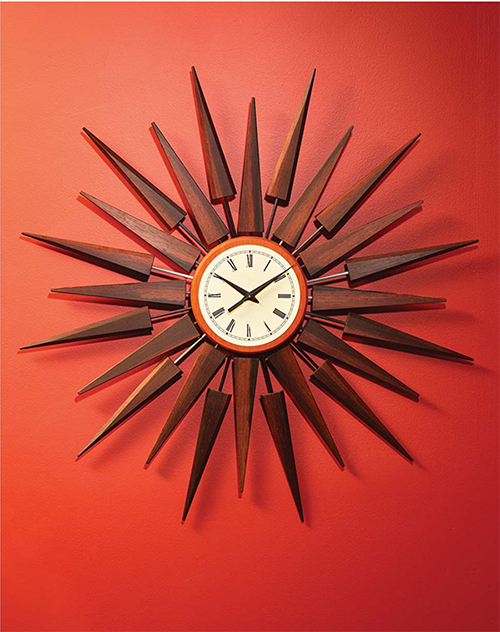
The sunburst-style wall clock came in a variety of shapes and sizes during its heyday of the mid-1940s to the mid 60s. Its aesthetic captured many of the design elements common to the mid-century modern style curves, colors, acute angles and mixed materials all elegantly arranged to deliver both beautiful design and function. Designers such as George Nelson with his work for the Howard Miller Clock Company (the iconic polygon clock), as well as his imitators, followed a simple set of three structural elements.
The first is the central structure of the clock face usually round, and either painted or adorned with a printed metal face of Arabic or Roman numerals, and, of course, the hands of the clock. Next are the spokes, typically round brass rods extending outward in a concentric pattern, and numbering anywhere from as few as four to as many as 48. Then come the rays that connect to the spokes; they often resembled sunflower petals, sun rays, globes or diamonds, and were commonly made from teak, walnut and rosewood.
These three key elements form the basis of just about all of the mid-century modern clocks that were produced last century, and they are replicated today. They also provide the baseline for developing an almost endless number of styles and variations. The version Ive built here measures 30" in diameter, has 24 rays and uses Brazilian rosewood and carbon-fiber tubes an updated look to the traditional brass.
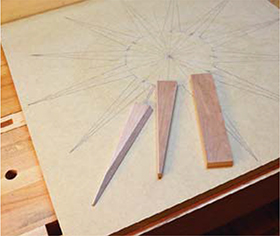
Out of one, many. Working from a scale drawing and common-sized stock materials offers a variety of design options for the final shapes of the rays.
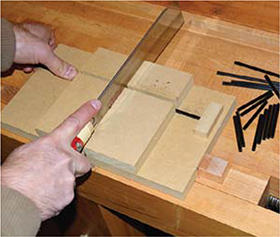
Consistent cuts. A small jig made from MDF holds the tubes in place, and a fine-toothed dozuki saw ensures consistent and square cuts on the tough carbon fiber.
Design at Full Scale
The great part about the sunburst design is that by alternating the number and geometric shapes of the rays, as well as the lengths of the spokes connecting them to the central dial, you can come up with a wide range of variations. My goal was to make two styles of rays efficiently by using the same dimensioned blanks for each style: 12" x 1916" x 8". The inner rays are a straightforward triangle shape, while the outer rays have complex bevels on the triangle sides for added visual interest.
The rays were the perfect place to use some (pre-embargo) Brazilian rosewood Id been saving for a special project. (Black walnut would also be a good choice.)
To get started, mill the 24 rectangular ray blanks and make a few extras from scrap wood to use for test cuts. The blanks should be ripped from quartersawn material so you have straight grain on all the rays.
In the period, the rods were typically made from brass and you can certainly use that for your project. This design, however, uses a far sturdier and lightweight option: 532"-diameter carbon-fiber tubes. To match my design, youll need 12 pieces at 214" long, and 12 pieces at 512" long. A modified bench hook (bottom left) helps you make consistent cuts. Chamfer the ends of the rods with #220-grit sandpaper to make them slide more easily in the holes.
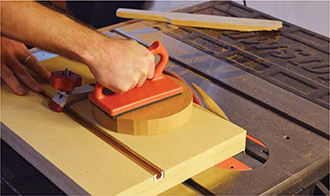
Table saw circles. I cut circles on the table saw using a sled and clamp. The stock is positioned on a small pin centered 312" from the blade (the circles radius). Clamp the face, cut a facet, then rotate the piece several degrees for each successive pass to approximate a complete circle.
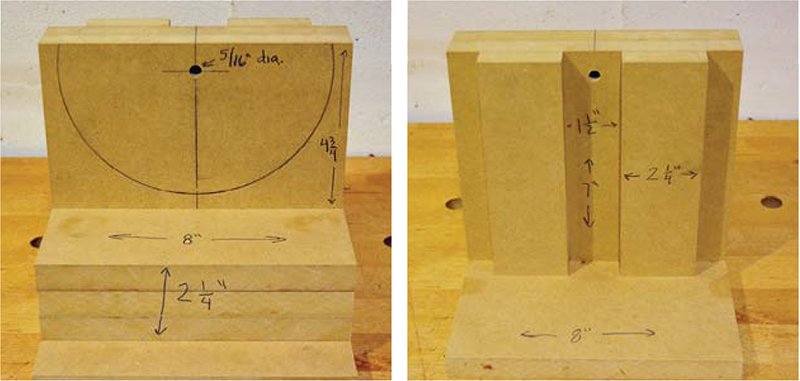
One jig, two uses. One side of the jig (left) holds the face in position at the drill press; the other side (right) holds the ray blanks.
For the clock face, I chose Honduran mahogany. Use whatever method and tools you prefer to cut a 1916"-thick x 7"-diameter circle, then drill a 516" hole through the center. Sand the edges fair and smooth with #220 then #320-grit wrapped around a block that matches the radius of the circle.
Precision Matters
Precision is a must with this project, so making many accurate geometric pieces requires some unique but simple jigs. If you stray from this particular design, youll need to make the appropriate adjustments on the jigs to accommodate your clocks geometry.
The first is the aforementioned jig for the carbon-fiber tubes. The next one (above), serves two purposes on the drill press:
Youll need to affix the clock dial to the jig using a 516"-diameter shaft in the dials center hole (I used a 516" drill bit) to provide precise vertical and concentric alignment of the 24 rods that connect the dial to the ray pieces.
After youve marked the hole locations, mount the face to the jig, and secure the jig to the drill press to drill 1"-deep x 516"-diameter holes directly in the center of the faces thickness at each of the 24 marks. So that each hole is oriented properly along the faces radius lines, use a square to ensure the 516" center pin is directly in line with the travel of the quill
Now turn the jig around to drill the 1"-deep holes in the ray blanks. Again, take care each hole is exactly centered on the end face and parallel to the blanks centerline.
With the drilling done, complete the clock face by routing a 116" chamfer on the back edge and a 38" chamfer on the front edge.
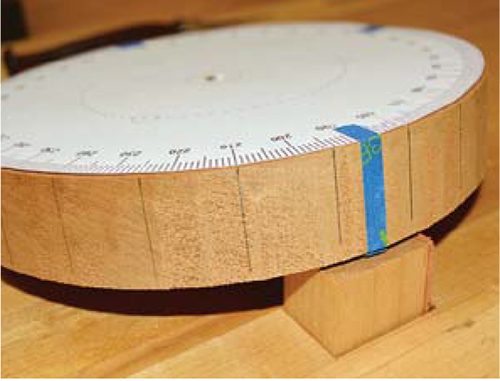
Paper template. Mount a 7"-diameter paper compass printout to the clock dial so you can squarely mark out the location of each of the 24 holes on the outside edge of the face, each spaced at 15 increments.

