Chapter 1
Getting started
Prior to getting to grips with the projects in this book some discussion regarding the lathe and the accessories that go with it is included for the newcomer to turning.
The Machines
Of course a lathe is a necessity, though for some this may initially be a machine available at the local technical college. If you are purchasing a lathe for the first time it is difficult to advise, as it will depend on the type of work envisaged and what other machines are to be acquired, two points are thought worth emphasising. First, if space and funds are available purchase a lathe of at least 90mm bed to centre height and secondly purchase a lathe with a tee slotted cross slide. The last point is a must if the workshop will not have a milling machine and even if it has many simple milling operations are easier to perform on the lathe as is illustrated in Chapter 13 Photos 14 and 15. However, as the projects are primarily aimed at those with limited experience it is assumed that other activities, typically milling, are even more of an unknown quantity. Their use in the series is therefore limited. A drilling machine will be required, but using the lathe for drilling as an alternative is briefly considered.
Whilst the use of cutting tools with replaceable tips considerably reduces the amount of grinding necessary to produce and sharpen lathe tools, some specials are bound to be required. An off hand grinder is therefore a necessity.
Chucks
Having dealt with the machines there is a number of accessories that are a must. It is easy to fall into the trap of considering that, due to its ease of use, a 3-jaw chuck is the one to acquire if funds will run to one chuck only, this is not so. Whilst a 3-jaw chuck, even if old and worn, will be accurate enough for most work there will be a significant number of instances where this is not so.
The beginner may not be aware that when material is placed into a 3-jaw chuck the work piece is unlikely to run true, perhaps a total indicator reading (TIR) of up to 0.1mm, more if measured some distance from the jaws. This can cause serious problems with concentricity when an item has to be removed and replaced, say to work from either end.
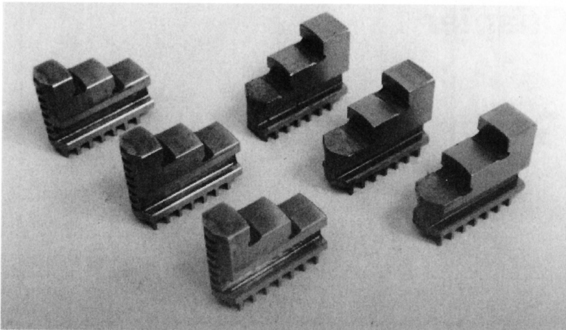
1. Normal (left) and Reverse (right) chuck Jaws.
Even a so-called precision chuck, with a price tag to go with the precision, will be unable to meet the most demanding requirements. A 4-jaw chuck with independent jaws is therefore a necessity as, being able to adjust each jaw individually, precise centring is possible. Of course where a 3-jaw chuck is adequate I will use one and this is evident in the photographs published. Where a reader has only a 4-jaw chuck this will be quite satisfactory. The only result being to slow down the operation a little due to the work necessary to get the part to run sufficiently true for the task in hand.
An essential accessory for the 3-jaw chuck are the reverse jaws that enable larger diameters to be held and are seen on the right of . A new chuck will always be supplied with these but if you have obtained a second hand chuck, maybe with a second hand lathe, they may well be missing. Unfortunately, spare jaws are not easily obtained and a replacement chuck may be the only option. One set of jaws will suffice for the 4-jaw chuck as its differing construction permits the single set of jaws to by used either way round.
Changing the jaws on the 3-jaw chuck is straightforward; open the chuck with the normal jaws fitted, and keep turning until the jaws can be removed. Now it will be found that both chuck and jaws are numbered 1, 2 and 3 and must be fitted with the numbers together and in that order. Turn the scroll in the direction to close the chuck, until its leading edge is seen to pass position 1. Next reverse the rotation until the leading edge passes back, fit jaw number 1 pushing it in as far as it will go. Then holding it there, again turn the chuck key as to tighten the chuck. Watch carefully for the scrolls leading edge to pass position 2,repeat the exercise and then also for jaw 3.Now close the chuck until the jaws meet in the middle. If you have made an error it will be large enough to be obvious and it will then be a case of repeat the task until alls well. Independent jaw 4- jaw chucks also have their jaws numbered and should be assembled with like numbers together, though they can of course be assembled in any order.
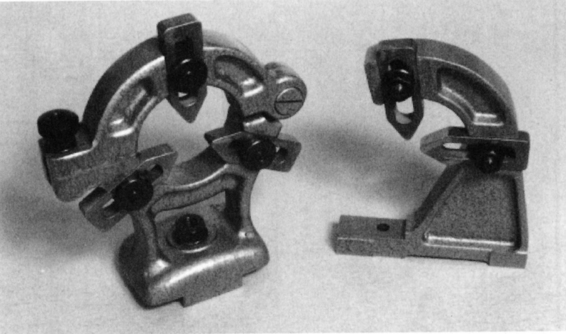
2. Fixed (on the left) and travelling steadies
Having said that the reverse jaws are for larger diameters it is necessary to know at what diameter the change over must take place. If a new chuck is purchased the data supplied with it should make this clear; my 100mm chuck quotes a maximum of 33mm. Whilst the jaws will open and grip a larger diameter some of the scroll will be disengaging from the teeth on the jaws placing more load on those remaining engaged. Frequently, scrolls will have just two rings, so if a scroll is not engaged only one ring and a single tooth are being used. It is not advisable therefore to go beyond the makers recommendations. If these are not available careful observation of the scroll, which becomes visible as the chuck is opened, should make the requirements clear.
At this stage I should add that the book is written assuming a lathe of around 90mm bed to centre height and fitted with at least 100mm diameter chucks. Larger lathes are unlikely to impact on the books content in any major way, though smaller lathes will and some comments are added through the series if considered appropriate. If a small lathe is being used then some items may benefit from being made smaller. In this case I would advise taking copies of the drawings and marking them up with the new dimensions in advance of making the item.
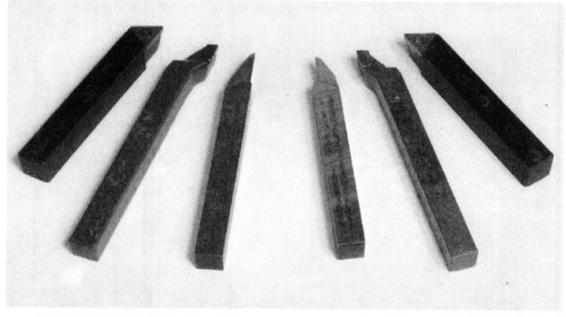
3. Left (on the left) and Right hand Knife tools.
Steadies
.
Cutting tools
Various cutting tools will be required with the knife tool being that most used, and in both left and right handed versions. shows some variations, I will refer to these throughout the book as, right hand on the right and left hand on the left. Right hand is used for cutting from right too left and Left hand from left to right. I make this precise definition as I find in the wider world there seems to be some variation in the meaning of left and right hand.
Also required are boring tools for a minimum bore of 6mm, say 20mm deep, and larger diameters of 20mm and more with a depth of say 50mm. Whilst knife tools can be ground from high speed steel, ready made brazed tungsten carbide tipped tools or replaceable tip tools are available as seen in the photograph and at a reasonable price. This is certainly not the case for very smaller boring tools which most certainly have to be ground from high speed steel tool bits, as whilst they are available their price probably prohibits their use in most home workshops. Some specialised tools will also be required, thread cutting, etc., and will be discussed at the point in the book where they become necessary.

