Janette Baker - Learn to Tat
Here you can read online Janette Baker - Learn to Tat full text of the book (entire story) in english for free. Download pdf and epub, get meaning, cover and reviews about this ebook. year: 2014, publisher: Annies, genre: Home and family. Description of the work, (preface) as well as reviews are available. Best literature library LitArk.com created for fans of good reading and offers a wide selection of genres:
Romance novel
Science fiction
Adventure
Detective
Science
History
Home and family
Prose
Art
Politics
Computer
Non-fiction
Religion
Business
Children
Humor
Choose a favorite category and find really read worthwhile books. Enjoy immersion in the world of imagination, feel the emotions of the characters or learn something new for yourself, make an fascinating discovery.

- Book:Learn to Tat
- Author:
- Publisher:Annies
- Genre:
- Year:2014
- Rating:4 / 5
- Favourites:Add to favourites
- Your mark:
Learn to Tat: summary, description and annotation
We offer to read an annotation, description, summary or preface (depends on what the author of the book "Learn to Tat" wrote himself). If you haven't found the necessary information about the book — write in the comments, we will try to find it.
Learn the beautiful art of tatting with the step-by-step instructions in this book from American School of Needlework. Does not include DVD. 48 pages
Janette Baker: author's other books
Who wrote Learn to Tat? Find out the surname, the name of the author of the book and a list of all author's works by series.


Learn to Tat — read online for free the complete book (whole text) full work
Below is the text of the book, divided by pages. System saving the place of the last page read, allows you to conveniently read the book "Learn to Tat" online for free, without having to search again every time where you left off. Put a bookmark, and you can go to the page where you finished reading at any time.
Font size:
Interval:
Bookmark:
 Patterns abbreviations vary somewhat from 1 pattern to the next, listed below are some of the more common abbreviations used. beg .... beginning CH .... beginning CH ....
 Chain CTM .... continuous thread method DNC .... do not cut DS .... Double Stitch JR .... Josephine Ring PR .... repeat RW .... reverse work SH .... shuttle st(s) .... stitch(es) T .... turn UTS .... unworked thread space .... picot - - .... long picot + = join a relatively new abbreviation that means to make a picot the first time and join in subsequent repeats Digits in patterns stand for the number of Double Stitches.
Tatting patterns vary in the style in which they are written. Tatting patterns vary in the style in which they are written.Some patterns are more detailed and others are simplified. If desired, detailed patterns can be read through and then rewritten in a simpler method before tatting. For example, a detailed pattern could be written as follows: Make a Ring of 3 DS, picot, 3 DS, picot, 3 DS, picot, 3 DS, close Ring, turn. Turn in general means to turn the Ring downward as we have learned in reversing work. This detailed pattern written in a simpler style would be written: R 3 3 3 3 RW Another example of a detailed pattern could be: Make a Ring of 12 double stitches evenly divided by 3 picots, close Ring, turn.
STEP-BY-STEP PROGRESSION Ring of Double Stitches Ring of Double Stitches with picots
  Row of joined Rings with picots Unworked thread space between Rings of Double Stitches
 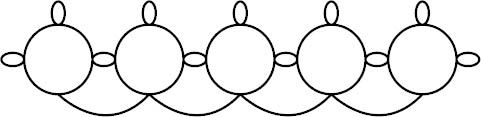 Double-sided rows of Rings with picots Unworked thread space between Rings of Double Stitches Reverse work between Rings
 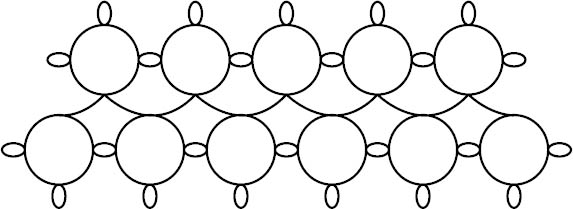 Consecutive Rings (3 Rings of Double Stitches with picots)
 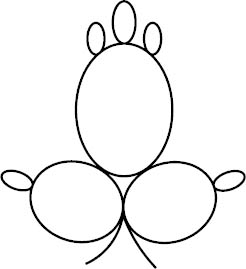 Row of joined Rings with picots Chains of Double Stitches with picots
 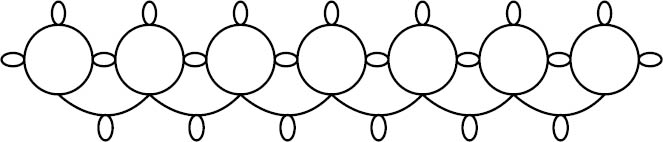 Double shuttle tatting
 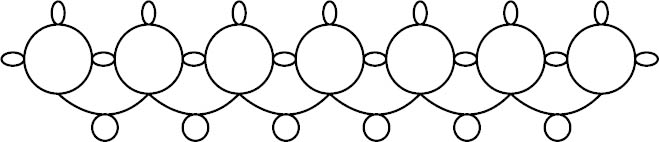 Row of Split Rings
  Tat with high-quality, tight-twist thread. STEP-BY-STEP PROGRESSION Ring of Double Stitches Ring of Double Stitches with picots Row of joined Rings with picots Unworked thread space between Rings of Double Stitches Double-sided rows of Rings with picots Unworked thread space between Rings of Double Stitches Reverse work between Rings Consecutive Rings (3 Rings of Double Stitches with picots) Row of joined Rings with picots Chains of Double Stitches with picots Double shuttle tatting Row of Split Rings Tat with high-quality, tight-twist thread.
 Use 2 balls of thread: 1 for tatting, 1 to refill the shuttle. Size of thread relates to thickness. The higher the sizing number of the thread, the finer it is. Size 20 thread is finer than a size 10 thread. Wind the shuttle counterclockwise, with the thread coming from the bottom right of the shuttle. Wind the shuttle for the traditional method of tatting by pointing the shuttle tip up with the tip pointing left.
Wind the thread from the front (closest to person) up and over toward the back of the shuttle. Wind to the outside edge. Over-winding the shuttle can force the tips apart, which allows the thread to unwind if the shuttle is hanging loose. Rings are the color of the shuttle thread, and Chains are the color of the ball thread in a simple Ring and Chain 2-color pattern. The length of thread between 2 double stitches makes a picot when the double stitches are slid into position. Use picot gauges to create uniform picots.
Close all Rings completely. To prevent gaps, tat the first half hitch of the double stitch very close to the previous element. Snug the Double Stitches of the Chain to the left to keep the tatting firm. Reverse work (turn Ring downward) after each Ring and reverse work (turn Ring upward) after making a Chain unless the instructions state otherwise. Some patterns do not print RW (reverse work) as part of the written instructions. Incorporate knotless techniques when possible.
Join #1: Join a new shuttle thread at the end of a Chain. Over-tat the thread tails. Join #2: Join a new thread over the base of an existing Ring with a larks head knot. Over-tat the thread tails in the following Chain. Hand-wash tatting with liquid soap. Roll in a towel until damp dry.
Block tatting that has numerous picots on a foam board with rustproof pins. Block tatting that has not been pinned to a blocking board, by ironing lightly between 2 damp towels. Hold a flat pinch over each tatted stitch to prevent twisting. Untangle twisted thread by letting the shuttle hang free. Read through new patterns before tatting to become familiar with the pattern style, abbreviations and new techniques. 
Font size:
Interval:
Bookmark:
Similar books «Learn to Tat»
Look at similar books to Learn to Tat. We have selected literature similar in name and meaning in the hope of providing readers with more options to find new, interesting, not yet read works.
Discussion, reviews of the book Learn to Tat and just readers' own opinions. Leave your comments, write what you think about the work, its meaning or the main characters. Specify what exactly you liked and what you didn't like, and why you think so.