
CROCHET Beautiful Baby SHOES! TM great pairs! Your precious little one will stand out in these irresistible designs. by LISA VAN KLAVEREN General Information Many of the products used in this pattern book can be purchased from local craft, fabric and variety stores, or from AnniesCatalog.com
Beautiful Baby Shoes! is published by Annie's, 306 East Parr Road, Berne, IN 46711. Printed in USA. Copyright 2010 DRG. All rights reserved.
RETAIL STORES: If you would like to carry this pattern book or any other Annie's publications, visit AnniesWSL.com.
RETAIL STORES: If you would like to carry this pattern book or any other Annie's publications, visit AnniesWSL.com.
Every effort has been made to ensure that the instructions in this publication are complete and accurate. We cannot, however, take responsibility for human error, typographical mistakes or variations in individual work. Please visit AnniesCustomerCare.com to check for pattern updates. ISBN: 978-1-59635-518-7  SKILL LEVEL
  INTERMEDIATE FINISHED SIZES Instructions given fit size newborn3 months (small); changes for sizes 36 months (medium), 612 months (large) and 1218 months (X-large) are in [ ]. FINISHED MEASUREMENTS Sole: 3 inches (small) [3 inches (medium), 4 inches (large), 4 inches (X-large)] MATERIALS
  Super fine (fingering) weight yarn: 1 oz/309 yds/50g each bright pink, pale pink and bright green for all sizes Size D/3/3.25mm crochet hook or size needed to obtain gauge Sewing needle Matching sewing thread GAUGE 6 sc = 1 inch; 6 sc rows = 1 inch PATTERN NOTES You may want to apply a rubber backing on bottom of Sole for toddler sizes if used on floors other than carpet. The 11 skipped single crochet at front of toe are worked off 1 at a time at beginning and end of each row.
Working in front loops and back loops creates the overlapping kimono-style effect after all 11 single crochet are worked and 11 rows of Sides are completed. Join with slip stitch as indicated unless otherwise stated. SPECIAL STITCHSurface stitch (surface st): Holding yarn at back of work, insert hook between sts, yo, pull lp through st and lp on hook.INSTRUCTIONSSLIPPERMAKE 2.SOLERow 1: With bright pink, ch 7 [8, 8, 8], sc in 2nd ch from hook and in each ch across, turn. (6 [7, 7, 7] sc)Rows 25 [26, 27, 28]: Ch 1, sc in each st across, turn.Row 6 [7, 8, 9] (inc): Ch 1, 2 sc in first st, sc in each st across with 2 sc in last st, turn. (8 [9, 9, 9] sc)Rows 710 [812, 914, 1016]: Ch 1, sc in each st across, turn.Row 11 [13, 15, 17] (inc): Ch 1, 2 sc in first st, sc in each st across with 2 sc in last st, turn. (10 [11, 11, 11] sc)Rows 1215 [1418, 1621, 1824]: Ch 1, sc in each st across, turn.Rows 16 & 17 [19 & 20, 22 & 23, 25 & 26] (dec): Ch 1, sc in first st, sk next st, sc in each st across to last 2 sts, sk next st, sc in last st, turn.
At end of last row, do not fasten off. (6 [7, 7, 7] sc at end of last row)EDGINGWorking in sts, ends of rows and in starting ch on opposite side of row 1, ch 1, evenly sp sc around, join(see ) in beg sc. Fasten off.LEFT SLIPPERSIDESRow 1: Working in back lps(see ) of next st at front of toe, leaving rem sts unworked, turn.Row 2: Ch 1, sc in same st, sc in both lps of each st across to opposite side, sc in front lp of next sk sc at front of toe, sl st in front lp of next sk st at front of toe, turn.Rows 36: Rep row 2.Rows 711: Ch 1, sc in same st, sc in both lps of each st across to opposite side, sc in rem lp of next sc at front of toe, sl st in rem lp of next sc at front of toe, turn. At end of last row, fasten off.RIGHT SLIPPERSIDESRow 1: Working in back lps, sk 11 sc to right of join at front of toe(see ), join light pink with sc in next st, sc in each st across to sk sts, sl st in back lp of next st at front of toe, leaving the rem sc unworked, turn.Row 2: Ch 1, sc in same st, sc in both lps of each st across to opposite side, sc in back lp of next sk sc at front of toe, sl st in back lp of next sk sc at front of toe, turn.Rows 36: Rep row 2.Rows 711: Rep rows 711 of Left Slipper.SIDE TRIMWith RS facing, join(see ) bright pink at 1 end of row 11, evenly sp sl st across to opposite side of row 11. Fasten off.FINISHINGFold rows at toe so that they meet at 9th or 10th st of row 11, using sewing needle and sewing thread, sew tog along overlap seam to secure.FLOWER BUTTONRnd 1: With light pink, ch 2, 5 sc in 2nd ch from hook. Fasten off.Rnd 2: Working in back lps, join bright pink in any sc, (ch 2, 2 dc, ch 2, sl st) in same st (petal), (sl st, ch 2, 2 dc, ch 2, sl st) in each st around, join in beg sl st.
Fasten off.Sew Flower Button in place at outer top side of Shoe, 7 or 8 sts further back from place where toe joins.FLOWER STEM BUTTON LOOPJoin bright green near bottom inner side of Shoe, surface st(see ) up side of Shoe to top, ch 11, sl st in 10th ch from hook, sl st in next ch, sl st in top of Shoe to secure. Fasten off. SKILL LEVEL
 INTERMEDIATEFINISHED SIZESInstructions given fit size newborn (small); changes for sizes 06 months (medium), sizes 612 months (large) and 1218 months (X-large) are in [ ].FINISHED MEASUREMENTSSole: 3 inches (small) [3 inches (medium), 4 inches (large), 4 inches (X-large)]MATERIALS
 Medium (worsted) weight cotton yarn:1 oz/88 yds/50g each dark brown and blue for all sizesSize F/5/3.75mm crochet hook or size needed to obtain gauge

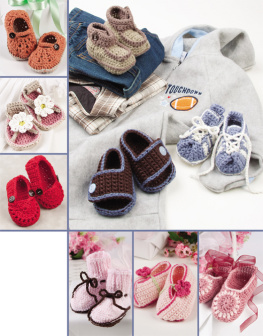



 CROCHET Beautiful Baby SHOES! TM great pairs! Your precious little one will stand out in these irresistible designs. by LISA VAN KLAVEREN General Information Many of the products used in this pattern book can be purchased from local craft, fabric and variety stores, or from AnniesCatalog.com Beautiful Baby Shoes! is published by Annie's, 306 East Parr Road, Berne, IN 46711. Printed in USA. Copyright 2010 DRG. All rights reserved. RETAIL STORES: If you would like to carry this pattern book or any other Annie's publications, visit AnniesWSL.com. RETAIL STORES: If you would like to carry this pattern book or any other Annie's publications, visit AnniesWSL.com.
  SKILL LEVEL
  INTERMEDIATE FINISHED SIZES Instructions given fit size newborn3 months (small); changes for sizes 36 months (medium), 612 months (large) and 1218 months (X-large) are in [ ]. FINISHED MEASUREMENTS Sole: 3 inches (small) [3 inches (medium), 4 inches (large), 4 inches (X-large)] MATERIALS
  Super fine (fingering) weight yarn: 1 oz/309 yds/50g each bright pink, pale pink and bright green for all sizes Size D/3/3.25mm crochet hook or size needed to obtain gauge Sewing needle Matching sewing thread GAUGE 6 sc = 1 inch; 6 sc rows = 1 inch PATTERN NOTES You may want to apply a rubber backing on bottom of Sole for toddler sizes if used on floors other than carpet. The 11 skipped single crochet at front of toe are worked off 1 at a time at beginning and end of each row.
 Medium (worsted) weight cotton yarn: