Doll Clothing: Knitting patterns for fashion dollsand Standard Barbie dolls. Copyright 2016 Anna Smit Published by Anna Smit atSmashwords Smashwords Edition LicenseNotes Thank you for downloading thisebook. This ebook is licensed for your personal enjoyment only.This ebook may not be re-sold or given away to other people. If youwould like to share this book with another person, please purchasean additional copy for each recipient. If youre reading this bookand did not purchase it, or it was not purchased for your enjoymentonly, then please return to Smashwords.com or your favoriteretailer and purchase your own copy.
Table ofContents
ShortIntroduction
Hey, Im Anna Smit and I would like towelcome you to my pattern book.
Table ofContents
ShortIntroduction
Hey, Im Anna Smit and I would like towelcome you to my pattern book.
I have several hobbies of which oneis knitting. I mostly do human sized knitting for myfamily. But, when I made these for a shop I sell my crafts at, Ithought I would share them with people that loved knitting to. In this book you will find the Basic RaglanJersey Pattern with 4 variations to create several different looksfrom the same basic pattern. You will also get a basic pant and beaniepatterns to complete your dolls winter outfit.
Abbreviations
K - knit p purl 2tog putting the needle through twostitches knitting them together as one.
Abbreviations
K - knit p purl 2tog putting the needle through twostitches knitting them together as one.
In effect decreasingstitches of row with one stitch M1 - Increase stitch by knitting into frontand back of same stitch before moving on to next. Stocking stitch Stocking stitch consistsof: Row 1 - Knit Row 2 Purl Row 3 Knit Row 4 Purl continue this pattern. Casting off Knit 1 stitch, knit 2nd stitch.Take first stitch and bring the loop over the second stitch and offthe needle. You should now have only one stitch on the needle. Knitnext stitch, taking the first stitch that was left on needlepreviously over the new stitch off the needle. You should now againhave only one stitch.
Keep doing this to end off you work and youonly have one stitch left. Cut of string leaving a 5 cm piece pullthis through the stitch loop take the stitch off the needle andpulling on the string. This will close up this stitch, keeping yourwork from unravelling. You can also do purl stitches this way bypurling instead of knitting the stitches.
Materials you will need
For all patterns in this book I used 4 plywool in any make and colour I felt like. Left over wool from humansized projects works great.
I got 2 jerseys from 1 ball of 50g 4plywool with 2 beanies. This is just to give you an idea of the amountof wool you need and if your gage is right you should get about thesame. 3mm needles for knitting. Try to get theshorter needles as they are not as heavy as the normal knittingneedles you would use for human sized clothing. If you cant findthe short needles in this size, the double pointed needles you usefor cabling and ribbing around the neck also works nicely for thesesmall garments. Just be careful not to push them off the other sideof the needle as there is nothing to stop them on the doublepointed needle.
You will also need a stitch holder. Becausethe work is on such a small scale extra stitches can also easily beheld by nappy pins or bandage pins which are lighter than usualstitch holders and easier to work with in this instance. A wool needle for working the pieces togetherand working strands away.
Jersey 1 Basic Pattern
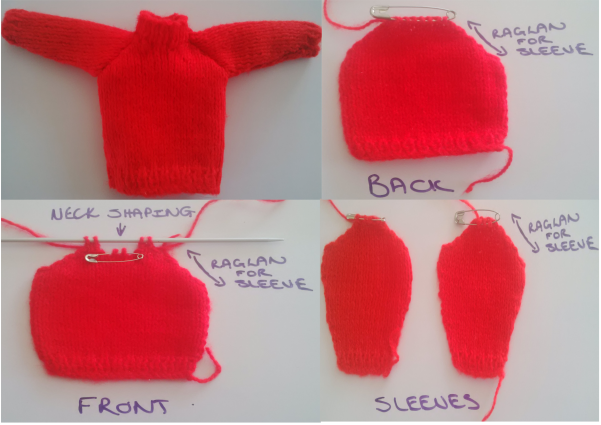
Back Cast on 24 stitches and rib 3 rows asfollows: Row 1 - *1K, 1P* repeat from *to * to rowend Row 2 - *1P, 1K* repeat from * to * to rowend Row 3 repeat row 1 Row 4 Knit. Increase 1 stitch at each endof row to 26 stitches. Rows 5 21 Continue in stocking stitch.
Row 22 - This is the start of the raglan forsleeves - Cast off first 2 stitches at start of next 2 rows. Rows 24 and on Work 2tog on each end of rowuntil only 8 stitches remain. Leave the remaining stitches on a stitchholder Front Cast on 24 stitches and rib 3 rows asfollows: Row 1 - *1K, 1P* repeat from *to * to rowend Row 2 - *1P, 1K* repeat from * to * to rowend Row 3 repeat row 1 Row 4 Knit. Increase 1 stitch at each endof row to 26 stitches. Rows 5 21 Continue in stocking stitch. Row 22 -This is the start of the raglan forsleeves - Cast off first 2 stitches at start of next 2 rows.
Rows 24 and on Work 2tog on each end of rowuntil 16 stitches remain. From here you will shape the neck. Wrong side facing you. Work first 2 stitchestogether and purl 5 stitches (leave rest of stitches on stitchholder). Turn. 2tog forraglan. 2tog forraglan.
Work first 2 stitches together for raglanwork to end of row. Turn Knit to last 2 stitches and work together forraglan. You should have 2 stitches remaining forshoulder. Leave the remaining stitches on a stitchholder. For other side of neck shaping. From stitch-holder, leaving first 2 stitchesfor middle of neck opening on stitch-holder, pick up next 7stitches towards the raglan shaping.
With right side of garment facing you. Fastenwool to raglan side of garment to start shaping. Right side facing you. Work first 2 stitchestogether and Knit 5 stitches. Turn. 2tog forraglan. 2tog forraglan.
Work first 2 stitches together for raglanwork to end of row. Turn Purl to last 2 stitches and work together forraglan. You should have 2 stitches remaining forshoulder. Leave the remaining stitches on a stitchholder. Sleeve Make 2 of the following pattern pieces. Cast on 13 stitches and rib as following: Row 1 - *1K, 1P* repeat from *to * to rowend Row 2 - *1P, 1K* repeat from * to * to rowend Row 3 repeat row 1 Row 4 - Knit - increasing 1 stitch at eachend of row to 15 stitches.
Rows 5 19 Continue in stocking stitch,increasing 1 stitch each end of row for every 5th row, till youhave 21 stitches. Rows 20 23 Continue working strait. Row 24 This is the start of the raglan forsleeves - Cast off first 2 stitches at start of next 2 rows. Rows 26 and on Work 2tog on each end of rowuntil 3 stitches remain. Leave the remaining stitches on astitch-holder. Neck band Put all the garment pieces onto one needle inthe following order with wrong side facing towards you: front,sleeve, back, sleeve.
Each raglan of the garment pieces will now bein the right order. Sew the raglans of the pieces together. (Sewthe right side sleeve raglan to the back raglan facing it rightsides together, the left side back raglan to the left sleeve andthe left sleeve raglan to the front raglan.) Do not sew the sidestogether yet. With wrong side facing you, attach the woolto sleeve. Row 1 purl 3 stitches of sleeve, 8 stitchesof back, 3 stitches of sleeve, 2 stitches of shoulder on frontpiece. Then pick up 5 stitches on the neck shaping up to the 2 inthe middle.
Purl middle 2 stitches then pick up 5 stitches on theside of the neck shaping. Purl 2 shoulder stitches. You should nowhave 30 stitches on your needle. Row 2 Rib row 1k,1p repeat to end of row Row 3 4 Rib (purl the purls and knit theknits to end of row) Bind of in rib. To make up Sew last raglan edges together, right sidesfacing. Work from neck band side to end of raglan.
Putting thefront and back together, right sides facing, will automaticallymake your sleeves fold in half and the garment ready for sewing thesides. Sew together starting from body side ribbing right to therib of the sleeve. Do this on both sides. Work away all looseends. Turn piece inside out and your done.
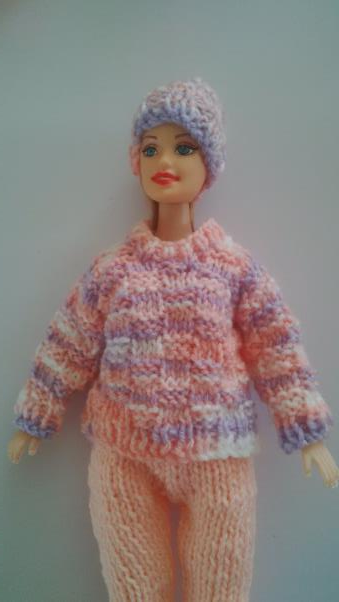
Jersey2
 Next page



 Back Cast on 24 stitches and rib 3 rows asfollows: Row 1 - *1K, 1P* repeat from *to * to rowend Row 2 - *1P, 1K* repeat from * to * to rowend Row 3 repeat row 1 Row 4 Knit. Increase 1 stitch at each endof row to 26 stitches. Rows 5 21 Continue in stocking stitch.