Introduction
The Easy Word Essentials 2019 series of books is designed for those users who just want to learn one specific topic rather than have a more general introduction to Microsoft Word 2019, which is provided in Word 2019 Beginner and Word 2019 Intermediate.
Each book in this series covers one specific topic such as formatting, tables, or track changes.
Im going to assume in these books that you have a basic understanding of Microsoft Word. However, this book does include an appendix with basic terminology just in case I use a term that isnt familiar to you or that isnt used the way youre used to.
This entire series of books is written for users of Word 2019. If you have a different version of Word then you might want to read the Easy Word Essentials series instead which is written as a more general approach to learning Microsoft Word.
For most introductory topics there wont be much of a difference between the two, but just be aware that this particular series does not worry about compatibility with other versions of Word whereas the more general series does.
Also, just a reminder that the content of this book is directly pulled from Word 2019 Beginner and/or Word 2019 Intermediate so there may be references in the text that indicate that.
Alright. Now that the preliminaries are out of the way, lets dive in with a discussion of tables.
Tables
Tables are incredibly useful for presenting a summary of information. I used these all the time in my corporate career. (Not so much in English class.)
A table is essentially a grid of spaces composed of x number of columns and y number of rows. Once you create that grid any text you enter into one of the spaces is contained within that space.
I find tables are the easiest way to control exactly where text that isnt in simple paragraphs appears on the page.
They also are the easiest way to use formatting with that type of text. For example, the first row of almost any table Ive ever used Ive shaded it a different color from the rest of the rows in my table. I could do that outside of a table, but it works better with a table.
Insert
So lets dive in, starting with how to insert a basic table into your document.
You do so by going to the Tables section of the Insert tab and clicking on the dropdown arrow under Table.
There you will see a grid of squares under the heading Insert Table as well as options below that for Insert Table, Draw Table, Excel Spreadsheet, and Quick Tables.
If you had text in your document that you selected before clicking on the dropdown, youd also see an option for Convert Text to Table.
Lets start with the Insert Table set of squares at the top of the dropdown menu.
To insert a table using this option, simply hold your mouse over the square that would be in the bottom right corner of the table you want to start with. So above Ive put my cursor over the fourth square from the right and fourth square from the top to create a 4x4 table.
As you move your mouse around over the squares youll see that a table appears within your document with that number of rows and columns.
The title Insert Table in the dropdown also changes to reflect the dimensions of the table youre about to insert. Which is why in the image above it says 4x4 Table above the selected squares in the dropdown..
By default, all columns are of an equal width to cover the width of the page or the width of the space youre working in if that happens to be smaller. (For example, you can create a table and then insert another table within a space of that table and the columns in your second table will have a width determined by the size of that space not the whole page.)
Rows are of a standard height thats driven by the current font size in your document.
Unless youre pasting in data, the number of rows is probably not that important. But do try to get the right number of columns initially because theyre harder to add later. (The number of columns can be adjusted its just not quite as easily as adjusting the number of rows.)
To actually insert your table, click on the square.
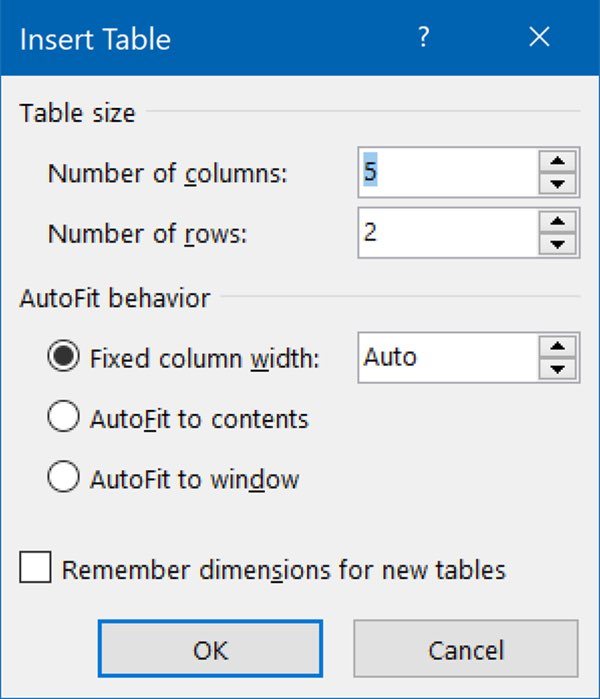
Your next option for inserting a table is to use the Insert Table option below those squares. When you click on that it will open the Insert Table dialogue box where you can type in the number of rows and columns that you want in your table. Just click into each box and type the number you need, or use the arrows on the sides to increase or decrease the number for rows and columns.
In the AutoFit Behavior section below that, if you use the arrows next to Auto for the Fixed Column Width value you can specify an exact width to use for each column rather than letting the columns fill the page or space youre working in.
Click OK or hit enter when youre done and Word will insert the table into your document.
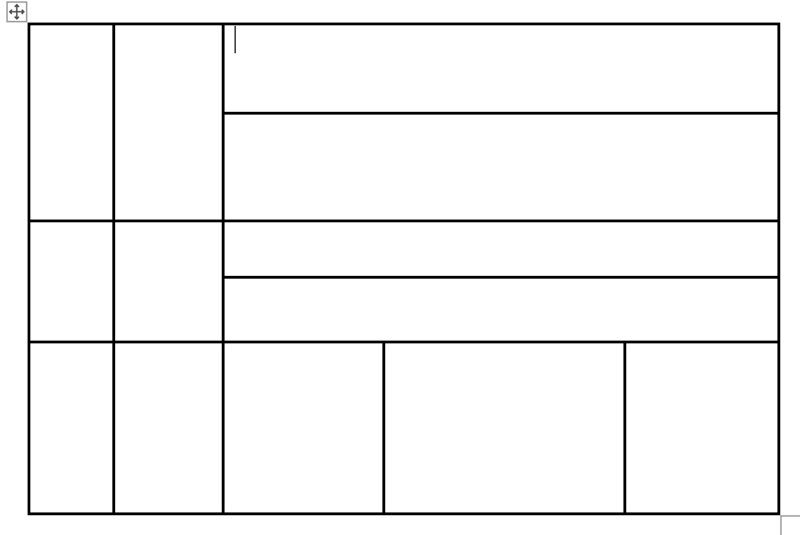
The Draw Table option is one I dont use. It lets you click on your document and drag to draw a large square that is the overall size of your table and then you can click and drag again to draw the lines for columns and rows. This is probably the best option for a table where the number of columns or the number of rows are not going to stay consistent, like in this table here:
You can get the same effect using split or merge cells, but this was a much quicker and easier option. I just generally dont need a table like the one above.
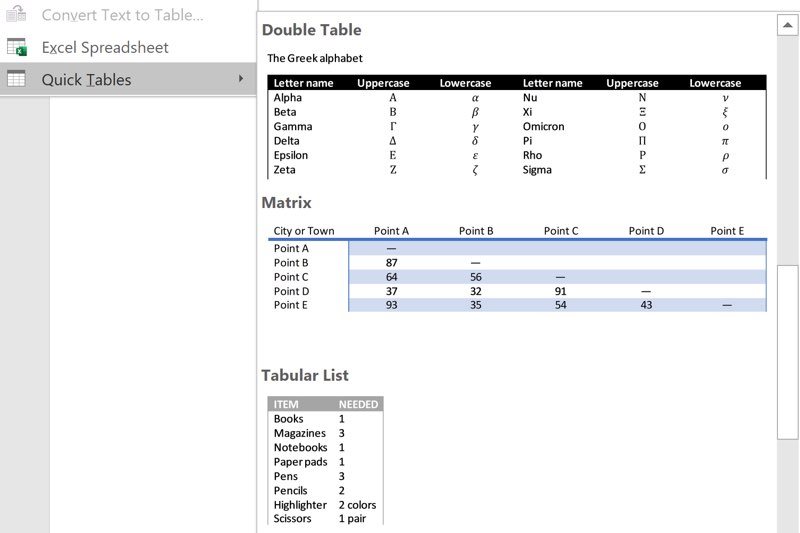
The final option in the dropdown is Quick Tables. If you scroll past the calendar options there are some basic formatted tables you can use:
They insert exactly as you see them, text and all, so if you use one youll need to overwrite that text with your own values. (Personally, Id rather format a new table myself, but if any of those options have a base-level appearance you like it could be a time saver to use one.)
The Excel spreadsheet option will embed an Excel spreadsheet in your document. It initially opens as an Excel rectangle within the document where you can enter values. Once you are done doing so, hit Esc, and it will appear as a basic table in your document. Double-clicking on that table will then open it as an Excel file that can be edited. (Although on my computer it froze and wouldnt open.)
I have used this option in PowerPoint in the past, but I find it to be generally finicky so I tend to avoid it when I can. (You can just as easily create your table and then copy and paste in your data from Excel. Granted, that means the two files arent connected, but hopefully your Word document is just a summary document anyway.)


