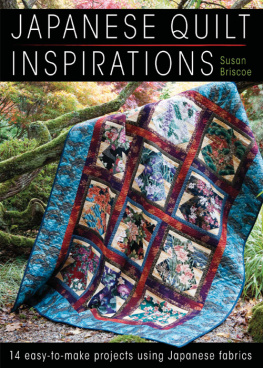
Susan Briscoe - Japanese Style
Here you can read online Susan Briscoe - Japanese Style full text of the book (entire story) in english for free. Download pdf and epub, get meaning, cover and reviews about this ebook. year: 2013, publisher: David & Charles, genre: Home and family. Description of the work, (preface) as well as reviews are available. Best literature library LitArk.com created for fans of good reading and offers a wide selection of genres:
Romance novel
Science fiction
Adventure
Detective
Science
History
Home and family
Prose
Art
Politics
Computer
Non-fiction
Religion
Business
Children
Humor
Choose a favorite category and find really read worthwhile books. Enjoy immersion in the world of imagination, feel the emotions of the characters or learn something new for yourself, make an fascinating discovery.

- Book:Japanese Style
- Author:
- Publisher:David & Charles
- Genre:
- Year:2013
- Rating:5 / 5
- Favourites:Add to favourites
- Your mark:
Japanese Style: summary, description and annotation
We offer to read an annotation, description, summary or preface (depends on what the author of the book "Japanese Style" wrote himself). If you haven't found the necessary information about the book — write in the comments, we will try to find it.
This collection of projects by Susan Briscoe really captures the essence of Japanese quilting style. It includes step-by-step instructions for creating Japanese style quilting projects including throws, cushions and quilts. The projects feature traditional Japanese techniques, designs and fabrics. Includes small, accessible projects such as coasters alongside full sized quilt instructions, as well as traditional Japanese quilting techniques such as sashiko.
Praise for Susan Briscoe
Susan Briscoe writes with an obvious fondness for Japanese culture. The Ardent Thread
Susan Briscoe: author's other books
Who wrote Japanese Style? Find out the surname, the name of the author of the book and a list of all author's works by series.


Japanese Style — read online for free the complete book (whole text) full work
Below is the text of the book, divided by pages. System saving the place of the last page read, allows you to conveniently read the book "Japanese Style" online for free, without having to search again every time where you left off. Put a bookmark, and you can go to the page where you finished reading at any time.
Font size:
Interval:
Bookmark:
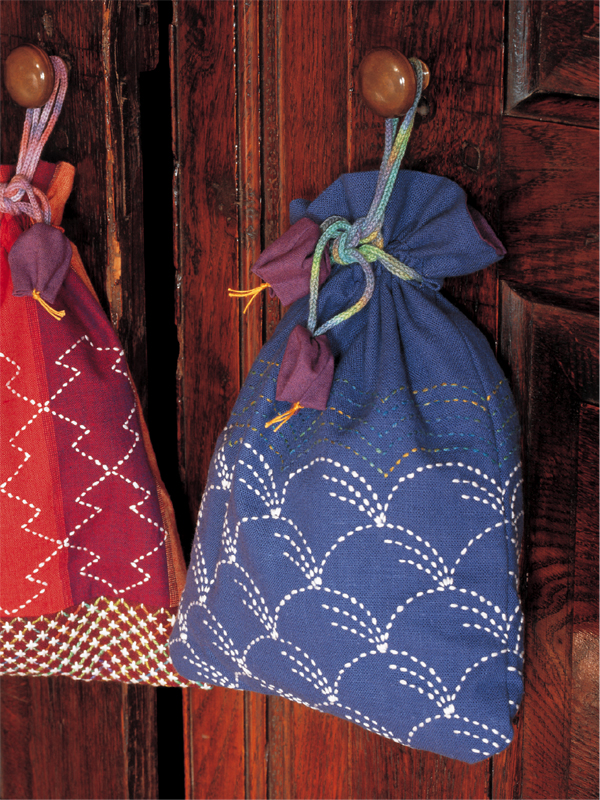
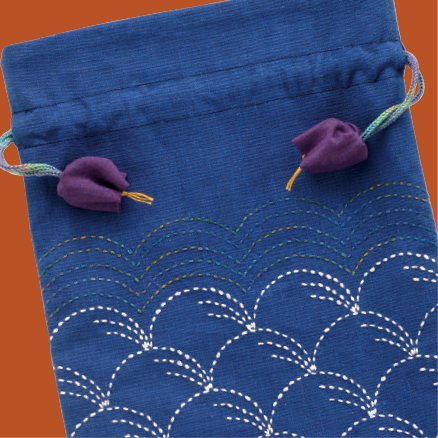
These pretty drawstring bags are called kinchaku, a word derived from kin (width) and chaku (to wear). In Japan, they are used as kimono accessories and are popular items for decorating with sashiko.
Two pieces of plain sashiko fabric 11in 8in (27.9cm 21.6cm)
Two pieces of plain cotton 11in 8in (27.9cm 21.5cm) for lining
Two pieces of plain cotton 3in (8.9cm) square for flower trims
Fine sashiko thread in white and variegated perle thread No 8
Two 25in (63.5cm) lengths of cord for drawstring
10in 8in (26.7cm 20.3cm)
1 Mark and cut curved bottom corners on the outside panels and the lining using a 2in (6.4cm) diameter circle template. Mark and stitch the nowaki (grasses) sashiko pattern see .
2 Assemble the bag using in (6mm) seams throughout. With right sides together, sew one outside panel to one lining piece across the top only. Press the seam towards the outside panel. Repeat with the second panel and lining piece but this time press the seam towards the lining.
3 With right sides together, outer against outer and lining against lining, sew the bag together (). Sew to 1in (2.5cm) below the top of the bag. Leave in (1.9cm) gaps unsewn for the drawstring and a 3in (7.6cm) gap unsewn in the lining. Press seams open and clip seam allowances to in (3mm) around corner curves.
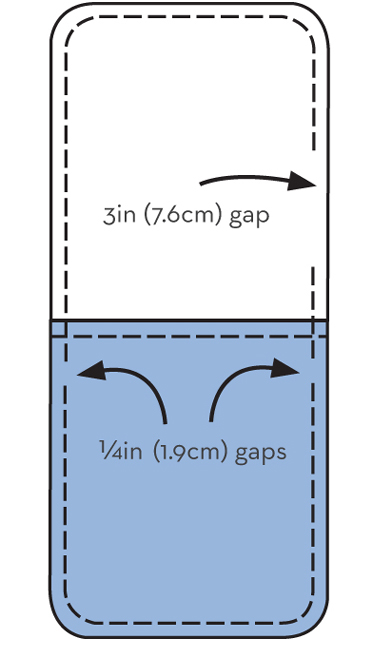
4 Turn right side out, through the lining gap. Push the lining down inside the bag and press. Mark two lines across the bag, joining the ends of the gaps left for the drawstring, 1in (2.5cm) and 1in (4.4cm) from the top edge. Stitch around the bag on each line to make a channel. Insert each drawstring, knot the ends and stitch the lining gap closed.
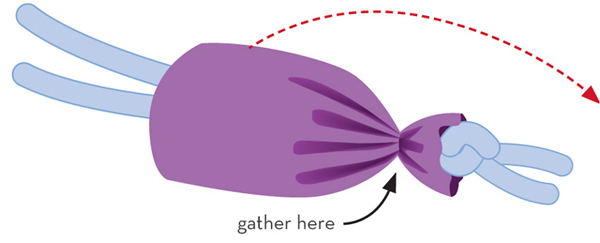
5 Fold one 3in (8.9cm) square of cotton in half, right sides together, and sew a in (6mm) seam to make a tube. Turn half of the tube right side out, so the fabric is doubled and seam allowance hidden. Sew running stitches around the raw end of the tube. Slip the tube over the knotted end of the drawstring and gather up tightly (). Stitch through the cord and knot to finish off. Fold the tube down over the knot. Sew stamens using yellow thread. Pinch the open end of the tube to flatten it, stitch thread through at the creases and leave loose. Pinch the end the other way and stitch another thread through. Hold all four ends of thread and knot together close to the end of the tube. Trim thread ends.
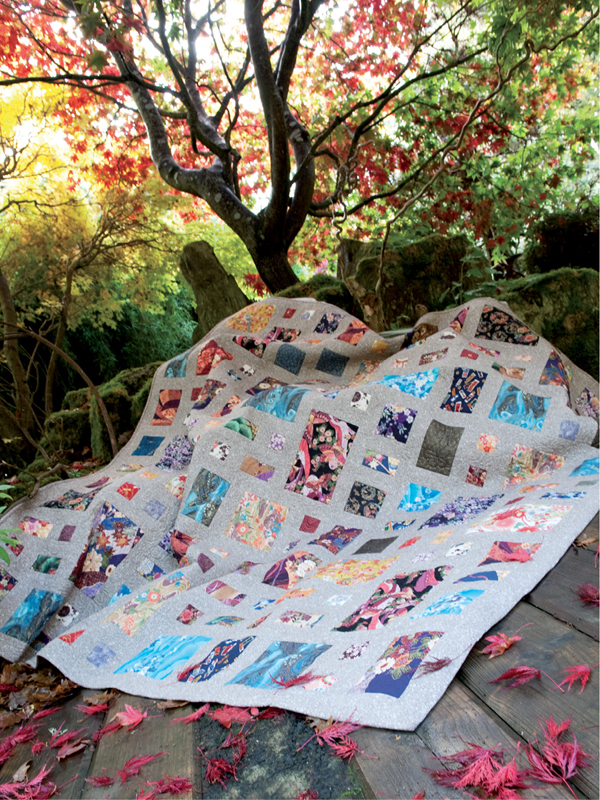
The Japanese word shimacho means stripe book, which were collections of fabric inspirations. This quilt was inspired by Japanese-style fabrics and makes good use of fabric scraps.
A fifty-four 2in (6.4cm) squares
B eighteen 4in (11.4cm) squares
C nine 6in (16.5cm) squares
D twenty-seven strips 4in 2in (11.4cm 6.4cm)
E eighteen strips 6in 4in (16.5cm 11.4cm)
F nine strips 8in 6in (21.6cm 16.5cm)
G nine strips 10in 6in (26.7cm 16.5cm)
Border fabric 3yd (3.25m)
Sewing and quilting threads to tone with patchwork
Backing fabric about 76in (193cm) square
Wadding (batting) about 76in (193cm) square
Binding fabric to match border strips about 290in (736.6cm) long
68in (172.7cm) square approximately
1 There are so many strips needed to border the feature fabric patches that it is easier to cut several sets at a time rather than cutting all of them at once, when it is very easy to lose count and either cut too few or too many. The border strips can be sorted into piles with the relevant centre fabrics as you cut. Begin by cutting twenty or so 1in (3.8cm) strips across the width of the border fabric.
Cut eighteen 9in (24.1cm) and 11in (29.2cm) strips and thirty-six 7in (19cm) strips.
Each 10in 6in (26.7cm 16.5cm) piece needs two 11in (29.2cm) and two 7in (19cm) border strips.
Each 8in 6in (21.6cm 16.5cm) piece needs two 9in (24.1cm) and two 7in (19cm) border strips. The shorter pieces left over from cutting the longer pieces can be used when you cut the borders for the 2in (6.4cm) squares.
Although this is a fairly easy quilt to make, there are 144 feature fabric pieces and 576 border pieces (four for each feature fabric patch)! It is not as quick to make as some other quilts, so allow yourself plenty of time to piece it.
2 Continue cutting strips for the medium-sized rectangular patches. Cut thirty-six 7in (19cm) strips, fifty-four 3in (8.9cm) strips and ninety 5in (14cm) strips.
Each 6in 4in (16.5cm 11.4cm) piece needs two 7in (19cm) and two 5in (14cm) border strips.
Each 4in 2in (11.4cm 6.4cm) piece needs two 5in (14cm) and two 3in (8.9cm) strips.
3 Cut the border strips for the squares. Cut thirty-six 7in (19cm) strips for the 6in (16.5cm) square borders, seventy-two 5in (14cm) strips for the 4in (11.4cm) squares and 216 strips 3in (8.9cm) long for the 2in (6.4cm) squares. Keep the remaining fabric to make the long borders on the outside of the quilt.
4 Using in (6mm) seams throughout, arrange and machine sew the blocks with the 6in (16.5cm) square patches first. Begin by making a partly sewn seam by stitching the first strip to the centre square but stopping after about 1in (3.8cm) (indicated by the red line in Fig 1A). Press the seam outwards. Machine sew the next strip to the side of the block. Continue adding strips until the block is complete, then finish the first seam, overlapping the stitches by about in (1.3cm).
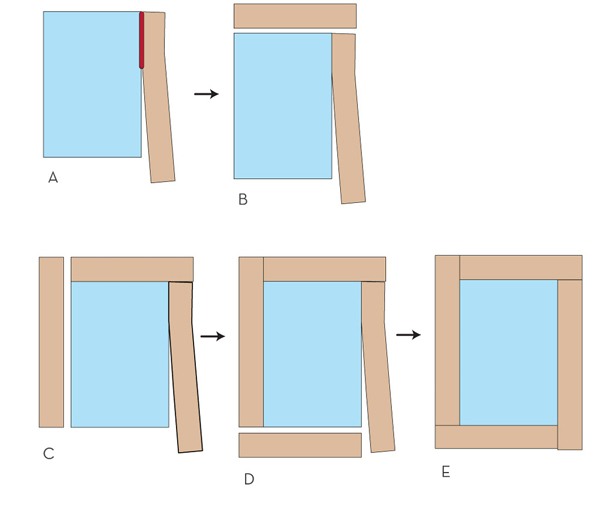
Fig 1
If you have not sewn a block with part-sewn seams before, begin with one of the larger, square blocks and work your way down to the smaller squares, where the seams are shorter and the space to fit the sewing machine foot into the patchwork seam is slightly less.
5 Machine sew the other blocks with square centre patches, then sew the blocks with the rectangular centre patches. You will need to check that you are sewing the longer border strip side to the longest side of the patch each time it is easy to get mixed up and sew a short border piece to the longer patch side. Once all the block borders are added, you can arrange and assemble the larger blocks.
Font size:
Interval:
Bookmark:
Similar books «Japanese Style»
Look at similar books to Japanese Style. We have selected literature similar in name and meaning in the hope of providing readers with more options to find new, interesting, not yet read works.
Discussion, reviews of the book Japanese Style and just readers' own opinions. Leave your comments, write what you think about the work, its meaning or the main characters. Specify what exactly you liked and what you didn't like, and why you think so.