Jewelry
Lab 52 Experiments, Investigations,
and Explorations in Metal Melissa Manley  Contents Contents  Lab 22: Recycling Tin (see ) Lab 22: Recycling Tin (see ) Lab 39: Flame Patina on Copper (see page 106) Introduction Lab 39: Flame Patina on Copper (see page 106) Introduction  Brooch with squirrel jaw and cloves by Melissa ManleyYou have not found your place until all your faculties are roused and your whole nature consents and approves of the work you are doing. Orison Swett Marden, writer I WROTE THIS BOOK FOR YOU. I teach people of all walks of life, retired folks, college students, teenagers, hobbyists; but my favorite students are total beginners, those to whom metal has called. They are interested but still fresh like young children, ripe for information about the new and foreign world of jewelry making. Its delightful and exhilarating to spark and share their joy of discovery, to empower them to create with metal. But I am only one person, and so many of you out there are hungry for more. Believe me, there is an abundance of jewelry-making and metalworking advice and information to share! So I wrote this book. I wanted a format that would allow a little dabbling each week, a chance for you to nibble off small, manageable bites of the huge, delectable metals pie. Brooch with squirrel jaw and cloves by Melissa ManleyYou have not found your place until all your faculties are roused and your whole nature consents and approves of the work you are doing. Orison Swett Marden, writer I WROTE THIS BOOK FOR YOU. I teach people of all walks of life, retired folks, college students, teenagers, hobbyists; but my favorite students are total beginners, those to whom metal has called. They are interested but still fresh like young children, ripe for information about the new and foreign world of jewelry making. Its delightful and exhilarating to spark and share their joy of discovery, to empower them to create with metal. But I am only one person, and so many of you out there are hungry for more. Believe me, there is an abundance of jewelry-making and metalworking advice and information to share! So I wrote this book. I wanted a format that would allow a little dabbling each week, a chance for you to nibble off small, manageable bites of the huge, delectable metals pie. Without you leaving the comfort of your own home, you and I can easily connect and share the jewelry-making experience. By completing the 52 labs in this book, you will have finished a beginners course in metals and jewelry. This format is intended to present the information in a fun and exciting way that reflects my own excitement about experimenting with metal and jewelry. It is by no means an all-encompassing metals encyclopedia, but rather a springboard for a long relationship with jewelry making, one that gets you addicted to playing with metal (the key words being relationship and play). Theres no greater reward for me than hearing about a former student who now drives down the road thinking about ways to connect jewelry parts or dreams about metalworking. I hope that through this book, you too catch this bug and join me on the jewelry journey. Getting Started What You Need to Know This book covers mostly nonferrous metals, or metals without iron in them. The methods discussed apply to silver, copper, brass, bronze, and nickel. Any words in bold text appear in the glossary at the back of the book. We measure sheet metal thickness in gauges. Using a round Brown & Sharpe (B&S) gauge, you can measure the metals thickness by sliding it into the slots around the edge until it fits snugly. Sawing To make jewelry from metal, you must first cut and shape the material into usable pieces with a jewelers saw. Sawing To make jewelry from metal, you must first cut and shape the material into usable pieces with a jewelers saw. Unlike a hardware store hacksaw, the jewelers version has wing screws at each end to clamp in a saw blade. The blades come in sizes from #10/0, which has the smallest teeth, on up to #6, #5, #4, and so on. (The higher the number, the smaller and closer together the teeth are.) Jewelers typically tend toward #3/0 or #2/0 blades for the most common metal thicknesses. As you become comfortable sawing, youll develop your own preferences. Heres the step-by-step on sawing metal: 1. Load the blade into the saw by clamping it with the wing screw at the tip opposite the handle. To make sure the blades teeth point downward, hold the blade over a white piece of paper or stroke it against your sleeve (it will pull on the cloth if the teeth face down). 2. Brace the end of the saw against a table edge and push toward the table with the handle as you tighten the blade into the bottom wing clamp. When you let go, the blade should ping when you pluck it, meaning its under enough tension. This tiny little piece of steel chewing through your metal will use tension as its ally. 3. Secure a V-slotted bench pin in place. This is a wooden tool that you must use while sawing to support your metal and to allow for free movement of the blade. It becomes the action zone for most of your metals processes. Your metal must have support underneath each side of the blade for the saw to work properly. Do not saw metal hanging off the edge of a table with no bench pin. 4. To pierce out a design from the middle, drill a hole in the metal you plan to cut. Tighten the top end of the saw blade in place, leaving the bottom loose. Thread the loose bottom (still partially in the saw) through the hole. Slide the metal all the way up on the saw blade to the top. Brace the saw against a table at a downward angle so the dangling piece of metal is out of your way as you hold the saw handle, push forward, and tighten the bottom end of the saw blade in the saw. You may have to stand up to do this until you get the hang of it. Now youre ready to saw. 5. Relax. This step is important. Remove the concept of sawing from your mind and instead envision yourself stroking the metal with the saw. 6. 6. Hold the metal as you transfer it to the bench pin so it doesnt snap your blade. Place it flat on the bench pin with your blade in the V-shaped opening. 7. Begin sawing. Gently move the blade straight up and downdont tweak it sideways, that will kink and eventually snap the blade. Two or three soft upward strokes will help start a trough to begin sawing.
The throat depth of a sawthe distance between the saws body and the bladedetermines how far you can cut into a large sheet of metal. If your only option is a shallow saw, back it out and turn the sheet around to saw the opposite side. Be prepared to break many bladesorder at least a couple dozen!as you learn to use subtle pressure. Remember, the more you force the saw, the harder it gets, and vice versa. If you force it, you pay a price.  Pieces of sheet metal and a round B&S sheet gauge Pieces of sheet metal and a round B&S sheet gauge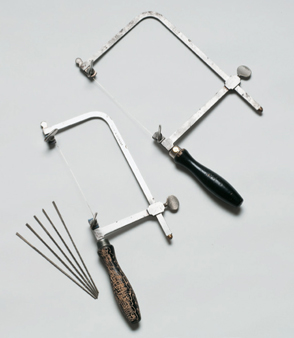 Tools to saw through metal Tools to saw through metal The size and placement of the teeth change depending on the thickness of the metal you want to cut. The size and placement of the teeth change depending on the thickness of the metal you want to cut.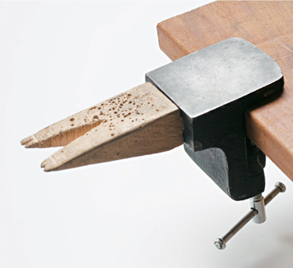 Use a V-slotted bench pin like this for easier sawing. Use a V-slotted bench pin like this for easier sawing.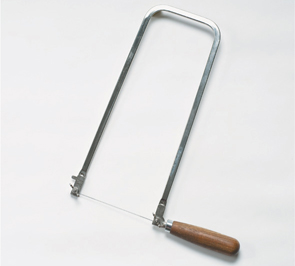 The distance between the saws body and its blade determines how far into a piece of metal you can cut.Saw Blade Specifications Use this chart to determine the proper drill size and blade you are using. The distance between the saws body and its blade determines how far into a piece of metal you can cut.Saw Blade Specifications Use this chart to determine the proper drill size and blade you are using. |


 Contents
  Lab 22: Recycling Tin (see )
 Lab 39: Flame Patina on Copper (see page 106) Introduction
  Brooch with squirrel jaw and cloves by Melissa ManleyYou have not found your place until all your faculties are roused and your whole nature consents and approves of the work you are doing. Orison Swett Marden, writer I WROTE THIS BOOK FOR YOU. I teach people of all walks of life, retired folks, college students, teenagers, hobbyists; but my favorite students are total beginners, those to whom metal has called. They are interested but still fresh like young children, ripe for information about the new and foreign world of jewelry making. Its delightful and exhilarating to spark and share their joy of discovery, to empower them to create with metal. But I am only one person, and so many of you out there are hungry for more. Believe me, there is an abundance of jewelry-making and metalworking advice and information to share! So I wrote this book. I wanted a format that would allow a little dabbling each week, a chance for you to nibble off small, manageable bites of the huge, delectable metals pie.
 Pieces of sheet metal and a round B&S sheet gauge
 Tools to saw through metal
 The size and placement of the teeth change depending on the thickness of the metal you want to cut.
 Use a V-slotted bench pin like this for easier sawing.
 The distance between the saws body and its blade determines how far into a piece of metal you can cut.Saw Blade Specifications Use this chart to determine the proper drill size and blade you are using.