Credits / Copyright Photo Projects
Make your own Greeting Cards, Calendars and Photo Books. by Margaret Brown ISBN: 978-0-9871595-2-6 The content in Photo Projects is included Printing Digital Photos Pocket Guide see www.photoeguides.com . All content in Photo Projects is protected under copyright and cannot be reproduced in any form without written consent from the publisher. Legal Notice click here . Published July 2011.
Media Publishing Pty Limited
ABN 86 099 172 577
Office 4, Clontarf Marina
Sandy Bay Road
Clontarf
NSW 2093
Australia Email:
Website: www.mediapublishing.com.au www.photoeguides.com www.photoreview.com.au
Introduction Aside from just making prints, there are plenty of printing projects you can produce with an inkjet printer. Included among them are creating your own greeting cards, calendars, photo books and printing labels for slideshows and movies recorded on DVD.

Desktop publishing software provides an easy and flexible way to create different types of documents using your digital photos and own text. Many software applications provide at least a few of these facilities, although some simply link to third-party producers and you must be prepared to wait a week or so to see the end results. The templates provided may also be very inflexible, restricting the value of these applications. Its much more satisfying when you print at home because you can see your work as it emerges from your printer. A desktop publishing application like Microsofts Publisher will be easier to use for most of these projects and provide far greater flexibility. Well be using Publisher for all examples as its widely available for both Windows and Mac platforms. Other affordable desktop publishing applications include Serif PagePlus X4, Nova Print Artist Platinum 23 and like Broderbunds The Print Shop Professional. Look for customisable templates, tools for resizing and re-orientating images and an abundance of worthwhile fonts. All projects start with one or more digital images and the images should be edited before you use them for projects to ensure they print out properly. While projects using only one image can be started directly from the editing window, its a good idea to create separate folders for storing edited images for multi-picture projects such as calendars and books.
Papers for Projects Cards and books, which are printed on both sides of the paper, require you to use double-sided paper. Calendars will be more economical to print if they, too, are printed on double-sided media, preferably with a weight of between 170 and 230 gsm. Options include Epsons Matte Paper Double-Sided, Innova Softex Dual Sided Inkjet and Smooth Cotton Dual Sided, Ilford Galerie Smooth Lustre Duo, Canson Infinity Rag Photographique Duo or Hahnemuhle Photo Rag Duo. Some are thicker than others and most of them are only available through specialist outlets or online resellers.
Making a Greeting Card Start your desktop publisher and select Greeting Cards from the publication types or template options. This should open a page of templates showing different card sizes, orientations and designs. Dont worry if you cant find the exact style you want; just look for one thats near enough to be easily customisable and be prepared to modify it. Click on Create to open the template and begin to customise it. Start by re-setting the page size; weve selected Half-page side fold for the birthday card were creating. Then select the Layout option; weve chosen Image Classic. Click OK and apply these changes to the current publication.
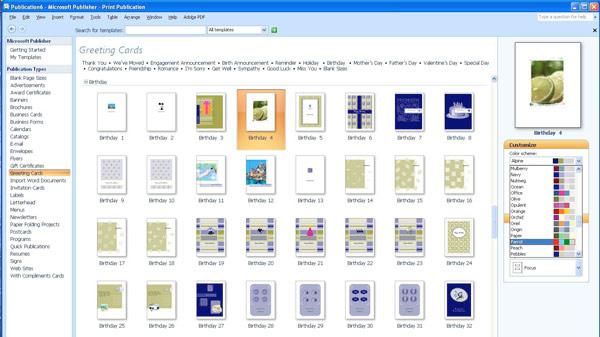
Select a template thats close to your requirements. You may also be able to choose a colour scheme from the dropdown menu provided. Delete the picture and replace it with your own picture by selecting Insert > Picture > From File and going to the folder you stored the picture in. The selected picture will drop into the centre of the template, from where you can drag it into position. You can also resize the picture by clicking on a corner and dragging it in or out.

This is a long way from the end result we have in mind but close enough for easy customisation. Now drag-and-drop the greeting title and its associated background and highlight line into position. Any of these can be deleted and you can change colours, font styles and sizes and text at this point. Right-click on the object you wish to edit and select the item to edit from the pop-up menu.
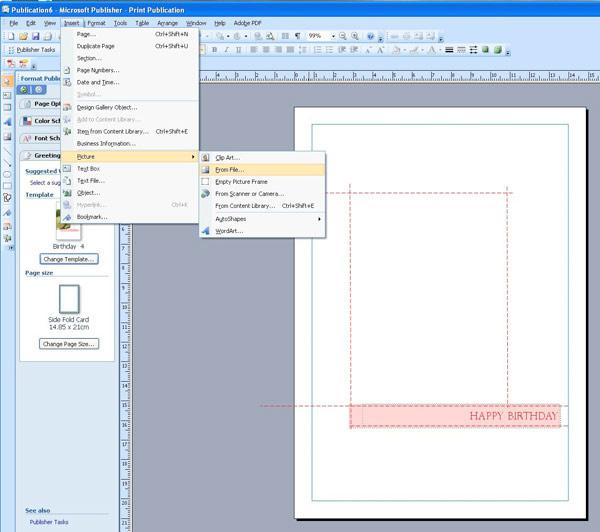
Replacing the picture in the template.
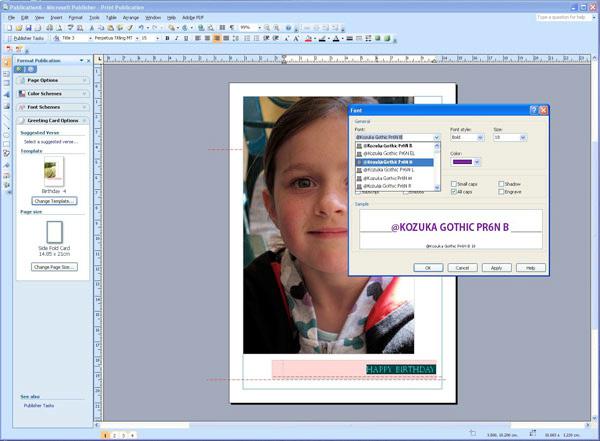
Right-clicking on the text and selecting Change Text > Font allows you to select a new font style, size and colour.
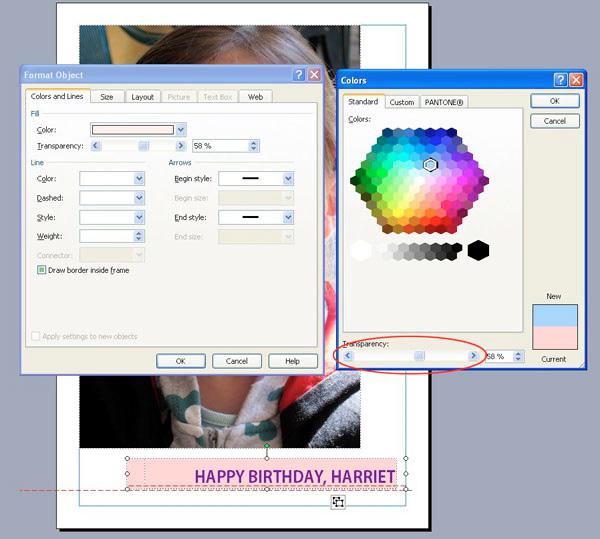
To change the background behind the text, select the coloured rectangle and right-click, then choose Format Object from the pop-up menu. Use this to reset colours, adjusting the intensity of the hue with the transparency slider (circled). When youre happy with the front page, go to the bottom left side of the desktop and click on the number 2. This opens the centre spread of the card, where youll find a pre-set greeting. This can be adjusted in the same ways as the greeting on the front of the card.
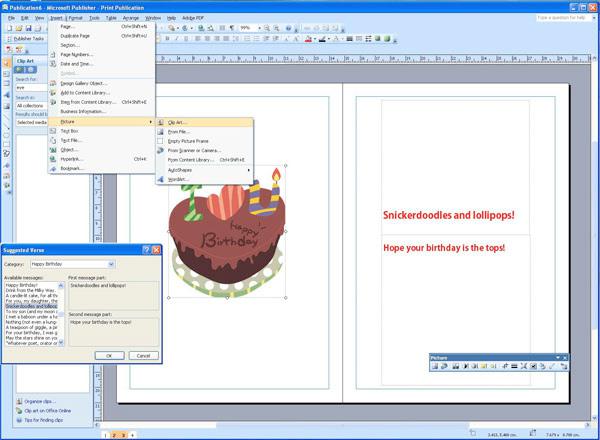
Some of the design options available for the centre of the card. Publisher will automatically place a message saying Made especially for you by ... with your name added on the back page of the card, which is now ready for printing. Simply click on File > Print to go to the printer driver.
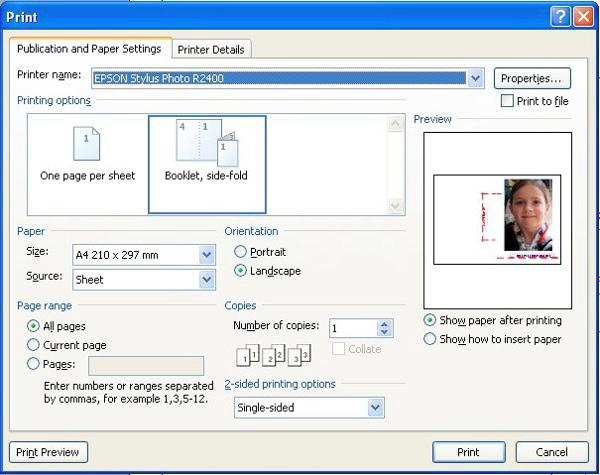
Printing your card.
Making a Calendar Open the software application, select the Calendars folder and decide on a template. (Weve selected A4 vertically orientated for this demonstration). Then select a colour scheme from the drop-down menu on the right hand column and check the One month per page button under Time Frame. To change the month that the calendar starts on, click Set Calendar Dates in the Calendar Options task pane. Click on OK to open the template.
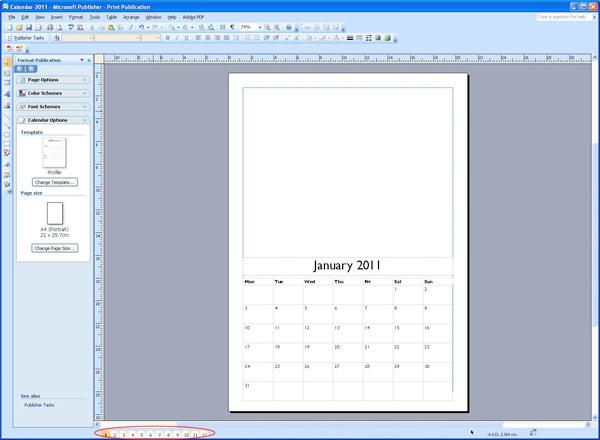
This customised calendar template automatically sets up a page for each month (shown circled on the lower left side of the workspace). Clicking on the relevant number opens the page for that month. Customise the template to meet your requirements by removing items you dont want with Edit > Cut. Set the font style, size and colour and adjust background colour and texture, if required. Then drag and drop the remaining components into place. Click on Insert > Picture > From File and select the picture for January. Clicking on the Insert button copies it to the open page of your calendar, where you can reposition and re-size it.

