Contents
Guide
Contents
CHAPTER ONE
CHAPTER TWO
CHAPTER THREE
CHAPTER FOUR
CHAPTER FIVE
CHAPTER SIX
CHAPTER SEVEN
What You Need
Materials
acrylic paints, assorted
aluminum foil
Apoxie Sculpt epoxy putty
clay: Super Sculpey, Super Sculpey Firm, Sculpey III, Premo! and/or Monster Clay
drawing paper
glassine paper
Mod Podge
Pearl Ex powder
primer paint, spray-on
sealant, brush-on or spray-on
varnishes, spray-on and clear brush-on
wire mesh, medium gauge recommended
wire, various gauges: fine, medium and heavy
wood bases
wood beads, black
Tools
craft knife and blades
hammer
heat gun (optional)
hot glue gun (low-temperature) and glue sticks
metal detail tool
metal or wire ribbon tool
needle tool
oven, conventional not microwave
paintbrushes, assorted including firm soft-bristled, large round-tipped and small fine-detail
pasta machine (optional)
pencil
permanent marker
pliers
rubber tools
scissors
straightedge
texture stamps (optional)
watercolor pencils
wire cutters
wooden tools (optional)
Other Supplies
cornstarch (baby powder optional)
glue (optional)
masking tape (optional)
newspapers
palette
paper towels
reference photos and anatomy books
rubbing alcohol
sandpaper, 220 grit or finer
Super Glue or epoxy glue
U-nails
Introduction
For me, sculpture was mostly a self-taught skill. I never went to art school. I have my degree in digital media, which has very little to do with traditional hands-on art. There were only a few sculpture books on the market when I first began sculpting in 2001, and most of them were rather outdated. None of them directly applied to the field of work that I wanted to get into. I learned about where to start from Katherine Deweys writings, namely Creating Life-Like Animals in Polymer Clay. I mostly referenced anatomy books, photos, pre-existing sculptures and real life. Practice, practice, practice is the main reason Ive gotten to the point I am now. At the time of this writing, Ive created hundreds of sculptures of varying size, complexity and subject matter.
With each sculpture, I try to learn something new. Even if its a small step each time, I am always learning and growing. Every now and then, I like to do a piece that is completely out of my comfort zone and interest range. I will experiment with a new style or sculpt an animal I have never heard of before. After I do this, my art takes a turn in a new direction and shows great improvement.
In 2006 I began teaching at Full Sail University in Winter Park, Florida. I worked in the computer animation department and focused on traditional art. I learned a lot through teaching others for five and a half years. My former job has been a big inspiration for writing this book.
I know how difficult it is getting started in sculpture. There is a serious lack of tutorials and reference for beginning sculptors. There were points (and still are sometimes!) when I was ready to tear my hair out in frustration. This book is to help you skip that step and get right into learning your own style and methods in sculpting.
I have not written this book in a step-by-step how-to-recreate-this piece style. The reason for this is that in order to be a successful artist, you need to learn to apply techniques to your own ideas and creations. Use this book as a starting point and develop your own ideas as you go though it. Rather than recreating the pieces I have done in this book, apply the techniques demonstrated to your own works.
I will be covering all the information you need to complete a sculpture. I will start with an introduction to the materials needed, moving on to armature building and blocking out the main forms with clay. From there, I will discuss various techniques on detailing a sculpture from anatomy to texture. I will then cover painting and finishing techniques to apply to your piece.
Creating this book has been a learning process for me. I hope you also learn from it and get introduced to some new concepts and techniques.
Enjoy, and happy sculpting!
CHAPTER ONE
Sculpting Mediums
Many materials can be used in sculpture. When starting out, it can be a bit overwhelming. To choose the correct medium, you must first understand the proper applications of each so you can select the best one for you.
Polymer clay is soft and pliable, but will become hard and ceramic-like when baked. The plasticisers in the clay react to heat and can be baked in a home oven at a low temperature. Baked polymer clay can be sanded, carved and painted.
Oil-based clay always remains pliable and is unable to be cured and hardened. Many of these clays are wonderful to work with, but they require molding and casting to create a finished, painted piece.
Epoxy clays are two-part molding compounds that cure when equal amounts of both parts are combined. These clays cure to a rock solid state after a workable period of several hours.
In this book, we will be using both polymer clay and oil-based clay to work with different techniques. I will also show how Epoxy clay can be used in conjunction with polymer clays. Keep in mind many of the techniques shown can be used with other clays too!
Materials and Tools
CLAY
Polymer Clay
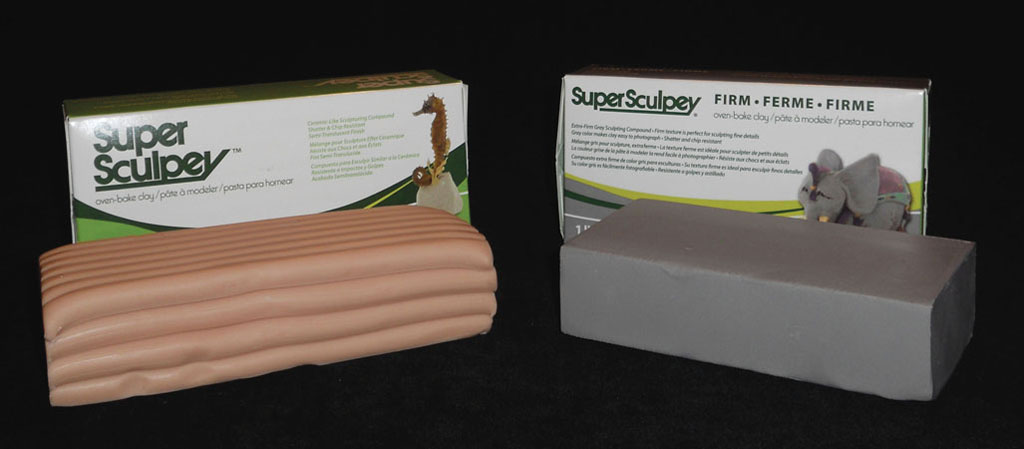
Super Sculpey is probably the most widely used polymer clay. It is pliable yet holds a high amount of detail. It is a beige/pink tone and can be tinted with inks or colored polymer clays. Super Sculpey can be purchased in one pound (454g) blocks or in bulk packages.
More recently, Super Sculpey Firm was released. It is more waxlike in consistency, but still wont harden until it is baked. This clay can hold an amazing amount of detail, as it doesnt get as soft as regular Super Sculpey. It is great for faces, textures and hard mechanical edges. It is difficult to manipulate, so doing entire sculptures with it can be monotonous. However, it can be blended with regular Super Sculpey and used only in the areas with extreme detail.

