Nelli - Create Web Charts With jqPlot
Here you can read online Nelli - Create Web Charts With jqPlot full text of the book (entire story) in english for free. Download pdf and epub, get meaning, cover and reviews about this ebook. year: 2014, publisher: Apress : Imprint: Apress, genre: Computer. Description of the work, (preface) as well as reviews are available. Best literature library LitArk.com created for fans of good reading and offers a wide selection of genres:
Romance novel
Science fiction
Adventure
Detective
Science
History
Home and family
Prose
Art
Politics
Computer
Non-fiction
Religion
Business
Children
Humor
Choose a favorite category and find really read worthwhile books. Enjoy immersion in the world of imagination, feel the emotions of the characters or learn something new for yourself, make an fascinating discovery.
Create Web Charts With jqPlot: summary, description and annotation
We offer to read an annotation, description, summary or preface (depends on what the author of the book "Create Web Charts With jqPlot" wrote himself). If you haven't found the necessary information about the book — write in the comments, we will try to find it.
Create Web Charts with jqPlotshows how to convert your data into eye-catching, innovative, animated, and highly interactive browser-based charts. This book is suitable for developers of all experience levels and needs: for those who love fast and effective solutions, you can use the jqPlot library to generate charts with amazing effects and animations using only a few lines of code.
By the end of the book, you will have a good knowledge of all the elements needed to manage data from every possible source, from high-end scientific instruments to Arduino boards, from simple HTML tables to structured JSON files, and from Matlab calculations to reports in Excel. You will be able to provide cutting-edge charts exploiting the growing power of modern browsers.
This book contains content previously published in Beginning JavaScript Charts.
- Create all kinds of charts using the latest technologies available on browsers
- Full of step-by-step examples, Create Web Charts with jqPlot introduces you gradually to all aspects of chart development, from the data source to the choice of which solution to apply.
- This book provides a number of tools that can be the starting point for any project requiring graphical representations of data, whether using commercial libraries or your own
Nelli: author's other books
Who wrote Create Web Charts With jqPlot? Find out the surname, the name of the author of the book and a list of all author's works by series.


![Scott Murray [Scott Murray] - Interactive Data Visualization for the Web, 2nd Edition](/uploads/posts/book/120518/thumbs/scott-murray-scott-murray-interactive-data.jpg)


Create Web Charts With jqPlot — read online for free the complete book (whole text) full work
Below is the text of the book, divided by pages. System saving the place of the last page read, allows you to conveniently read the book "Create Web Charts With jqPlot" online for free, without having to search again every time where you left off. Put a bookmark, and you can go to the page where you finished reading at any time.
Font size:
Interval:
Bookmark:
APPENDIX A

Guidelines for the Examples in the Book
This appendix provides guidelines on how to use XAMPP and Aptana Studios together to create a development environment on your PC that will allow you to develop, run, and fix the examples given in the book.
Installing a Web Server
Nowadays, on the Internet, you can easily find free software packages containing everything you need to set up a test environment for all your examples and for everything related to the web world in general.
These packages minimize the number of programs that need to be installed.More important, they may be acquired with a single installation. The packages generally consist of an Apache HTTP server; a MySQL database; and interpreters for the programming languages PHP, Perl, and Python. The most complete package is XAMPP (available for download at the Apache Friends web site [ www.apachefriends.org/en/index.html ] ). XAMPP is totally free, and its key feature is that it is a cross-platform package (Windows, Linux, Solaris, MacOS). Furthermore, XAMPP also includes a Tomcat application server (for the programming language Java) and a FileZilla FTP server (for file transfer). Other solutions are platform specific, as suggested by the initial letter of their name:
- WAMP (Windows)
- MAMP (MacOS)
- LAMP (Linux)
- SAMP (Solaris)
- FAMP (FreeBSD)
In fact, XAMPP is an acronym; its letters stand for the following terms:
- X , for the operating system
- A , for Apache, the web server
- M , for MySQL, the database management system
- P , for PHP, Perl, or Python, the programming languages
Thus, choose the web server solution that best fits your platform, and install it on your PC.
Installing Aptana Studio IDE
Once the Web server has been installed, it is necessary to install an integrated development environment (IDE), which you need to develop your JavaScript code. In this appendix, you will install Aptana Studio as your development environment.
Visit the Aptana site ( www.aptana.com ), and click the Products tab for the Aptana Studio 3 software (at the time of writing, the most recent version is 3.6.0). Download the stand-alone edition (with the Eclipse IDE already integrated): Aptana_Studio_3_Setup_3.6.0.exe .
After the download is complete, launch the executable file to install the Aptana Studio IDE. At the end of the installation, in launching the application, you should see the workbench opening, as shown in .
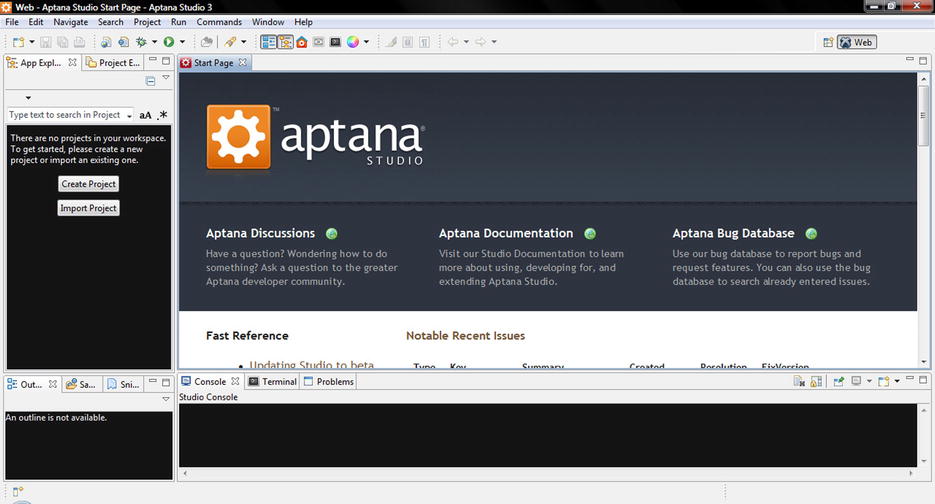
During the installation of Aptana Studio, the software detects the various browsers and the web server installed and configures itself accordingly.
Setting the Aptana Studio Workspace
Before starting to develop the examples in the book, you must create a workspace. First, you should set the workspace on Aptana Studio, where the Web server document root is.
These are typical paths with XAMPP:
- Windows: C:\xampp\htdocs
- Linux: /opt/lamp/htdocs
- MacOS: /Applications/XAMPP/xamppfiles/htdocs
Whereas with WAMP, this is the path:
- C:\WAMP\www
Thus, select File ![]() Switch Workspace
Switch Workspace ![]() Other... from the menu. Then, insert the path of the web server document root in the field, as demonstrated in .
Other... from the menu. Then, insert the path of the web server document root in the field, as demonstrated in .
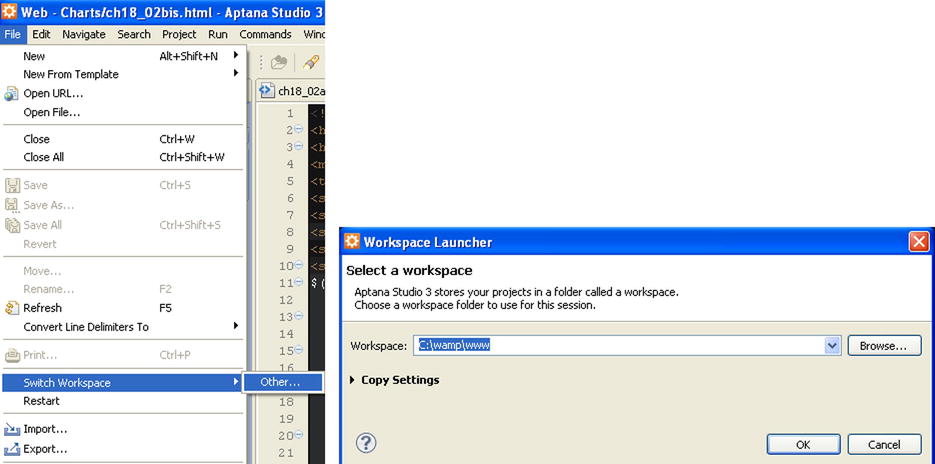
. Setting the workspace on the document root
Creating a Project
The next step in creating your workspace consists of creating a project in Aptana Studio:
- Select New
 Web Project from the menu.
 - A window such as that shown in appears. Select Default Project, and click Next.
- Insert charts as the name of the project. This will be the directory in the workspace in which you will write all the example files described in the book, using Aptana Studio.
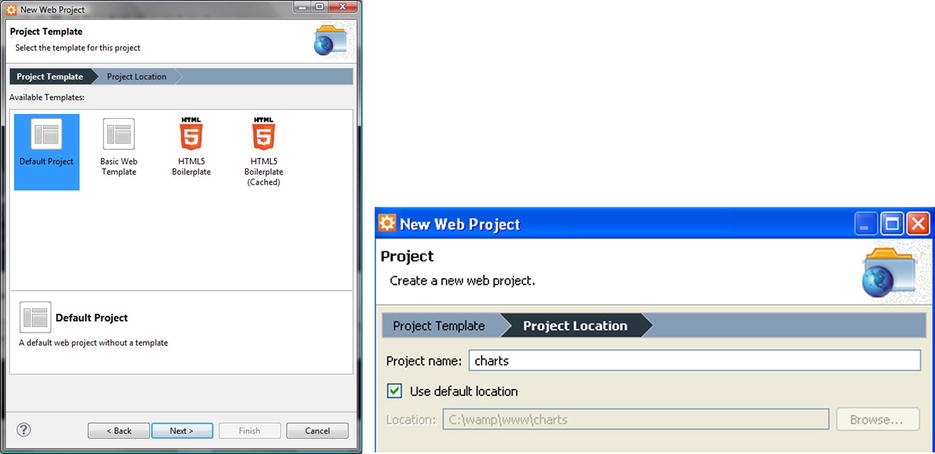
. Creating a default project
Completing the Workspace
Once you have set the Aptana Studio workspace and created a project, you complete the workspace.
Let us open the document root directory and create a new directory, named src . Now, the workspace on which you will be working throughout the book is composed of two directories:
- src
- charts
The src directory should contain all the files related to libraries.
The charts directory should contain all HTML, images and Cascading Style Sheets (CSS) files related to the examples in the book (which is in fact a project). Each example file should be created in this directory (if you prefer to do things differently, thats fine, but it is important to take note of the different path reference in HTML pages in order to include the library files and images).
 Note The source code that accompanies this book (available from the Source Code/Download area of the Apress web site [ www.apress.com ]) is practically already packaged in a workspace. With it, you will find two versions of the charts project: content delivery network (CDN) and local. The charts_ CDN directory contains all the examples referring to libraries remotely distributed from CDN services. The charts_local directory offers all the examples referring to libraries found within the src directory.
Filling the src Directory with the jqPlot Library
If you have chosen to develop HTML pages by referring to libraries locally, it is necessary to download all their files. These files will be collected in the src directory. This is a good approach, as you can develop several projects that will make use of the same libraries without having to copy them for each project.
The versions listed in this appendix are those used to implement the examples in the book. If you install other versions, there may be issues of incompatibility, or you may observe behavior different from that described.
jqPlot library version 1.0.8 (includes jQuery library version 1.9.1)
- Visit the jqPlot web site ( https://bitbucket.org/cleonello/jqplot/downloads/ ), and download the compressed file (.zip, .tar.gz or tar.bz2) for the library: jquery.jqplot.1.0.8r1250 .
- Extract all content. You should get a directory named dist , containing the following subdirectories and files:
- doc
- examples
- plugins
- A series of files ( jquery.min.js , jquery.jqplot.min.js , and so on)
- Copy the set of files and the plugins directory, and place in src .
jquery UI library version 1.10.3, with the smoothness theme
- Visit the JQuery user interface library (jQuery UI) site ( http://jqueryui.com/themeroller/ ), and download the library from ThemeRoller, with the smoothness theme: jquery-ui-1.10.3.custom.zip .
- Extract all content. You should get a directory named jquery-ui-1.10.3.custom , with the following directories inside:
- css
- js
- development-bundle
Font size:
Interval:
Bookmark:
Similar books «Create Web Charts With jqPlot»
Look at similar books to Create Web Charts With jqPlot. We have selected literature similar in name and meaning in the hope of providing readers with more options to find new, interesting, not yet read works.
Discussion, reviews of the book Create Web Charts With jqPlot and just readers' own opinions. Leave your comments, write what you think about the work, its meaning or the main characters. Specify what exactly you liked and what you didn't like, and why you think so.