SCRIVENER WINDOWS EBOOK CREATION
Quick and Dirty Resource
by Ronald E. Newton
Copyright April 2015 by Ronald E. Newton All rights Reserved
No part of this book may be used or reproduced in any manner whatsoever without written permission except in the case of brief quotations embodied in critical articles or reviews.
While every precaution has been taken in the preparation of this book, the publisher and author assume no responsibility for errors or omissions, or for damages resulting from the use of the information contained herein.
Scrivener screen shots are from Scrivener for Windows Version: 1.8.6.0 - 11 Mar 2015 running on my PC.
The author gives thanks for the Scrivener forums, YouTube videos, and the successful publishing of 10 eBooks using Scrivener. Along the way I met many individuals whose expertise made my life easier by using the Scrivener product.
So, I still remember the opening screen and the dawning fear of what do I do with it. The simple answer is whatever you want with it. A real answer would be only what you need to know and do!
For those of you just beginning the journey have fun and keep your sense of humor.
Preface
Producing an eBook by using Scrivener software may appear as a daunting task for a writer. Let me inform that it is not! Creating the books contents is the hardest task. To tell Scrivener how to generate a Mobi or ePub book is the easiest part of creating an eBook.
Right now youre probably smirking at my naivety in believing you can follow simple instructions. If you want Scrivener to produce that book you had better do as I say at first. Remember, that later, you can do what you want and debug what went wrong. Let us start simple and stay simple in our approach to the task of producing an eBook.
My eBook is a show & tell how to make an eBook. But you must follow along to reap the benefits of Scrivener! My book is not perfect in presentation, but the result is awesome and it's what you are reading right now. I dont mind your criticism of my writing; but, you cant fault Scrivener in producing this eBook.
Start Your Journey.
Contents
Introduction
Scrivener is a great tool for producing manuscripts for publishing books, eBooks, and PDF media. You write your books content once and then choose to produce the content as:
- A Manuscript
- A Microsoft Word Document
- A PDF, Kindle mobile eBook
- An EPub eBook
- An HTML file
I have published books with Kobo, Lulu, Smashwords, and Amazon Kindle. At first, I tried Word and grew tired of its styling quirks. Then HTML and CSS became my preferred method of publishing eBooks for the distributors above. This author built ePub eBooks by hand. It was tedious; but, satisfying to have a little control of the formatting process compared to Microsoft Word. One would have to generate separate ePub for Mobi and ePub eBooks.
On a Kindle forum the author stumbled over a post declaring that Scrivener could compile ePub, Mobi, PDF. And Word files. For $ 32 Scrivener was purchased, a 20 % savings. After I read the installation manual and reviewed many You Tube Scrivener videos. Step by step I built a three chapter fiction novel with two scenes in each chapter. The author did reach the point of compiling the content as:
- PDF
- EPub
- Mobi
- Print
- Word document
With age came laziness or smartness! There had to be an easier way. Wait for it! Scrivener, in this authors opinion, is the easiest way to publish manuscripts and eBooks. What took days, even hours before, now takes seconds, to produce a product ready for self-publishing distributors when I use Scrivener.
This author, at 75, does not need stress or aggravation in his life! No, I am not a Scrivener expert; and I do not wish to become one. Let me give you the benefits of what I learned in using the software.
- Scrivener does not hamper the writing process.
- It is difficult for a beginner of Scrivener to figure out all the options offered without help.
- The author boils it down in the First Steps chapter. It is the first chapter in this book for a reason. I really want the reader to have it easy in getting started with Scrivener. So this book strives to not set up any military boot camp mentality with the reader.
- You can learn in gory detail Scriveners functions through the help screen or queries on the Internet.
E-book creation is where I hope this book helps your understanding. The compile definition of ePub files applies directly to Kindle Move files, PDF, DOCX, DOC, or RTF files. Create the content once, then compile for the eBook output or print you desire. Save the compile definitions that work for you. Then merely use them in another eBook to style it the way you want.
Instead of my throwing the kitchen sink of information at you; sit down and take a sip of Scrivener in a glass, not the fire hose approach of many. Seated at this table is you and me. We have a Windows PC sitting on the wooden table. Scrivener is running on it. You and I will go through seven steps to build an ePub file. That file may be a fiction or non-fiction book.
The first time through this book follow the directions closely. Quash the urge to experiment until you have compiled your first ePub eBook. That was the main objective! After that you may experiment with options and note their effect within the eBook.
Proofread your book contents. After which get someone else to proofread the contents. Then use Scrivener to compile the eBook format you desire.
I wont keep you from producing that eBook any longer. Go read the First Steps chapter.
First Steps
Okay, it is time to get started on producing your first eBook using Scrivener. Beneath this text is the seven steps by which you may do it. Before you write your first word of content do step one through three. When done with that move into the content writing and organization step four. Then complete step five through seven.
Now begin to work on writing your book.
Step one, decide if you are writing a fiction or non-fiction eBook. This decision determines the styling you will use in your eBook. These details are proposed in the Book Layout chapter.
What styles?
- Paragraph
- List
- Heading 1
- Heading 2
- Heading 3
Step two , set up the five format presets for your book project. For example, let us set up the styling of our chapter heading which you may call H1. Type H1 in a text file within the editor. Then navigate to Format, Font, and Show Fonts. Now select the font, font style, and font size as shown below. Which is Times New Roman, Bold, and 18.
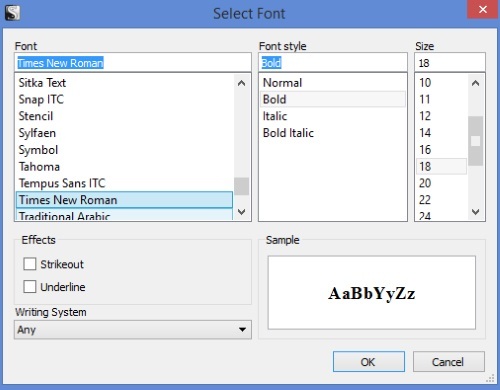
Then click on the text toolbar center, align the icon to center your H1. Now you set the spacing by navigating to Format, Text, Spacing, and make the following selections shown below.
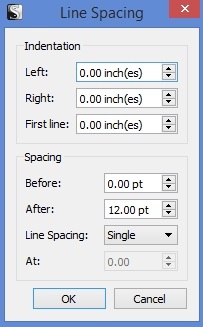
Important navigate to Format, Formatting, New Preset From Selection and add H1 for the Name: field.
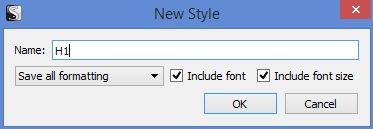
Repeat process for H2 and H3 headings. We could use this line spacing for the body text in a non-fiction book. Remember to change the font size to 12, style normal or regular, and text left aligned. An appropriate preset name might be NFpara.
Next page


