Table of Contents
Pattern Services and Revisions
If you are an Annies customer and have a question about the instructions on a pattern you have purchased, please visit:
http://www.anniescatalog.com/pages/customer_care/pattern_services.html
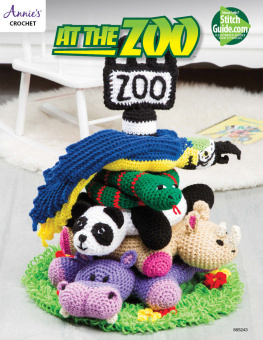
At the Zoo
Designs by Cindy Cseh


FINISHED MEASUREMENTS
Pole: 19 inches tall
Hippo Body: 8 inches in diameter, not including Head or Legs
Rhino Body: 8 inches in diameter, not including Head or Legs
Panda Body: 8 inches in diameter, not including Head or Legs
Snake Body: 7 inches in diameter, not including Head
Parrot Body: 6 inches in diameter, not including Head or Tail
MATERIALS


Red Heart Super Saver medium (worsted) weight acrylic yarn (7 oz/364 yds/198g per skein):
2 skeins #311 white
1 skein #312 black
6 oz #672 spring green
6 oz #334 buff
5 oz #313 Aran
4 oz #358 lavender
4 oz #324 bright yellow
4 oz #385 royal
3 oz #368 paddy green
2 oz #530 orchid
2 oz #390 hot red
1 oz #706 perfect pink
4 yds #254 pumpkin
Sizes F/5/3.75mm, H/8/5mm, I/9/5.5mm and J/10/6mm crochet hooks or size needed to obtain gauge
Tapestry needle
Stitch marker
Fiberfill
12-inch plastic foam cone with 5-inch base
3-inch x 5-inch-piece cardboard
GAUGE
Size I hook: 3 sc = 1 inch; 3 sc rnds = 1 inch
PATTERN NOTES
Weave in loose ends as work progresses.
Use size I hook unless otherwise stated.
Join with slip stitch as indicated unless otherwise stated.
Do not join rounds unless otherwise stated. Use stitch marker to mark rounds.
Chain-3 at beginning of round counts as first double crochet unless otherwise stated.
Snake Body is not worked like other animal bodies. Its worked in 1 long tubular piece and then sewn to form a ring. Stuff Body as work progresses, except in indicated sections.
SPECIAL STITCH
Loop stitch (lp st): Wrap yarn from front to back over index finger. Insert hook in next st and under the strands of yarn from behind your index finger and draw yarn through the st. With yarn lp still on your index finger, yo and draw through 2 lps on hook. Remove lp from finger.

POLE

BASE
Rnd 1 (RS): With black, ch 3, join(see Pattern Notes) in first ch, ch 1, 2 sc in each ch, do not join, place marker(see Pattern Notes). (6 sc)
Rnd 2: 2 sc in each sc around. (12 sc)
Rnd 3: Rep rnd 2. (24 sc)
Rnd 4: [Sc in each of next 2 sc, 2 sc in next sc] 8 times. (32 sc)
Rnd 5: [Sc in each of next 3 sc, 2 sc in next sc] 8 times. (40 sc)
Rnds 6 & 7: Sc in each sc around. At the end of rnd 7, sl st in next sc. Fasten off.
OUTER COVER
Note: Beg with black, work Outer Cover alternating 4 rnds black and 4 rnds white throughout, ending with black.
Rnd 1: Beg at top of Pole with black, ch 3, join, ch 1, 2 sc in each ch, do not join, place marker. (6 sc)
Rnd 2: Work 2 sc in each sc around. (12 sc)
Rnd 3: Sc around, inc(see Stitch Guide) 2 sc evenly sp. (14 sc)
Rnd 4: Rep rnd 3. (16 sc)
Rnd 5: Sc in each st around.
Rnd 6: Rep rnd 3. (18 sc)
Rnd 7: Rep rnd 5.
Rnd 8: Rep rnd 3. (20 sc)
Rnds 9 & 10: Rep rnd 5.
Rnds 1134: [Rep rnds 810 consecutively] 8 times. (36 sc)
Rnd 35: Rep rnd 3. (38 sc)
Rnds 3638: Rep rnd 5.
Rnd 39: Rep rnd 3. (40 sc)
Rnds 4044: Rep rnd 5. At the end of rnd 44, do not fasten off.
Rnd 45: Place Outer Cover over plastic foam cone and with top facing and working through both thicknesses of rnd 44 and rnd 6 of Base, sc in each st around, join in beg sc. Fasten off.
GRASS
Rnd 1 (RS): With top of Pole facing, join green in any st of rnd 45, ch 3(see Pattern Notes), 2 dc in next sc, [dc in next sc, 2 dc in next sc] around, join in top of beg ch-3. (60 dc)
Rnd 2: Ch 3, dc in next sp between dc sts, 2 dc in next sp, [dc in next 2 sps, 2 dc in next sp] around, join in top of beg ch-3. (80 dc)
Rnd 3: Ch 3, dc in each of next 6 sps, 2 dc in next sp, [dc in each of next 7 sps, 2 dc in next sp] around, join in top of beg ch-3. (90 dc)
Rnd 4: Ch 3, dc in each of next 7 sps, 2 dc in next sp, [dc in each of next 8 sps, 2 dc in next sp] around, join in top of beg ch-3. (100 dc)
Rnd 5: Ch 3, dc in each of next 8 sps, 2 dc in next sp, [dc in each of next 9 sps, 2 dc in next sp] around, join top of beg ch-3. (110 dc)
Rnd 6: Ch 3, dc in each of next 8 sts, 2 dc in next sp, [dc in each of next 10 sps, 2 dc in next sp] around, join in top of beg ch-3, turn.(120 dc)
Rnd 7: Ch 1, work lp st(see Special Stitch) in each dc around, join in beg lp st. (120 lp sts)
Rnds 811: Rep rnd 7. At the end of rnd 11 join in beg st, fasten off.
TOPPER
Inner Cone
Rnd 1: With black, ch 3, join to form a ring, ch 1, 2 sc in each ch around, place marker. (6 sc)
Rnd 2: 2 sc in each sc around. (12 sc)
Rnd 3: [Sc in next sc, 2 sc in next sc] 6 times. (18 sc)
Rnds 48: Sc in each sc around.
Bottom of Cone
Rnd 9: Sl st in next st, turn piece so RS is on the inside of Cone, ch 1, working in back lps(see Stitch Guide) only, [sc in each of next 2 sts, 2 sc in next st] around. (24 sc)
Outer Cone
Rnd 10: Sl st in first st, ch 1, working in back lps only, sc in each st around. (24 sc)
Rnds 1113: Sc in each st around. At the end of rnd 13, change color(see Stitch Guide) to white.
Rnds 1417: Sc in each st around. At the end of rnd 17, change color to black.
Rnds 18 & 19: Sc in each sc around.
Inner Cone is rnds 18 of Topper and rnds 1019 is the Outer Cone of Topper; rnd 9 is Bottom of Cone. Push Inner Cone into Outer Cone and stuff lightly with fiberfill between layers.
Rnd 20: [Sc dec(see Stitch Guide) in next 2 sc] around. (12 sc)
Rnd 21: Rep rnd 20. (6 sc)
Rnd 22: [Sl st in every other st] 3 times. Fasten off.
SIGN
Sign Front
Row 1: With size I hook and white, ch 18, sc in 2nd ch from hook, sc in each rem ch across, turn.


![Annies - Doily afghans: [5 colorful afgans made using worsted-weight yarn!]](/uploads/posts/book/166053/thumbs/annie-s-doily-afghans-5-colorful-afgans-made.jpg)


