Thank you for purchasing this Martha Pullen eBook.
Sign up for our newsletter and receive special offers, access to free content, and information on the latest new releases and must-have crafting resources! Plus, receive a coupon code to use on your first purchase from Store.MarthaPullen.com for signing up.
or visit us online to sign up at
http://marthapullen.com/ebook-promo
Contents
CHAPTER ONE
CHAPTER TWO
CHAPTER THREE
CHAPTER FOUR
CHAPTER FIVE
CHAPTER SIX
Introduction
Why do we love winged creatures? Why do we put wings on horses and create great, flying beasts that exist only in our dreams and imaginations? Perhaps it begins with our own yearnings for flight. Throughout history, humankind has tried to fly, and through the technology of machinery, we have succeeded. But there is something much more specialmore magicalabout being able to fly aided only by your own power. We gaze with awe at birds flying effortlessly overhead, pushed only by their own two wings, and our imaginations take flight with them.
Fantastical winged creatures are nothing new. The Pegasus has origins in Greek mythology, gryphons are found in sculpture as far back as the eleventh century and dragons appear throughout Europe and Asia in everything from heraldry to paintings to architecture. In the present day, dragons breathe fire on our movie screens and hippogryphs appear in literature to fly to the rescue. In this book, you will learn to draw and paint these winged creatures. I will introduce you to the materials you need to paint worlds of watercolor and teach you the techniques to bring them to life. Most importantly, you will discover how to create your own creatures and compositions from your imagination and how to tell your own storyone that perhaps future generations will look upon as a legend of the past.
CHAPTER ONE
Materials and Techniques
Contrary to what many artists who are just starting out believe, the quality of an artists work is not defined simply by his or her materials. It is true that using quality materials will make it easier to create beautiful artwork, but it is not necessary to buy the most expensive paint or brushes, and many good materials are not only affordable, but often they are very easy to find. In this chapter, I will cover the materials necessary to work in watercolor and explain how to use them.
Techniques go hand in hand with materials. Anyone can dip a brush into watercolor and make a mark on the paper, but how do you create a beautiful gradient? What about the crumbly texture in that rock or the blotchy surface of a dragons hide? These techniques may look challenging, but you may be surprised to find they are quite simple, and, once explained, you will be eager to try them out for yourself.
Pencils
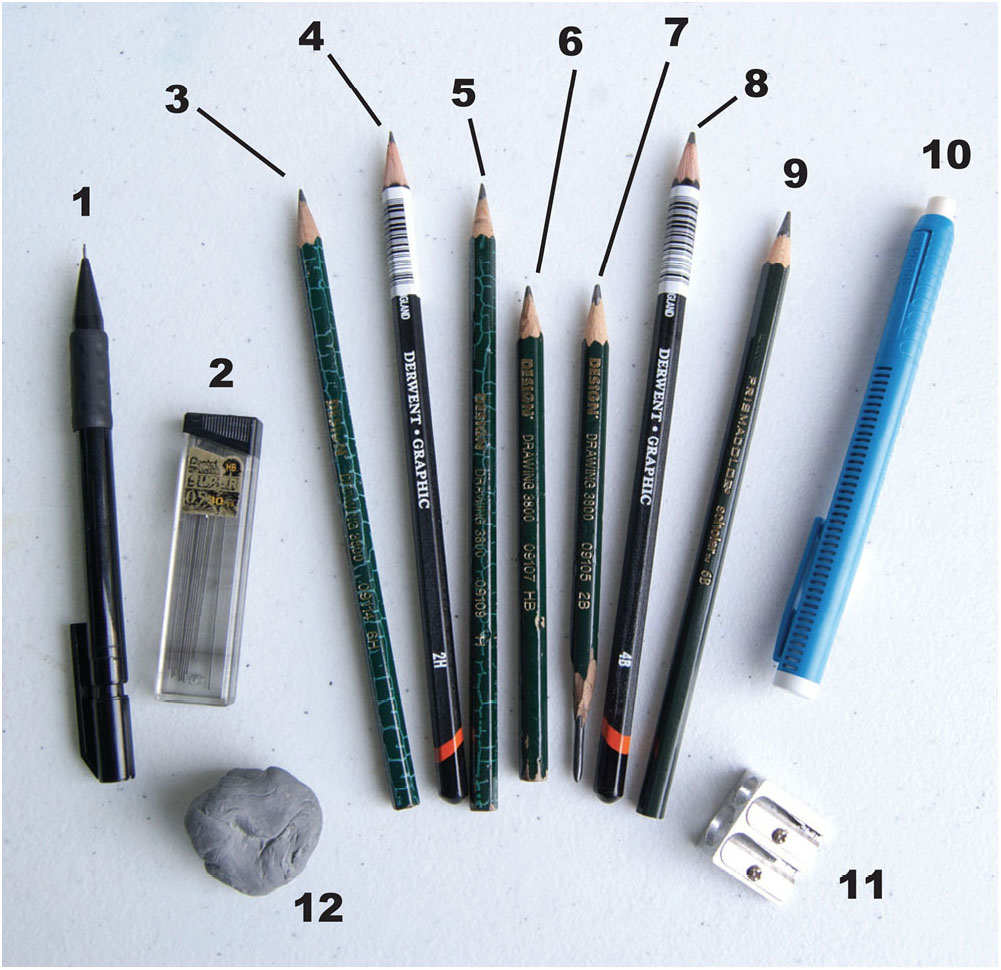
Pencils are one of the most useful drawing tools, because you can draw as dark or light as you wish and erase any unwanted lines. When drawing from life or sketching ideas in a sketchbook, a simple pencil and eraser are two basic and easy-to-use tools that you can take anywhere. When working in watercolor, graphite allows you to draw light lines as a guide for your watercolor paintings. You can also use shading within your drawing with different hardnesses of graphite.
- Mechanical pencil
- Mechanical pencil lead
- 6H pencil
- 2H pencil
- H pencil
- HB pencil
- 2B pencil
- 4B pencil
- 6B pencil
- Mechanical eraser
- Pencil sharpener
- Kneaded eraser
There are different types of pencils. I prefer a .05mm mechanical pencil with HB lead for my go-to pencil because it keeps a constant point. If you prefer a traditional pencil, make sure you keep a pencil sharpener handy. Experiment and see what kind of pencil you like the best. Kneaded erasers are good for larger areas, whereas mechanical erasers give you a small, concentrated eraser for details.
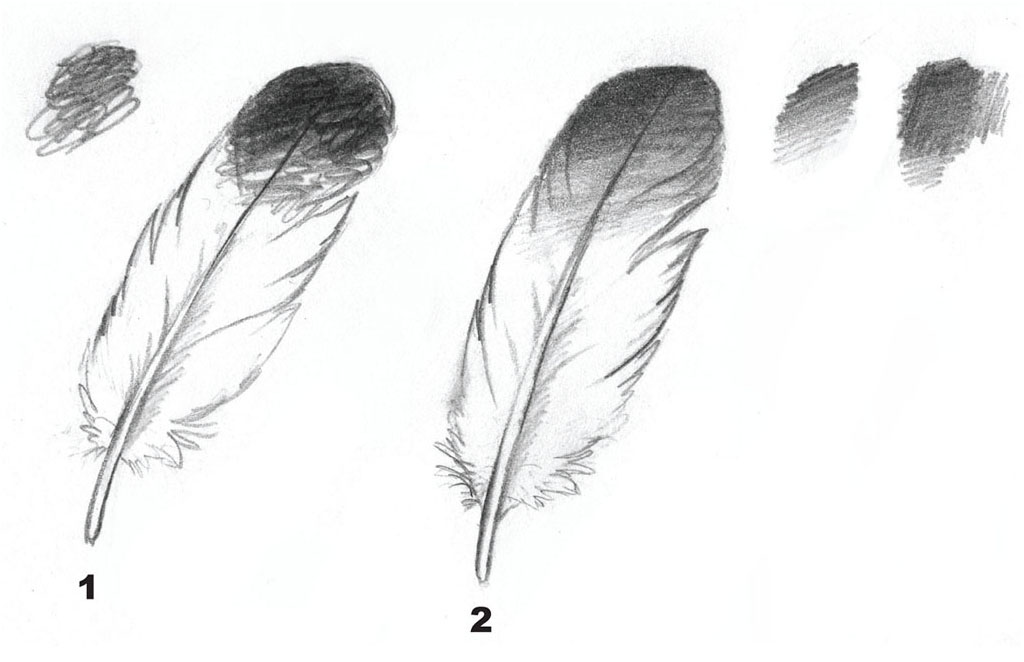
- Dont
- Do
When you shade, try not to scribble in random directions. This can result in random light and dark areas and lines. Try to shade in one direction; this will make your shading look smoother and more controlled. Sometimes its fine to leave lines showing when shading. This is called hatching and is a wonderful way to shade.
- 6B
- 4B
- 2B
- H
- 2H
- 4H
- 6H
Graphite Hardness
Pencils come in different graphite hardnesses. Most commonly sold for standard use is HB and 2B. However, for drawing you will find harder and softer leads are useful for creating a variety of value. H pencils have harder lead and create a lighter line. B pencils have softer lead, and create a darker line. In the diagram above, you can see how the hardest lead at the right, 6H, is much lighter than the softest lead at the left, 6B. No matter how hard you press with a 6H pencil, it will never be as dark as a 6B pencil.
How to Use Different Pencils
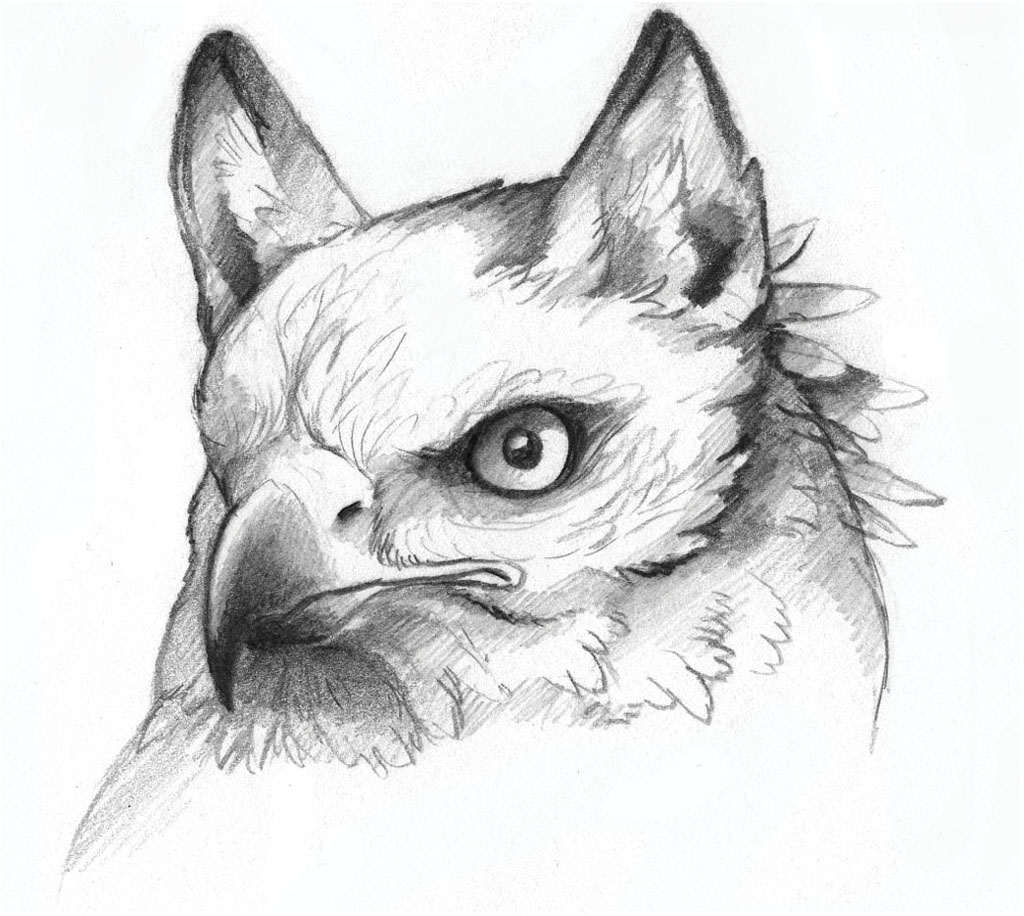
I used a variety of pencils on this gryphon head. The very dark area around the eyes is a 6B, and the very, very light shading is a 4H pencil. I used an HB pencil for the general feather details. For the subtle gradation of the beak, I used a 6B at the very tip, then a 2B, H and 4H at the base. When shading with a hard pencil such as a 4H, try not to push down too hard; otherwise the lead will press lines into your paper. If you want to go darker, use a softer lead, such as an HB. You will find that by using different hardnesses of graphite, your pencil drawings will have deeper and smoother values.
Paints
For most of us, our first experience with watercolors was a small set of watercolor cakes with a small, bristly brush. Watercolors come not only in cakes, but tubes as well. Whats best is you only need a pan with a few colors, some water and brushes, and you can take your paints anywhere! Unlike other paints, such as oils, you dont need odorous chemicals to use them, and unlike acrylics, they dont become dead once dry; add a little bit of water, and your watercolors will spring to life once more.


