If you are an Annies customer and have a question about the instructions on a pattern you have purchased, please visit:
http://www.anniescatalog.com/pages/customer_care/pattern_services.html
Table of Contents
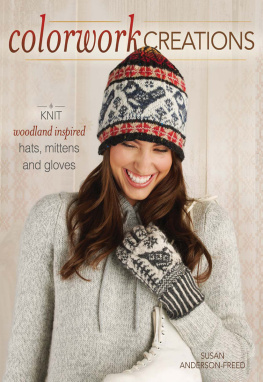
Theres no doubt about itknitting looms are great tools for making hats! But why limit yourself to the same old basic hat? A hat is the perfect small project for spreading your wings and trying something new.
In this book, you will learn some new techniques, stitch patterns and methods that will help you build confidence in your loom-knitting skills. From colorwork to lace and cables, you can take a chance and try something new on a small scale! These hats will give you the opportunity to experiment with a smaller investment of yarn and time.
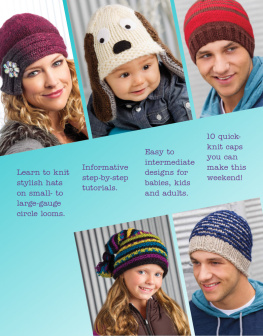
These 10 patterns are written for a range of skill levels, so all loom knittersfrom the beginner to the more experiencedwill find something that is either a quick and easy project or a new challenge. With hats for adults and children and styles ranging from formal to whimsical, this book offers you a hat for everyone on your list!
Sojump in, grab your favorite loom, and knit a hat!
The patterns in this book are written to be used with a variety of large-gauge and small-gauge looms. As such, the patterns should work well with any of the large- and small-gauge looms currently available and many of the classic looms that are no longer in production.
That said, checking the gauge of the loom with your chosen yarn is an important step in the process of making any knitted item. This is the one thing in loom knitting that should not be skipped. Because everyone knits differently, the gauge of the loom itself is actually not as important as you might think.
There are many different things that can affect your gauge including stitch pattern, yarn, color of yarn and other factors like the weather or how you are feeling while you knit!
The loom gauge and recommended loom given in the pattern are key information when deciding which loom to use. With your yarn and loom of choice, work a swatch at least a 6 x 6 inches square. Dont measure the piece until you have bound off the stitches and processed the swatch like you will the final piece. If you plan to block your final piece, then block the swatch.
If the swatch gauge matchesgreat! If not, consider using another yarn. A slightly thicker yarn will yield fewer stitches per inch, and a slightly thinner yarn will yield more stitches per inch. Another trick is to use a different method of forming your stitches, or if you have a loom with interchangeable pegs, use the smaller or larger pegs to change your gauge.
Another consideration when figuring out what loom to use is the number of pegs on the loom versus the number of stitches you will be working. Many of the patterns in this book are written to be knitted flat, so you simply need a loom that gives you the correct gauge and has the number of pegs needed for the project you are making. It can be any style of loom round, rectangular, straight, etc.since the item will be worked back and forth on the loom.
For the projects worked in the round, if you have a loom that has a peg count that is close to the peg count needed (but not exactly the same), all may not be lost. Pay attention to the stitch count in pattern repeats, and see if your loom fits the bill. For example, if the pattern has a 4-stitch repeat and the number of pegs on your chosen loom is divisible by 4 and is also a close match to the number of stitches called for, then you should be fine using that loom. You will simply work a different number of repeats, probably one more or one fewer.
If your loom has just one extra peg (as many of the classic looms have), you can simply work an extra stitch or two into your pattern, and when the time comes to divide the stitches for decreasing at the top of the hat, eliminate that extra stitch to decrease to the even number of stitches you need to make it work.
You can also consider using an adjustable small-gauge loom; these styles of looms are quite flexible and, with optional peg extension kits, can accommodate just about any number of stitches needed. They can also be used in lieu of a large-gauge loom by simply skipping every other peg, or even using two pegs as one as you knit. Again, just experiment and make a gauge swatch and see what works for you! 
The patterns in this book were all made and written as if the loom was being worked in a clockwise direction, so all patterns start at the starting peg on the loom and are worked to the left as the loom is held facing you. However, any pattern in this book can be worked in the counterclockwise direction by simply following the patterns as written.
Casting On
E-Wrap Cast-On Method
Make a slip knot about 6 inches from the end of the yarn. Place it on peg 1.
Starting from the inside of the loom, bring the working yarn between pegs 2 and 3 to the outside of the loom. Continue wrapping peg 2, bringing the working yarn between pegs 2 and 1 to the inside of the loom.
The yarn will cross over itself on the inside of peg 2 as it travels to peg 3.
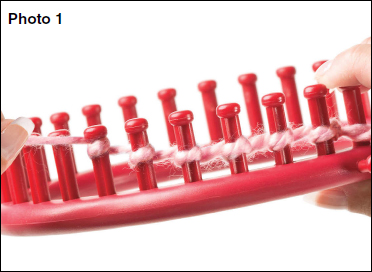
Continue wrapping the pegs until the desired number of pegs have loops on them (Photo 1).
Purl Cast-On Method
Note: This is a 2-row cast-on.
Make a slip knot about 6 inches from the end of the yarn. Place it on peg 1.
E-wrap to the desired number of stitches, minus one.
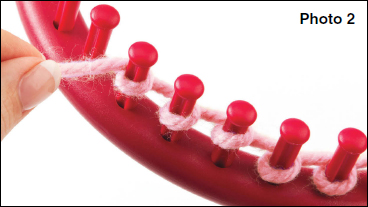
Bring the working yarn between the last wrapped peg and the next empty peg to the front of the loom and then around the far edge of the next peg into the center of the loom (Photo 2).
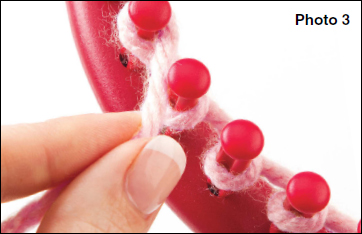
Bring the working yarn back between the two pegs to the front of the loom so that the working yarn is in position to be purled on the first e-wrapped peg on the next row or round (Photo 3).
Purl the return row or round.
Basic Stitches
Knit Stitch
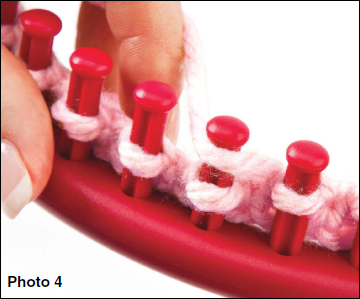
To make a knit stitch without a twist, bring the working yarn to the front of the loom above the previous stitch on the peg (Photo 4).
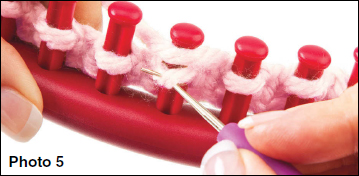
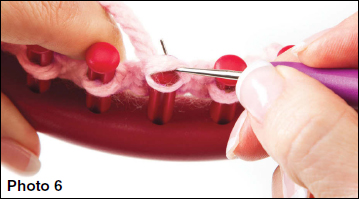
Bring the yarn slightly behind the peg, forming a little hook around the peg, and pull the lower stitch over the working yarn and off the peg (Photos 5 and 6).
Move working yarn to next peg and repeat.
Purl Stitch
Wrap one loop on number of pegs as directed in the pattern.
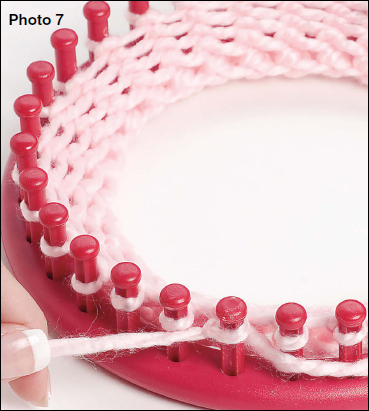
Lay your working yarn across the front of the pegs, just below the first wrapped loop (Photo 7).
