Sign up for the author's New Releases mailing list and get your free copy of 27 Tips + Hacks for New Freelancers.
Click here to get started: www.lisecartwright.com

Copyright 2014 Lise Cartwright
All rights reserved. No part of this publication may be reproduced, distributed, or transmitted in any form or by any means, including photocopying, recording, or other electronic or mechanical methods, without the prior written permission of the publisher, except in the case of brief quotations embodied in reviews and certain other non-commercial uses permitted by copyright law.
Www.outsourcedfreelancingsuccess.com
For queries, please email:
Step 2 - Action List
R EMEMBER , THIS checklist is here to ensure that you don't forget anything and that you follow the process. If you get stuck, circle back to the last step.
:: Step 2 Action Checklist
- Connect with your network and let them know what you're up to (if applicable)
- Join job boards and set up profiles the right way
- Utilise LinkedIn and Twitter to connect with clients
In the next chapter, I'm going to share with you how to pitch clients the right way. We'll look at what you should include in your proposal and how you can ensure to at least land an interview. Let's jump straight to it.
5. STEP 3 - YOUR PROPOSAL
Pitches and Proposals
"THERE IS no try. There is only do or do not." ~ Yoda
IN THIS section, we're going to focus on how to best pitch a client and what to include in a proposal. Because if you don't get this right, no matter how many gigs you apply for, all you'll get in response is crickets. (again, cue chirping noise!)
I don't think I have to say this, but I will. If you can't write a strong proposal or pitch, it's going to be difficult to land a gig with a client, no matter how great your profile or website is.
The art of communicating with clients online requires the ability to communicate well while also getting across what you will provide to a client in less than two pages.
If you disagree with what I've just said, then I think you need to stop right here, rewind and maybe give yourself a bit of a slap!
HELLO - if you can't effectively articulate in your proposal or pitch why a client would benefit working with you, how will you make any extra income and be successful in your new side hustle?
Um, you won't; it's that simple.
Now, before you stress out, I'm going to provide you with some tips on how to write a great pitch or proposal. I'll also provide you access to some actual proposals I've written and a template for you to use going forward.
When writing your proposal or pitch, you want to grab a potential client's attention fast.
Here's how you can do that:
- Be straight to the point - tell them what you're applying for (clarify the position using their words.).
- Use bullet points - list your qualifications and experience in a bullet list. Just provide them the highlights as they relate to the job. They can learn more about you by viewing your profile or website.
- Answer any questions - whether directly asked or implied. Make sure you understand the job, and answer any questions they ask. Failure to do this will result in your landing in the 'no' pile.
Use headings to separate your information. You want your proposal to be easy to skim and digest. If the client needs to know more info or delve deeper, they'll do this by looking at your online profiles and/or website.
These are some of the headings you should include:
- Experience/Qualifications
- What to Expect
- What's Next
Make sure you explain how the client can get in touch with you, and sign off appropriately.
Below is an example of a proposal I sent to a client. You can access a similar template in the Tips and Tools Guide here.
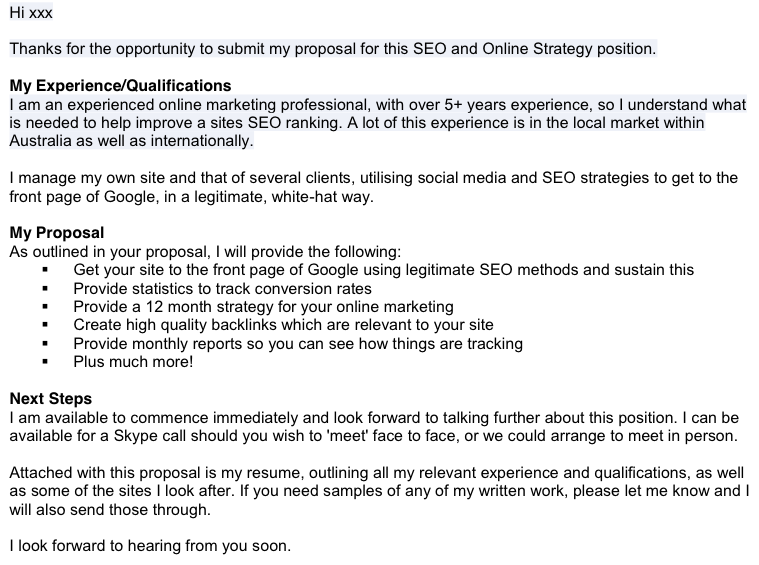
Make sure that you always attach your one-page resume (or online resume) and link to your portfolio items, either through your online profile (if applying via oDesk or Elance) or your website.
The above is what you should include in a proposal when applying via a job board or outsourcing site.
If you're applying via email, i.e., a direct contact, then your pitch will be a little different.
An email pitch consists of 3 different sections:
- Cover letter
- Proposal
- Resume
In an online proposal pitch, your cover letter and proposal are the same thing. But when applying via email, you need to go that extra step to grab the client's attention.
Let's start with the cover letter:
- Use a professional and friendly greeting. If possible, greet the person by first name (if you know it).
- Outline what you're applying for, how you found the job and how you understand the job folding out.
- Use a bulleted list to highlight your experience and qualifications, and also list what you've included as attachments to the email.
- Sign off, making sure that all your contact information is in your email signature.
Once you've nailed the cover letter, you outline your proposal much the same way, but be sure to provide a bit more detail in what the client can expect when working with you as well.
Your resume should highlight the relevant skill set for this position and should definitely be one page.
Make sure all your contact information is included in your resume as well. Include your Skype ID to make it as easy as possible for a client to reach you.
You can find the email template that I use to pitch clients in the Tips and Tools Guide.
Rates
Before we move to the interviewing process, I want to touch on rates a little here.
If your side hustle is a completely new skill, you want to offer your services at a low price for at least the first 3 to 5 clients. After that, you should look to increase your rate with each new client. I used increments of $5 per each new client until I reached my hourly rate of $55.
However, I don't charge myself out at an hourly rate. I charge per project, but it helps to have an idea of what your hourly rate is so you can price projects using that as your base.
I figure out pricing as follows:
- Estimate the number of hours the project will take to complete; for example, let's say it was 5 hours.
- Depending on the level of difficulty, I'll add an extra 2 to 5-hour buffer. Let's say it was 'easy,' then I'd add 2 hours; mildly difficult, I'd add 3 to 4 hours and difficult, the full 5 hours.
- I'll then add 10% on top of that.
Here's how this looks as a calculation:
Estimated # hours + buffer hours + 10% = project fee
Using the figures from above, this would look like: 5 hours (5 x $55) + 2 hours (2 x $55) + 10% = $423.50 project fee
Setting your fees can be a bit tricky to begin with, but if you stick to the formula above, you'll get the hang of it.
For more details on this subject, which I wrote about in June 2014, you can read "Tips on how to set your rates as a new freelancer" now.
Once you've sent your proposal or pitch, you should be available for an interview over the next few days. Watch your email for your client's response!
Interviewing can be nerve-racking the first time around which is why I've prepared some tips on how to make sure you ace your interview.
Next page


