If you are an Annies customer and have a question about the instructions on a pattern you have purchased, please visit:
AnniesCatalog.com/pages/customer_care/pattern_services.html
Templates
To download templates for easy printing, view the download instructions at the end of this book or click the Templates chapter in the Table of Contents.
Introduction
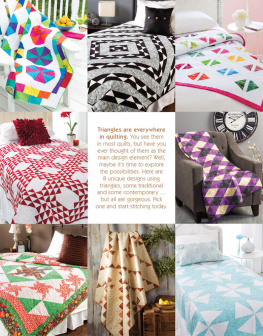
Triangles are so versatile and are a standard unit in quilting. They come in many different sizes and angles. Many of the traditional patterns that use them have been around for years and years. Styles and fabrics change, but triangles remain an important element in quilts. The techniques for making them have also changed. Now there are rulers for easy, accurate cutting, or precise foundation piecing methods along with several traditional techniques. No matter how you make them, they are here to stay. The popularity of triangles tends to ebb and flow. Sometimes theyre everywhere, and sometimes not so much. Todays quilter sees them everywhere.
No matter which way you decide to construct them, including triangle shapes in your quilts can add interest and beauty to them. Trendy Triangles is a collection of eight outstanding designs for todays quilter. These timeless patterns were selected for their unique style and varietypatterns that are in line with trends in the quilting community. Study them and use your imagination to see your own fabric choices in them.
Triangles are an important part of quilt designs and are much easier to construct than you might think. The options are endless, so jump right in!
Enjoy!

Table of Contents
Make this fun and bright quilt with 20 fat quarters and a background fabric. Its easier than it looks.
Design by Gina Gempesaw
Quilted by Carole Whaling

Skill Level
Intermediate
Finished Size
Quilt Size: 58" x 70"
Block Size: 10" x 10" finished
Number of Blocks: 20

Materials
20 assorted fat quarters
yard coordinating stripe
2 yards white solid
Backing to size
Batting to size
Thread
Template material
Basic sewing tools and supplies
Project Notes
Read all instructions before beginning this project. Stitch right sides together using a " seam allowance unless otherwise specified. Refer to a favorite quilting guide for specific techniques. Materials and cutting lists assume 40" of usable fabric width.
Cutting
Prepare a template for the A triangle using pattern given. Mark the dot on the seam allowance at the tip on the template.
From each fat quarter:
Cut 8 A triangles from each fat quarter (160 total) using the prepared template. Stack and pin in matching sets of 4 triangles.
Cut a total of 68 (3" x 6") G rectangles.
From coordinating stripe:
Cut 7 (2" by fabric width) binding strips.
From white solid:
Cut 4 (3" by fabric width) strips.
Subcut strips into 40 (3") squares. Cut each square in half on 1 diagonal to make 80 B triangles.
Cut 1 (10" by fabric width) strip.
Subcut strip into 15 (1" x 10") C strips.
Cut 5 (1" by fabric width) D strips.
Cut 3 (2" by fabric width) E strips.
Cut 3 (3" by fabric width) F strips.
Cut 2 (3" by fabric width) strips.
Subcut strips into 4 each 3" x 8" J strips, 3" x 6" H strips and 3" I squares.
Heres a Tip
Block pieces are cut on the bias. To help prevent stretching of pieces during piecing, apply spray starch or sizing to the wrong side of fabrics before cutting.
Completing the Blocks
To complete one Surfside block, select two different-color sets of four matching A triangles and four B triangles.
Join one A triangle from each fabric to make an A unit, stopping stitching at the inside point on the marked dot as shown in Figure 1; press. Repeat to make a total of four A units.

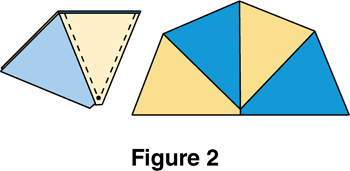
Join two A units to make half the block, again stopping at the marked point as shown in Figure 2; press. Repeat to make the second half of the block.
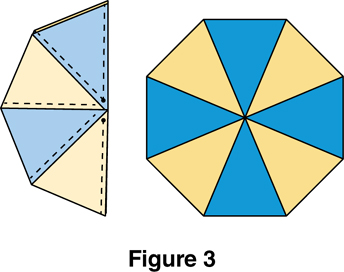
Join the two block halves, stopping stitching at the marked dots to complete the center section as shown in Figure 3.
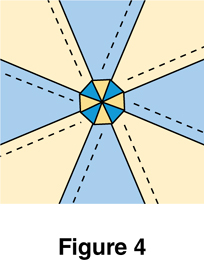
Press the center points to reduce bulk as shown in Figure 4 and in Spinning Centers to Reduce Bulk on page 8.
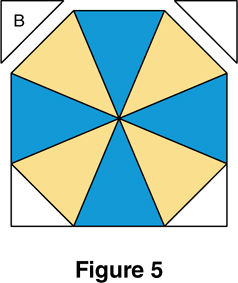
Sew a B triangle to each corner to complete one Surfside block as shown in Figure 5; press.
Repeat steps 16 to complete a total of 20 Surfside blocks.
Completing the Quilt Top
Refer to the Assembly Diagram for row piecing and arrangement as needed.
Arrange and join four Surfside blocks with three C strips to make a row; press. Repeat to make a total of five rows.
Join the D strips on the short ends to make a long strip; press. Subcut strip into four 1" x 44" D strips.
Join the pieced rows with the D strips to complete the quilt center; press.
Join the E strips on the short ends to make a long strip; press. Subcut strip into two 2" x 55" E strips. Sew these strips to opposite long sides of the quilt center; press.
Join the F strips on the short ends to make a long strip; press. Subcut strip into two 3" x 48" F strips. Sew these strips to the top and bottom of the quilt center; press.
Select and join 10 G rectangles on the short ends to make a pieced side strip; press. Repeat to make a second pieced side strip. Sew these strips to opposite long sides of the quilt center; press.

Select and join eight G rectangles with two I squares to make a pieced top strip; press. Repeat to make a pieced bottom strip. Sew these strips to the top and bottom of the quilt center; press.
Select and join nine G rectangles and add an H rectangle to each end to make a pieced side strip; press. Repeat to make a second pieced side strip. Sew these strips to opposite sides of the quilt center; press.
Select and join seven G rectangles and add a J strip to each end to make the pieced top strip; press. Repeat to make the pieced bottom strip. Sew these strips to the top and bottom of the quilt center to complete the quilt top.

