Learn How to Draw
Landscapes with Colored Pencils
For the Beginner
Jasmina Susak
And
John Davidson
~~~
Smashwords Edition
Learn to Draw
Book Series
JD- Biz Publishing
All Rights Reserved.
No part of this publication may be reproducedin any form or by any means, including scanning, photocopying, orotherwise without prior written permission from JD-Biz Corp and at http://JD-Biz.com . Copyright 2013
Smashwords Edition, License Notes
This ebook is licensed for your personalenjoyment only. This ebook may not be re-sold or given away toother people. If you would like to share this book with anotherperson, please purchase an additional copy for each recipient. Ifyoure reading this book and did not purchase it, or it was notpurchased for your use only, then please return to Smashwords.comand purchase your own copy. Thank you for respecting the hard workof this author.
All Images Licensed
By: Jasmina Susak and 123rf.com
Learn How to Draw Books for The AbsoluteBeginner
Table of Contents
Introduction:
Drawing with colored pencil is super easy ifyou use the right colors and have drawn a good sketch. Unlike thegraphite pencils, colored pencils cannot be easily erased, so wehave to draw carefully, particularly the darker areas. Always drawa parts with colored pencil pressing down lightly and if it looksgood, color over the same area pressing down hard. Buy good brandof colored pencils and smooth paper. If you don't have a lot of sayred pencils, you can get more nuances with only one pencil, bycontrolling how hard you press when you draw. In the image belowI've drawn with one red pencil three nuances. In the first exampleI pressed hard, in the second I pressed normally and in the thirdexample I pressed lightly. Even more nuances can be created thisway:

Blending:
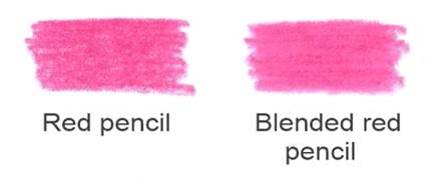
With colored pencils is difficult to make asmooth drawing, even when you draw on the smoothest paper, so youcan use a colorless blender or, like me in these tutorials, whiteand/or gray colored pencils. Be careful when blending the blackareas, don't go over them with white pencil because will get someyellow nuance. For blending the parts colored with black pencilrather use light or dark grey pencils. In the image below I want toshow you how it looks with normal red pencil without blending(left) and after adding a layer over with white pencil (right). Youcan see that the right example is smoother than the leftexample:
Mixingthe colors:
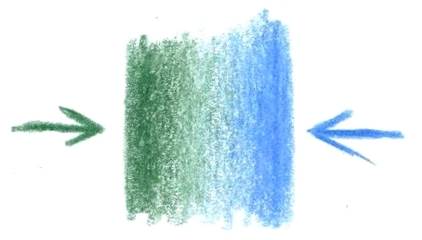
Some areas in drawing has to be blurry, forexample: something that's farther away, in a water or something inmotion. These areas cannot have a sharp edges and here we have tomake the things blurry, drawing the colors into each other. In theimage below, I've shown you an example of such a drawing. As I drewwith green pencil, I gradually reduced the presing, and from otherside I drew with blue pencil draw it toward green also reducing thepressing of my hand. This way I achieved the blurry edge betweengreen and blue. See an image below and try the same with othercolors. Finally blend this all with colorless blender or with whitecolored pencil.
Drawing the shadows:
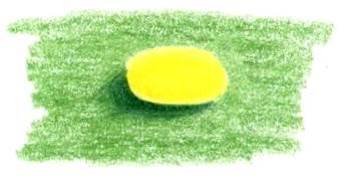
For making the shadows under anything use thedarker nuance of the shadowed area. In my example below you can seethat I used the dark green for shadow on the light green. Try thesame with other colors and use the darker nuance of that or pressharder. Also don't be afraid to use a black colored pencil forshadows on the brown or gray areas. For getting even better resultuse the darker nuance than used for shadow, and draw a thin linedirectly under the thing:
Proportionality:
If you want to draw in realistic style, youshould make it proportionally. As a first, draw a main lines withHB graphite pencil and don't press hard because these lines have tobe erased during the process. To get the good, proportional sketch,I recommend you to use a grid, which almost every artist uses. Drawa grid over the reference photo and draw a grid on a paper. Drawthe same lines from squares of reference photo in the squares ofyour paper (see an example below):

Sunsetin Africa - drawing tutorial:
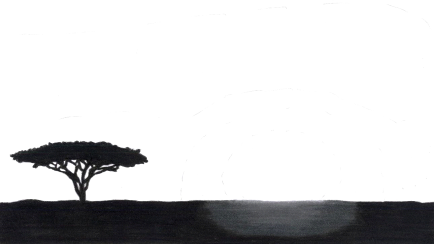
Let's start with simple landscape, which hasonly few color. As a first draw a main lines using grid:
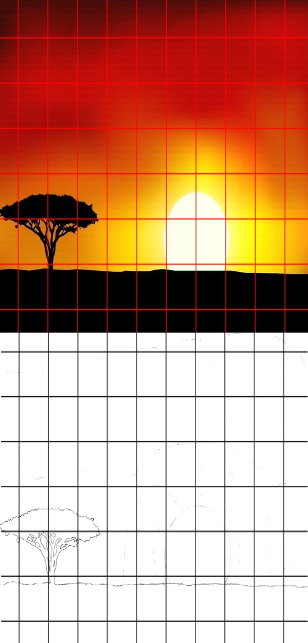
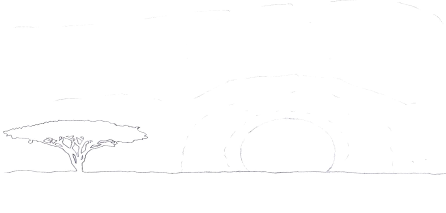
After erasing the grid your sketch shouldlook like the sketch below. You can see that I've made a stronglines only for black areas and light sketch lines for the partsaround the sun and among the lighter colors. If we press too hardwith pencil drawing the sketch, those lines would be still visibleafter erasing them. In this case we have only light lines and theyyet can help us to know where to draw with colors.
Blackparts:
With black pencil draw the tree and theground. Draw once pressing light and if it looks good draw overmore times till get an absolute dark:
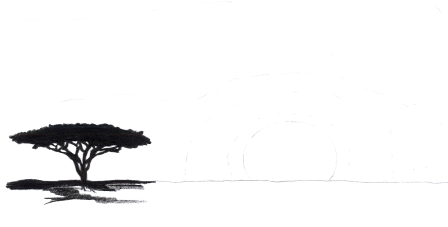
Draw away with black pencil pressing hard. Asyou can see in reference photo, every part of the ground isabsolute black and it looks like a vector drawing rather thanphoto, but I want to make it more realistic, so I leave an areaunder the sun for the next step:
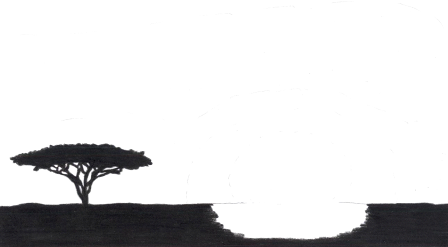
Now with dark gray pencil draw this area anddirect to the sun draw with light gray pencil. Blend all the edgesamong nuances with dark or light gray pencil. Do not use whitepencil for blending these, because white pencil leaves some yellownuances when drawn over the black. Also you can buy and use acolorless blender for blending any color:
