Imagine waking up to the tantalising aroma of freshly baked bread filling your home! Next, picture yourself cutting thick slices of crusty bread to serve with cheese and a glass of wine. Or how about a buttery croissant to accompany your cappuccino, chewy bagels to serve with smoked salmon, or soft pitta bread for the childrens packed lunch. Wishful thinking? Not when you have a bread machine. You can enjoy these simple pleasures each and every day and all at the push of a button or two.
If you have ever felt nervous or intimidated by the thought of making your own bread, a bread machine is definitely for you. It transforms what can seem like a laborious, time-consuming and skilled process into a spectacularly easy affair. Until recently, I too was a reluctant maker of bread on the one hand eager to experience the tactile and therapeutic pleasures it can bring; on the other hand desperately short of time. Now that I have a bread machine, we enjoy fresh bread every day and see little need to buy mass-produced loaves ever again.
When I was first asked to write this book, I confess to having questioned the wisdom of the idea. After all, bread machines are usually supplied with their own recipes recipes that, in my opinion, produce bread that is far superior to any mass-produced loaf.
I put several machines to work on their basic recipes and soon discovered that many of them used what seemed like large amounts of yeast, salt, sugar, fat and dried milk powder. It made me wonder if they were really necessary to make a good loaf of bread, and what would happen if I reduced or omitted one or all of them. So I went back to basics, visiting flourmills and talking to expert bakers. They reminded me that traditional bread (in other words, bread made by hand with wholemeal, brown or unbleached white flour and baked in the oven) needs only flour, water and small amounts of yeast and salt. My next step then was to take these four natural ingredients and put them in the bread machine to make a delicious loaf (the resulting recipe appears on page 40). I soon concluded that it mattered little to me if a loaf did not rise spectacularly high, look perfectly uniform or stay fresh for a long time. What I was seeking was freshly-baked well-risen bread (the sort that just begs to be eaten), made with minimum ingredients, having a lovely texture and a delicious flavour, and looking obviously homemade. This became the foundation for my section on everyday loaves.
As my baking progressed I learned that sugar, fat and milk powder can, and do, have roles to play in bread making, and explanations appear on pages 21 and 22. In my recipes, they feature to a small degree in the section on flavoured breads (page 55) and to a larger degree in hand-shaped doughs (page 75). In all instances however, they are included only when I believe their addition improves the finished result or when the recipe would not be traditional without them.
As well as plenty of recipes, I have put together all the information you need to get the best out of your bread machine. Within these pages you are likely to find answers to all your questions too, and much more besides.
In the writing of this book, I have sought the help of many. In particular, I would like to thank the following companies for supplying me with bread machines with which to test the recipes: Panasonic, Russell Hobbs, Breville, Morphy Richards, Prima and Hinari. My thanks also go to Shipton Mill, Doves Farm and Allinson for their advice on flours, and to Mike Hall, the miller at Y Felin, a twelfth century watermill at St Dogmaels in west Wales. Finally, I am most grateful to my publishers for their patience in allowing me plenty of extra time to test all the recipes several times over.
Enjoy using your bread machine and have fun trying out the recipes in this book. Happy button pushing!
Annette Yates
A BAKERY AT HOME
(OR ALL ABOUT BREAD MACHINES)
Using a bread machine is simple you just add the ingredients to the bread pan, close the lid, choose your program and press the Start button. Without any more effort from you, it will automatically mix, knead, prove and bake the bread.
WHAT TO LOOK FOR IN A BREAD MACHINE
A bread machine is best left on the kitchen worktop, ready for use at any time (mine is used at least once most days). So consider the space you have available and the shape and style that will best fit into your kitchen.
Bread machines are available in many shapes and sizes in white, black or stainless steel and with a variety of features. Though they all work in the same way, inevitably some are better than others. Of course, its worth remembering that you are unlikely to be in a position where you can compare the results of one machine with another, so as long as YOUR machine produces bread that you and your family enjoy, thats all that matters.
A bread machine is basically an insulated box with a hinged lid. The main body contains the working parts, including the motor, the heating elements and the control panel. Inside, a removable non-stick bread pan (with a handle) locks into position. In the pan is a non-stick kneading blade that fits on to a rotating mounting shaft. Some larger models have two kneading blades, each fitted to its own mounting shaft.
The shape and size of the bread pan dictates the shape and size of the bread. When buying your first machine, it may be tempting to buy a small model but remember that small ones are unlikely to be able to make large loaves while larger machines can usually make small loaves. The most versatile machines are those that will make three sizes small, medium and large.
The lid usually has an air vent to allow steam to escape. Sometimes a window is fitted in it, enabling you to view the bread as it cooks. In my experience, machines with a large window tend to produce bread with a slightly softer and paler top crust than those with a small or no window.
At the time this book is going to press, I have found that machines with the longer programs are the ones that consistently produce the best bread. Longer programs give the yeast plenty of time to do its work and make the bread rise. An added bonus is that the slower the bread rises, generally the better is its flavour. The best machines have programs that take 3-4 hours for white bread, 4-5 hours for wholewheat bread, 2-2 hours for white dough and about 3 hours for wholewheat dough. Though these may seem long, remember, the bread machine is doing all the work while you get on with other things (just like a washing machine cleaning your clothes imagine how much time and effort you would need to do it by hand). Bread machines with shorter programs can be good too they usually require the addition of lukewarm liquids in order to speed up the rising process.
Most bread machines are supplied with a measuring cup and measuring spoons.
When choosing a bread machine for the first time, look for a well-written instruction book with enough basic, and not-so-basic, recipes to get you started. The best machines have a good back-up service too, in case you need help and advice.
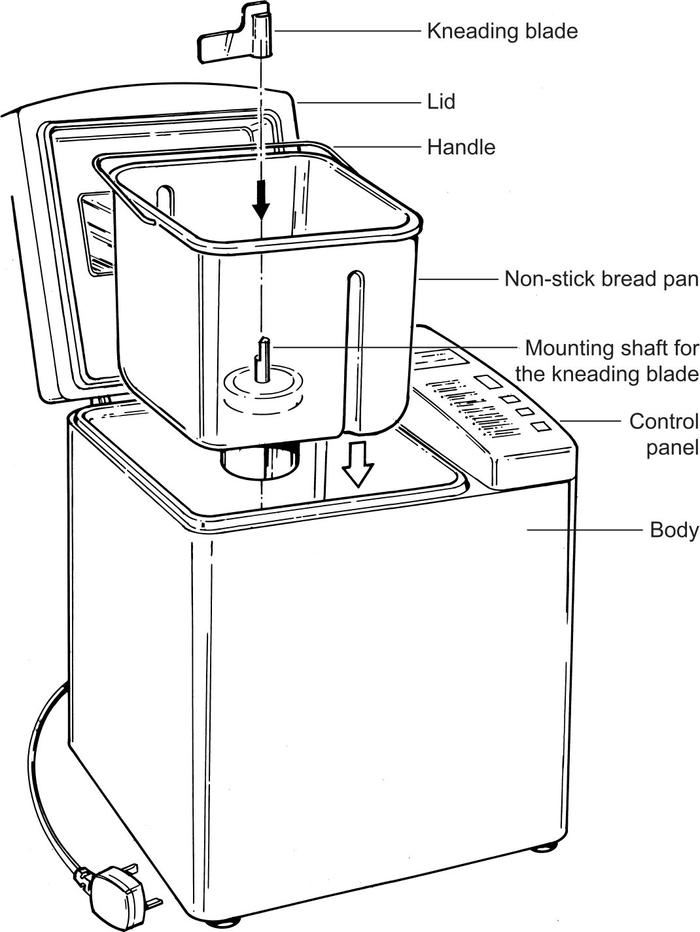
A typical bread machine.
Power Failure
Good bread machines incorporate built-in safety devices that allow for a short break in power supply (if the machine is accidentally switched off or in the event of a brief power cut) as well as an automatic cut-out to stop the machine if the kneading blade is prevented from turning (by dough that is too dry and heavy for example).

