Chapter 1: Nail Anatomy
Hey Guys, if you are struggling with where to begin on your acrylic nail journey, hopefully this eBook will help you along the way
First, it is important to have a clear understanding of your Nail Structure.
Please look at the diagram below and compare it to Your finger so that you can know the correct terms as they relate to the natural nail.
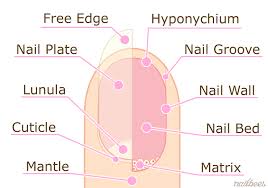
- Free Edge- This is the end of the nail plate that extends past the fingertip that is shaped during Nail Services.
- Hyponychium- The portion of skin at the end of the finger underneath the free edge, where the nail plate separates from the skin.
- Nail Grooves- The grooves on the skin at the sides of the free edge, and the nail follows the line as it grows.
- The Nail Plate- This is the visible portion of the nail that sits on top of the nail bed. It is made by Keratinization; the change of living cells to hard dead cells, and it consists of carbon, hydrogen, oxygen, sulfur, and nitrogen.
- Nail Walls- These are the folds of skin where the nail is still attached.
- Nail Bed- The part of the finger underneath the nail plate.
- The Lunula- The Moon shaped point where the matrix and nail bed meet.
- Cuticle- The overlapping skin surrounding the nail. Its job is to protect the matrix from invading bacteria and physical damage.
- The Matrix- This is where the nail is made. It is the only living part of the nail and contains nerves and blood vessels so that cell reproduction can occur.
Chapter 2: Acrylic Nail Supplies
To Perform Acrylic Nail Services, you will need the following supplies:
- Monomer Liquid- This Liquid will be combined with polymer powder to form the acrylic nail. The amount of liquid and powder used to create a bead is called the Mix Ratio. A bead mix ratio can be best described as Dry, Medium, or Wet. If equal amounts of liquid and powder are used to create a bead, it is called a Dry bead. If twice as much liquid as powder is used to create a bead, it is called a Wet bead. Halfway between these two is a medium bead, which contains one-and-a half more liquid than powder. In general, medium beads are the ideal mix ratio for working with liquid and powders.
The mx ration ensures maximum strength of the acrylic nail enhancement. If
too much powder is picked up in the bead, the acrylic will cure (harden)
incorrectly and may lead to brittleness and/or discoloration. If too little
powder is used, the nail enhancement can become weak, and the risk of
clients developing skin irritation and sensitivity may increase.
Remember: You should always use products in accordance with the manufacturers instructions. If youre not sure about how to use the products, contact the manufacturer.
- Polymer Powder- Polymer powder is available in a variety of colors and specialty mixes (glitters or add-ins). The color you choose will depend on the Acrylic Nail enhancement method you choose.
- Nail files- Select a medium grit (180 to 240) for Natural Nail prep and initial shaping. And a Course grit (100) for Acrylic only. Do NOT use a 100-grit file on the Natural nail . It could cause severe damage to the nail plate.
- Buffer- Choose a fine Buffer (350 grit or higher) for final buffing. A Three-way buffer is used to create a High Shine on the enhancement when No polish is worn. If you avoid putting the product on too thickly, a 180-grit file is usually enough to shape the acrylic nail enhancement.
- Nail Glue- As a beginner, I would recommend a Brush-on nail glue because you can brush on the right amount of glue in an even layer and it can adhere to the natural nail without any gaps.
- Nail Dehydrator- Nail dehydrators remove surface moisture and oil left on the natural nail plate, (which can lead to lifting if oil remains) The nail dehydrator should be applied only on the natural nail plate Avoiding skin contact, before applying primer.
- Nail Primer- There are two types of primer. Acid-Based primer (methacrylic acid) is corrosive to the skin and dangerous to the eyes. These are rarely used today. Strict caution must be used with this primer. Read the manufacturers instructions and refer to the MSDS for safe handling recommendations and instructions. Non-Acid and Acid-Free primers are less corrosive and dangerous to the nail, but skin contact should be avoided, and the manufacturers instructions should also be followed.
- Nail Tips- These are Pre-Formed nail extensions made from ABS or Plastic and are available in a variety of shapes, styles, and colors.
- Dappen Dish- You will need 3 The Liquid and Powder are each poured into a special holder called a dappen dish. Each time the brush is dipped into the dappen dish, the remaining monomer liquid is contaminated with small amounts of powder. So Never pour the unused portion of liquid back into the original container Empty the monomer liquid from your dappen dish after the service and wipe it clean with a disposable towel. To avoid skin irritation, do not contact skin with the monomer liquid during this process. Wipe the dish clean with acetone, if necessary, before storing in a dust-free location.
- Acrylic Brush- The Best brush to use for acrylic applications consists of Sable hair or Natural hair fibers and they are usually oval, round, or flat shaped. Synthetic and less expensive brushes do not pick up enough liquid or do not release the liquid properly. Choose the brush shape and size that you feel most comfortable. Also Make sure that the brush is an Acrylic brush. There are many different types of brushes.
Heres a Tip: Avoid wiping your brush too hard or rapidly against a table towel. This can press hairs against the sharp edge of the metal that holds the hairs in place and cut them off.
- Safety Eyewear- (Optional but important) Safety eyewear should be used to protect your eyes from flying objects or accidental splashes.
True Story: Over the years I have had Acrylic, Rhinestones, etc. fly into my eyes accidently. So Please, Protect your Eyes. Youre going to need them to see! Lol
- Dust Masks- Dust Masks are designed to be worn over the nose and mouth to prevent inhalation of excessive amounts of dust. They provide no protection from vapors.
- Gloves- Disposable Gloves can be purchased and used during acrylic nail services
- Acetone- A powerful solvent used to remove polish/acrylic enhancements. It is very harsh on the skin, so please avoid contact because it can dry the skin. Also keep in a well-ventilated area . It is very flammable.
- Tip Cutters / Nail Clippers / Scissors- Used to cut the Length of the artificial nail enhancement (Nail Tip)
- Paper Towel- Used to Clean your brush during the acrylic application. I recommend an absorbent brand so that your acrylic brush can be cleaned properly.
- Plastic Manicure Brush- I recommend a Plastic manicure brush to remove all dust from the nails during the acrylic application. I prefer the plastic brush as opposed to a duster because you can easily sanitize the plastic brush (the duster cannot as easily) and the plastic brush will not leave residue on the nail plate. (It is a great implement to use to avoid lifting)
Next page
