Linux Photography
Linux Photography
Tools for automated and streamlined photographic workflow on Linux
Dmitri Popov
Coffee, Code, Camera
2016-2020, Dmitri Popov, CC BY-NC-SA 4.0
Colophon
Copyright Dmitri Popov 2020
This work is licensed under the Creative Commons Attribution-NonCommercial-ShareAlike 4.0 International license.
Cover photo: Ikebukuro, Tokyo, Japan, May 2016. SONY NEX-3N, SONY E 18-55mm f/3.5-5.6 OSS SEL1855. Processed in digiKam.
About the author

Dmitri Popov has been writing exclusively about Linux and open source software for many years, and his articles have appeared in Danish, British, US, German, and Russian magazines and websites. He regularly contributes to PIXLS.US, and you can find more about his work on his Coffee, Code, Camera website.
About this book
This book provides practical examples of automating the key stages of a Linux-based photographic workflow using minimalist and specialized tools to manage, process, publish, and back up photos. The book demonstrates how to harness the power of Bash shell scripting to automate the process of transferring, renaming, and organizing photos. Youll also learn how to use gThumb to manage and edit images, process RAW files in Darktable, implement an automatic cloud backup system, build a mobile backup device, and host your own photo gallery. Understanding the books material requires a working knowledge of Bash and Linux. The book assumes that you are using Debian or openSUSE Linux distribution with sudo enabled and configured.
Import photos and RAW files with Photo Funnel
When it comes to transferring photos and RAW files from a camera to a regular Linux machine, you have plenty of tools at your disposal: from digiKam to Rapid Photo Dowloader. But in case you are looking for something more simple and straightforward in use, Photo Funnel might be right up your alley.
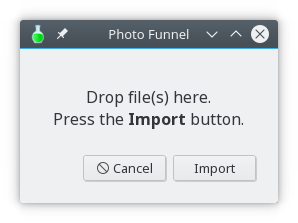
Photo Funnel is a simple graphical tool that allows you to import, geotag, and organize photos and RAW files. When running, Photo Funnel displays a drag-and-drop panel. Drop the photos and RAW files you want to import on to the panel, press Import, and the utility takes care of the rest.
During the import operation, Photo Funnel writes useful information (copyright, camera model and lens) into the appropriate EXIF fields.
Installing Photo Funnel is a matter of running the curl -sSL https://is.gd/photofunnel | bash command. On the first run, it prompts you to specify copyright notice and a target directory for storing the transferred files.
The configuration procedure is done only once, and the provided values are stored in the ~/.pf file. If you need to change the saved values later, edit the .pf file in a text editor.
Using Photo Funnel couldnt be easier. First, insert and mount a storage card on your machine. Launch then Photo Funnel either by using the Desktop launcher or by running the pf command. Select the photos and RAW files on the storage card, drop them on to the designated area of the Photo Funnel panel, and press Continue. Enter the city where the photos were taken, press OK, and wait till the transfer operation is finished. Youll then find the transferred photos in the specified destination directory renamed, geotagged, and neatly organized into folders by date.
Import and organize photos with Otto
Moving files from a storage card or an external storage device to a NAS is usually a rather straightforward affair. But if you want to teach your NAS a few clever tricks, Otto is just the tool for the job. Install it on your NAS, and you can use the appliance to transfer photos and RAW files as well as rename and organize the transferred files, and even write useful information into EXIF metadata.
Before you deploy Otto, you need to install several tools on your Linux-based NAS. Most NAS models dont allow you to install third-party packages out of the box. Fortunately, the Entware project provides a solution to the problem. Install the Entware app on your NAS, and youll instantly get access to a wide range of popular Linux tools and utilities. The Entware project offers a compiled app for several mainstream NAS models, including ASUSTOR, Synology, and QNAP. If you happen to use the latter, grab the appropriate .qpkg package from the Install on QNAP NAS page. On the NAS open App Center, click the Install Manually button in the upper-right corner of the main window, select the downloaded .qpkg package, and press Install.
Next, establish an SSH connection from your regular machine to the NAS. Run the opkg update command to update the list of available packages. Install then the required packages using the following command:
opkg install getopt bc jq curl perl-image-exiftool git git-httpIf you want to be notified when Otto has finished importing and organizing photos, install the Simple Push app on your Android device, run the app, and note the unique token.
Deploying Otto on the NAS is a matter of switching to the desired directory (e.g., /share/homes/admin) and cloning the projects Git repository:
git clone https://gitlab.com/dmpop/otto.gitThe QNAP NAS can handle practically any other mainstream file system, including NTFS, Ext2, Ext4, etc. So when you connect a supported external storage device, the appliance automatically detects and mounts it. To find the directory where the device is mounted, run the mount command and note the path to the directory (it may look something like this: /share/external/DEV3301_1).
Unfortunately, QNAP NAS appliances dont support the exFAT file system out of the box. And if you want to use an exFAT-formatted external storage device with your QNAP NAS you need to purchase a license. However, if you dont mind manually mounting external storage devices and you dont want to waste money on something that should have been included with the NAS by default, Entware got you covered. Run the opkg install exfat-fuse lsblk command to install the required packages. Connect then an exFAT-formatted device to your NAS, run the lsblk command, and note the device name and path of the connected storage device (e.g., /dev/sdc1/). Use the command below to mount the device in the /root/media/ directory (you need to create the mount directory if it doesnt exist):
mount.exfat-fuse /dev/sdc1 /root/media/By default, Otto works with photos and RAW files that have the JPG and ARW extensions. To change that, open the otto.sh script for editing and modify the values of the EXT and RAW variables.
With all the pieces in place, you are ready to run the script. Plug in a storage card into your NAS, and make sure that the card has been mounted. The Otto command has the following format otto.sh -d -g , where directory is the absolute path to the root directory of the storage card and city is the name the of the city where the photos where taken. If your photos are already geotagged, you can omit this parameter. For example:

