ADOBE PHOTOSHOP CC ADVANCED AND BASICS OF PHOTO EDITING TECHNIQUES
BY MARK MYERS
Copyright 2018 Mark Myers
All rights reserved. no part of this guide may be reproduced, stored in a retrieval system, or transmitted, in any form or by any means, electronic, mechanical, recording, or otherwise, without the prior written permission of Author Mark Myers
CONTENTS
BASICS OF PHOTOSHOP
CHAPTER 1 INTRODUCTION TO ADOBE PHOTOSHOP
CHAPTER 2 Basic Photo EDITING , Retouching and Corrections
CHAPTER 3 WORKING WITH IMAGES EDITING , CROP
CHAPTER 4 LAYER CREATING BASICS
CHAPTER 5 DRAWING SHAPES AND PATHS
CHAPTER 6 CLIPPING Masks and Channels
CHAPTER 7 Vector Drawing Techniques
CHAPTER 8 WORKING WITH SELECTION TOOLS
CHAPTER 9 VIDEO EDITING IN PHOTOSHOP
CHAPTER 10 APPLYING EFFECTS
CHAPTER 11 SAVING FOR WEB
CHAPTER 12 SAVING AND EXPORTING FILE FORMATS
Introduction
Adobe Photoshop CC is a photo editing program that pushes the
boundaries of digital imaging and editing. While widely used by professional photographers as well as web and graphic designers,
Photoshop can also provide a creative outlet for amateurs, enthusiasts, and artists alike. This handout covers the basics of which includes maneuvering through the interface as well as
editing, saving, and printing images. The lessons incorporate new features found in Photoshop CC
However, many of the techniques can also be used in previous versions of Photoshop.
New Features of Photoshop
Adobe has added many new features to Photoshop CC, al owing you to go even further when editing
photographs. Some of the new features of Photoshop CC are improved guides which let you quickly see the distance in pixels between objects so you can lay out content with precision, and the editable
rounded rectangles which let you resize shapes, edit them, and re-edit them before or after they are created. The Perspective Warp feature lets you easily adjust perspectives in images. For more information, visit the Adobe Photoshop CC New Features p age.
Downloading the Data Files
This handout includes sample data files that can be used to fol ow along the steps. If you plan to use the data files, download the fol owing ZIP file to your computer and extract the files. It is recommended to save the data files on your desktop for easy access.
A Part 1 Data Files
Starting Photoshop
The following steps cover how to start using the computers in the ITS Training
Program computer labs. The steps for starting the program on other computers may vary.
To start in Windows 10:
- Click the Start button, click All apps , and then click .
Opening Files in Photoshop
Photoshop works with digitized images which can come from a digital camera, a scanner, other drawing programs, or captured video stil s. Once the desired digital image has been imported to a computer, you can open it in Photoshop for further viewing and editing.
To open a file in Photoshop:
- Click the File menu, and then click Open (see
- In the Open dialog box, navigate to the Data Files folder, select the earth_and_moon.jpg file, and then click the Open button.
- Repeat steps 1 and 2 to open
Figure 1 File Menu When Selecting Open
the red_moon.jpg file.
2 |

Navigating through Photoshop
The best way to become familiar and comfortable with any workspace is to explore and practice.
Furthermore, learning to maneuver through wil give you a head start when learning how to use other Adobe CC 2015 programs with a similar interface (e.g., InDesign, Illustrator, or Flash).
Workspace Overview
The work area, or workspace, includes menus, toolbars, and panels that give you quick access to an
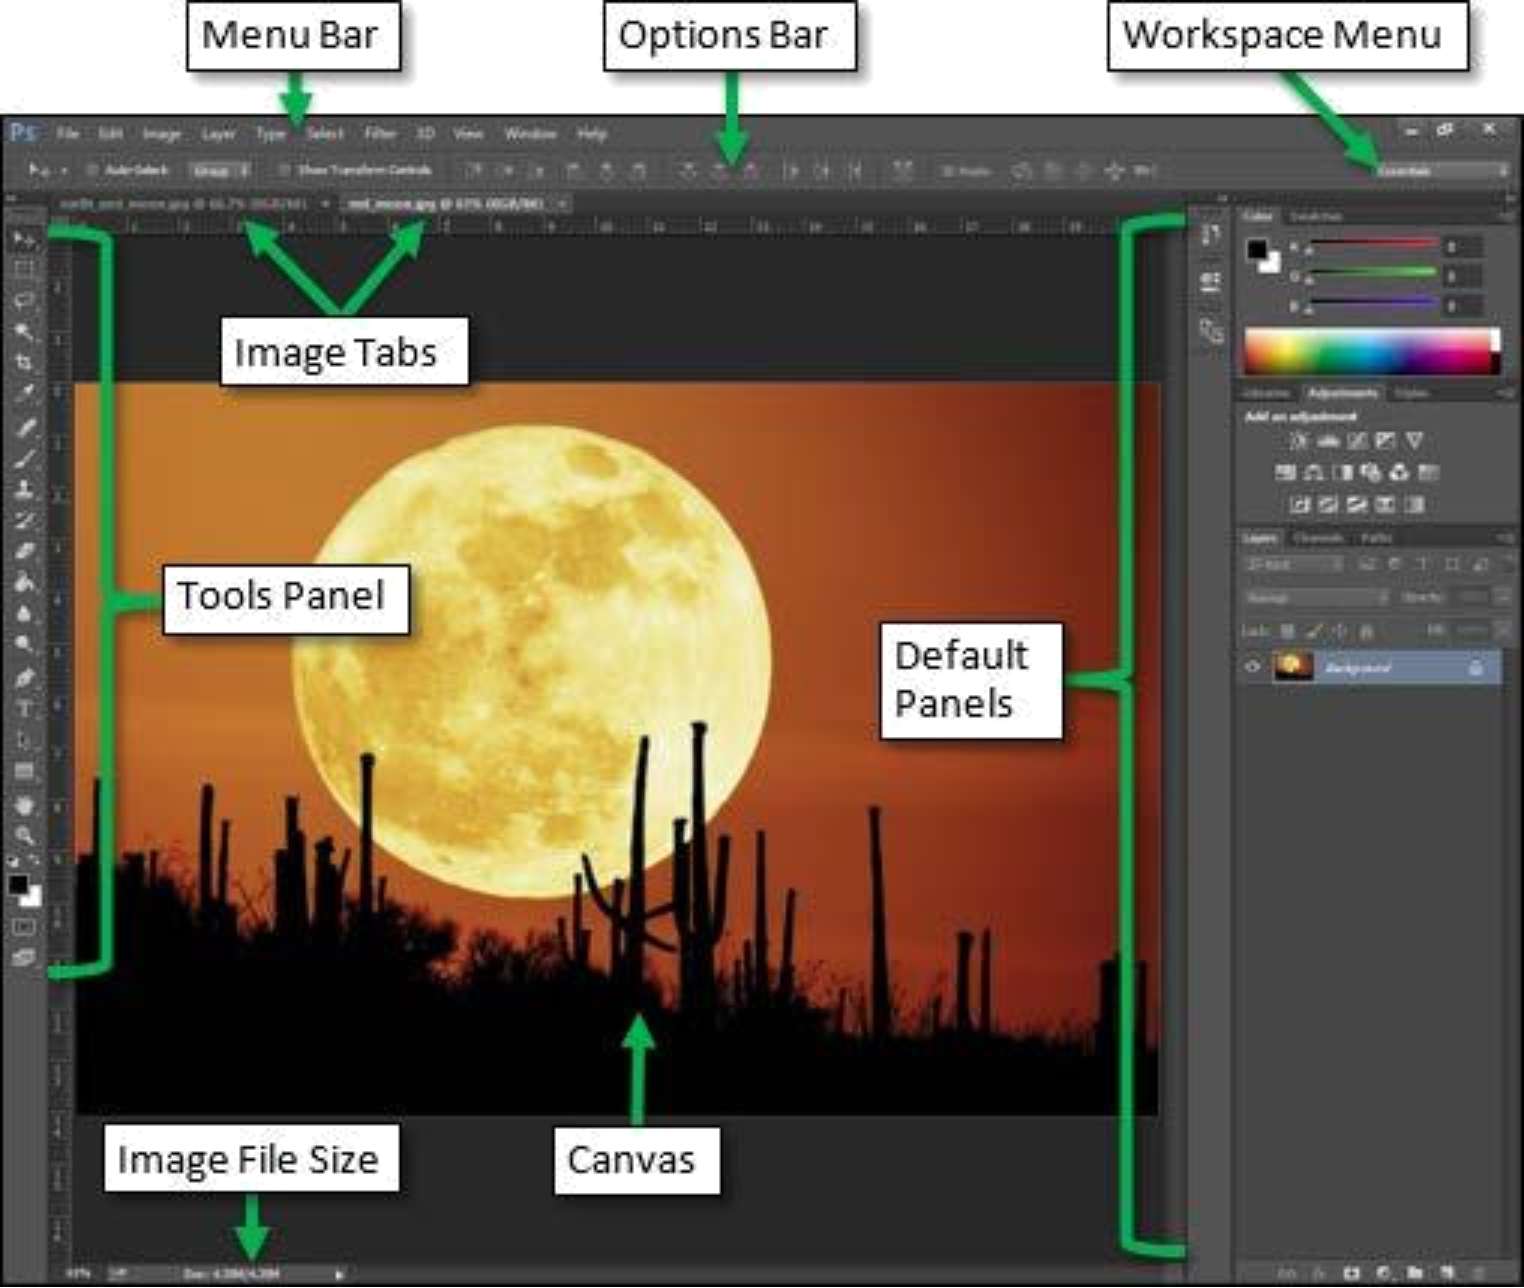
array of tools and options for editing and manipulating images and graphics. The default workspace in Photoshop displays the Menu and Options bars at the top of the window, the Tools panel on the left side of the window, and several other panels on the right side of the window (se .
Figure 2 Default Workspace
Changing the Workspace
Not all projects utilize the same tools and panels. Therefore, Photoshop includes a number of preset workspace layouts which cater to certain types of projects, as wel as the option to customize ones own workspace.
To select a preset workspace:
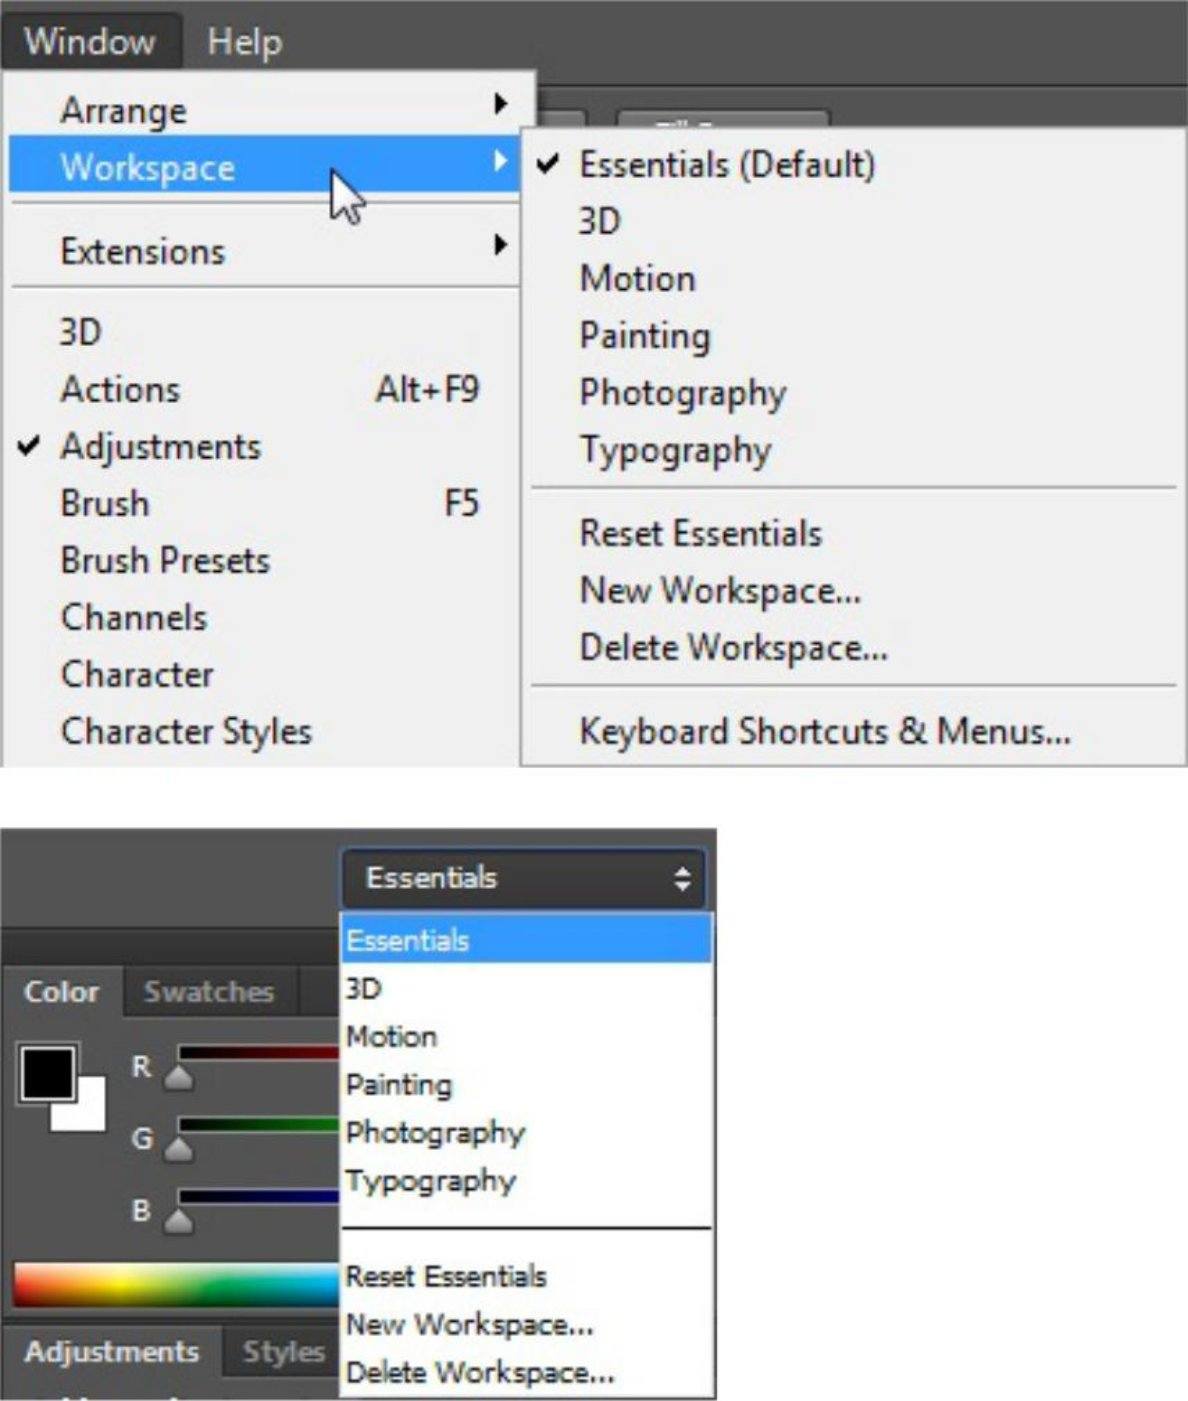
- Click the Window menu, point to Workspace , and then click Typography (see
To return to the default workspace:
- Click the Window menu, point to Workspace , and then click Essentials (Default) (see
3 |


NOTE : Another way to switch from one workspace to another is to use the Workspace menu located on the right side of the Options bar, above the default panels (see
Figure 4 Workspace Menu
Figure 3 Window Menu and Workspace Submenu
To customize and save a workspace:
- Use the Window menu to add and remove the desired panels. Resize and position the panels within the workspace as desired.
NOTE : A check mark next to a panel name on the Window menu indicates that the panel is open. Selecting a panel name with a check mark closes that panel; selecting a panel name
without a check mark opens that panel.
2. Click the Window menu, point to Workspace , and then click New
.
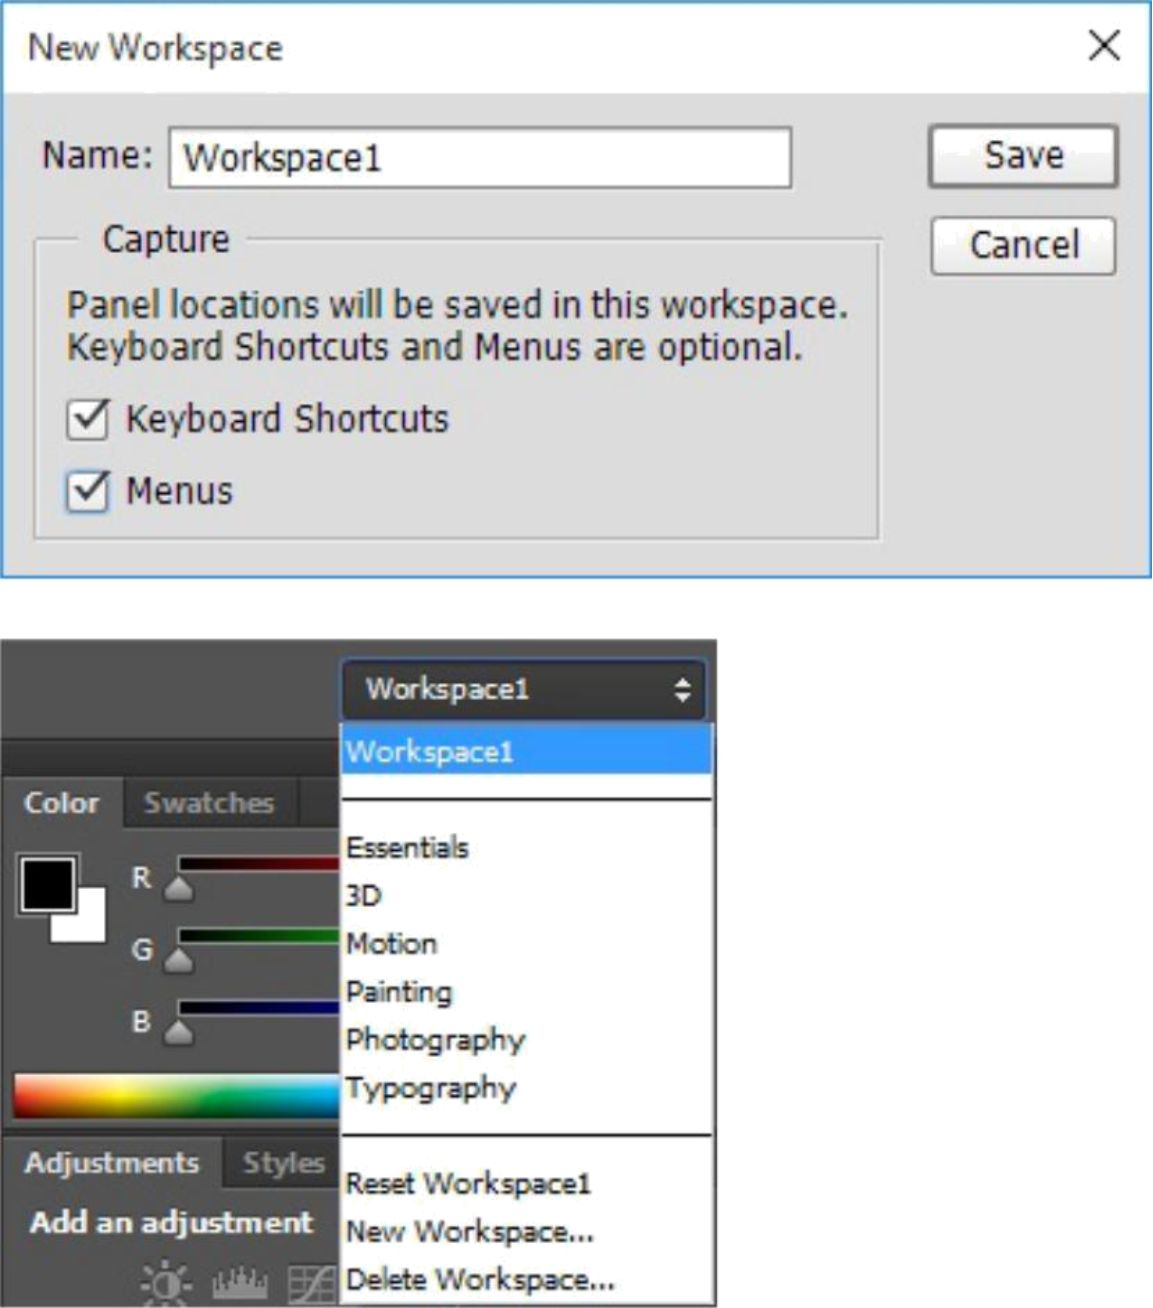
- In the New Workspace dialog box, in the Name box, type the desired name for the custom workspace (e.g., Workspace1) (see .
- Select the Keyboard Shortcuts and Menus check boxes.
- Click the Save button. The new Workspace is displayed at the top of the Workspace menu (see
Figure 5 New Workspace Dialog Box Figure 6 Workspace Menu with a Custom Workspace
To delete a custom workspace:
1. Click the Workspace menu, and then click Essentials (see .
NOTE : A workspace cannot be deleted if it is the active workspace.
4 |


- Click the Workspace menu again, and then click Delete Workspace .
- In the Delete Workspace dialog box, click the Workspace arrow and select the workspace that you want to delete (e.g., Workspace1).
- Click the Delete button. A confirmation dialog box opens.
- Click the Yes button to proceed.
- Click the Workspace menu to verify that the custom workspace has been deleted and is no
longer listed on the menu.
Changing the Screen Mode
When previewing an image, it helps to have a different background and to remove the workspace
altogether. By default, Photoshop opens in Standard Screen Mode .
To change the screen mode:
1. Click the View menu, point to Screen Mode , and then click Ful Screen
Mode .
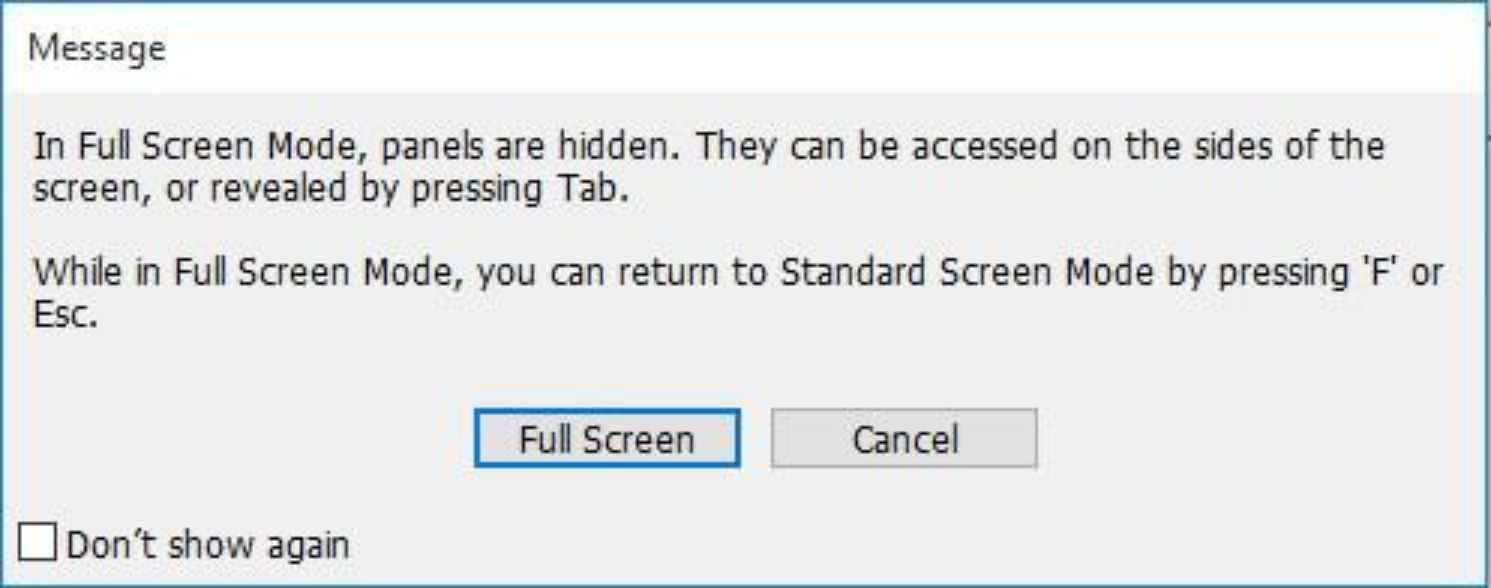
I In the Message dialog box, click the Ful Screen button (see
Figure 7 Message Dialog Box
Figure 8 Ful Screen Mode
Next page


