• Complain

Kevin Muramatsu - Gun Digest Browning Semi-Auto 22 Assembly/Disassembly Instructions

Here you can read online Kevin Muramatsu - Gun Digest Browning Semi-Auto 22 Assembly/Disassembly Instructions full text of the book (entire story) in english for free. Download pdf and epub, get meaning, cover and reviews about this ebook. year: 2011, publisher: F+W Media, genre: Detective and thriller. Description of the work, (preface) as well as reviews are available. Best literature library LitArk.com created for fans of good reading and offers a wide selection of genres:

Romance novel Science fiction Adventure Detective Science History Home and family Prose Art Politics Computer Non-fiction Religion Business Children Humor

Choose a favorite category and find really read worthwhile books. Enjoy immersion in the world of imagination, feel the emotions of the characters or learn something new for yourself, make an fascinating discovery.

Kevin Muramatsu Gun Digest Browning Semi-Auto 22 Assembly/Disassembly Instructions
  • Book:
    Gun Digest Browning Semi-Auto 22 Assembly/Disassembly Instructions
  • Author:
  • Publisher:
    F+W Media
  • Genre:
  • Year:
    2011
  • Rating:
    3 / 5
  • Favourites:
    Add to favourites
  • Your mark:
    • 60
    • 1
    • 2
    • 3
    • 4
    • 5

Gun Digest Browning Semi-Auto 22 Assembly/Disassembly Instructions: summary, description and annotation

We offer to read an annotation, description, summary or preface (depends on what the author of the book "Gun Digest Browning Semi-Auto 22 Assembly/Disassembly Instructions" wrote himself). If you haven't found the necessary information about the book — write in the comments, we will try to find it.

This short eBook teaches you how to take apart and reassemble your Browning Semi-Auto 22 with confidence. Thanks to clear Assembly/Disassembly instructions and crisp photography - aided by gun expert J.B. Woods sage advice - youll save an expensive trip to the gunsmith by getting to know your gun inside and out!

Kevin Muramatsu: author's other books


Who wrote Gun Digest Browning Semi-Auto 22 Assembly/Disassembly Instructions? Find out the surname, the name of the author of the book and a list of all author's works by series.

Gun Digest Browning Semi-Auto 22 Assembly/Disassembly Instructions — read online for free the complete book (whole text) full work

Below is the text of the book, divided by pages. System saving the place of the last page read, allows you to conveniently read the book "Gun Digest Browning Semi-Auto 22 Assembly/Disassembly Instructions" online for free, without having to search again every time where you left off. Put a bookmark, and you can go to the page where you finished reading at any time.

Light

Font size:

Reset

Interval:

Bookmark:

Make
Browning Semi-Auto 22 SimilarIdentical Pattern Guns The same basic - photo 1
Browning
Semi-Auto 22


Similar/Identical Pattern Guns

The same basic assembly/disassembly steps for the Browning Semi-Auto 22 also apply to the following guns:

Browning Standard Auto Grade IINorinco 22 ATD
Browning Standard Auto Grade IIIRemington Model 24
Browning Standard Auto Grade VIRemington Model 241


Data:Browning Semi-Auto 22
Origin:Belgium
Manufacturer:Browning Arms Company, Morgan, Utah
(Made for Browning by FN in Belgium)
Cartridge:22 Long Rifle
Magazine capacity:11 rounds
Overall length:37 inches
Barrel length:19 inches
Weight:4 pounds


This neat little semi-auto rifle was first produced in 1914 by FN in Belgium - photo 2

This neat little semi-auto rifle was first produced in 1914 by FN in Belgium. In 1922, production rights for the U.S. were leased to the Remington company, and it was made by them as the Model 24 and Model 241 until 1951. In 1956, a slightly altered version was introduced by Browning, and it was made for them at FN until 1974. From that time to the present, the gun has been made for Browning by Miroku of Japan. Through all of this time, the internal mechanism has been essentially unchanged. There are some minor differences in the extractor and cartridge guide systems, but the instructions will still apply.

Disassembly:

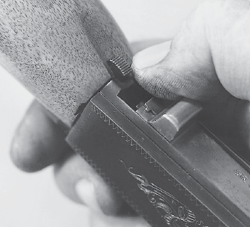
The takedown latch is located on the underside of the forend, at its rear edge. Push the latch forward into its recess in the forend.
Retract the bolt slightly and turn the barrel assembly clockwise rear view - photo 3

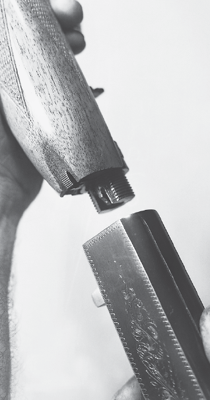
Retract the bolt slightly, and turn the barrel assembly clockwise (rear view) until it stops. Then, remove the barrel assembly toward the front.
Remove the screw on the underside of the forend and take off the forend - photo 4

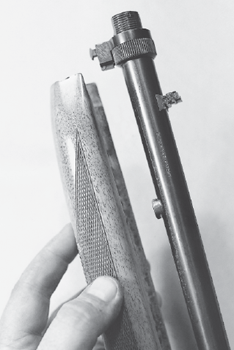
Remove the screw on the underside of the forend, and take off the forend downward.
Slide the takedown latch forward out of its base at the rear of the barrel - photo 5

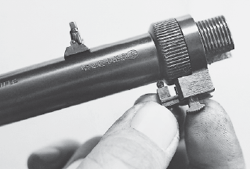
Slide the takedown latch forward out of its base at the rear of the barrel. Caution:Two plunger-and-spring assemblies will be released, and must be restrained to prevent loss. The first will be the positioning plunger and spring at the rear of the latch, and the second will be the wedge-shaped plunger under the latch which bears on the barrel adjustment nut serrations. Ease both of these out, and take care that these small parts arent lost.
Remove the takedown latch base ring toward the rear Unscrew the knurled barrel - photo 6

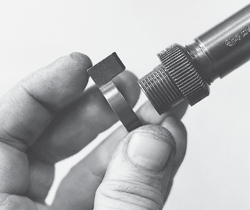
Remove the takedown latch base ring toward the rear. Unscrew the knurled barrel adjustment nut and remove it toward the rear.
Insert a finger through the trigger guard place the thumb on the bolt handle - photo 7

Insert a finger through the trigger guard, place the thumb on the bolt handle, and retract the bolt to the rear while exerting forward pressure on the guard. The trigger group and bolt assembly can now be moved forward together and removed downward.
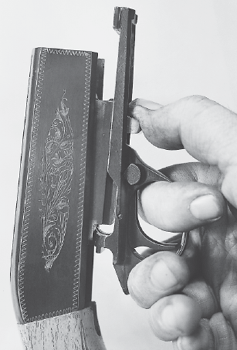
Pull the trigger to release the striker into the bolt then move the front of - photo 8

Pull the trigger to release the striker into the bolt, then move the front of the bolt upward out of the guard unit and ease it off forward. Caution:Both the bolt spring and the striker spring are under some tension, so take care that they dont get away. Remove the springs and their guides from the rear of the bolt.
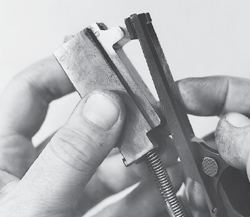
Remove the striker from the rear of the bolt Drifting out the cross pin at - photo 9

Remove the striker from the rear of the bolt.
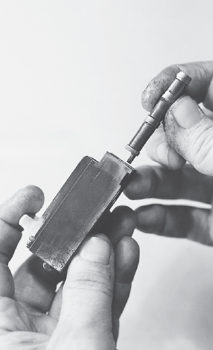
Drifting out the cross pin at the lower front of the bolt will release the - photo 10

Drifting out the cross pin at the lower front of the bolt will release the extractor retainer and allow removal of the extractor and its spring downward.
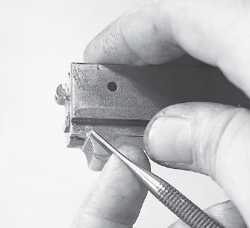
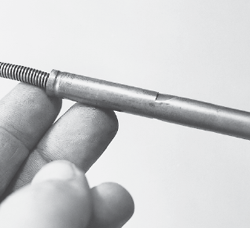
To remove the inner magazine tube pull it out until it stops then turn it 180 - photo 11

To remove the inner magazine tube, pull it out until it stops, then turn it 180 degrees to clear its side steps from the detents in the outer tube and take it out toward the rear.
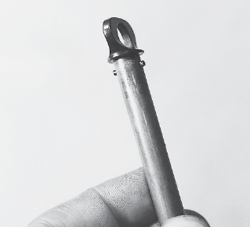
Drifting out the locking cross pin at the head of the inner magazine tube will - photo 12

Drifting out the locking cross pin at the head of the inner magazine tube will allow removal of the handle piece, spring, feed cable, and follower.
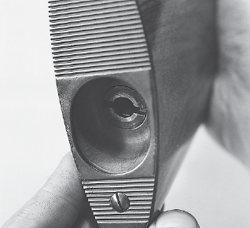
Use a very wide screwdriver or a special shop made tool to remove the nut at - photo 13

Use a very wide screwdriver or a special shop made tool to remove the nut at the rear of the buttstock, and its lock washer, and take off the stock toward the rear. The outer magazine tube can now be unscrewed from the rear of the receiver. Caution:Avoid gripping the tube too tightly and deforming it.
Swing the cartridge stop toward the inside wall of the receiver to clear its - photo 14

Swing the cartridge stop toward the inside wall of the receiver to clear its inner arm and lift it out of its pivot-hole in the roof of the receiver. It should be noted that on older guns that have seen a lot of use, the cartridge stop may fall out when the bolt and trigger assembly are removed, so be sure it isnt missed and lost.
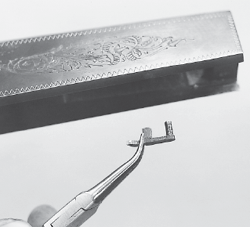
Removal of the cartridge guide spring in the top front of the receiver will - photo 15

Removal of the cartridge guide spring in the top front of the receiver will release the cartridge guide to be taken out toward the front. To remove the spring, use a small tool to pry its rear loop from beneath its flange in the receiver.
Drifting out the small cross pin upper arrow at the top of the vertical - photo 16

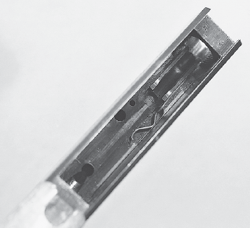
Drifting out the small cross pin (upper arrow) at the top of the vertical trigger group extension will release the sear spring and plunger for removal upward. Drifting out the sear pivot pin (lower arrow) will allow the sear to be taken out toward the front. The trigger and disconnector pivot on the same pin, are removed as a unit, along with the disconnector spring. The disconnector can be separated from the trigger by drifting out the short pin that mounts it in the trigger. To remove the safety, use a small screwdriver to depress the plunger and spring inside, at the center, under the safety, and move the safety out toward the right.


Next page
Light

Font size:

Reset

Interval:

Bookmark:

Make

Similar books «Gun Digest Browning Semi-Auto 22 Assembly/Disassembly Instructions»

Look at similar books to Gun Digest Browning Semi-Auto 22 Assembly/Disassembly Instructions. We have selected literature similar in name and meaning in the hope of providing readers with more options to find new, interesting, not yet read works.


Reviews about «Gun Digest Browning Semi-Auto 22 Assembly/Disassembly Instructions»

Discussion, reviews of the book Gun Digest Browning Semi-Auto 22 Assembly/Disassembly Instructions and just readers' own opinions. Leave your comments, write what you think about the work, its meaning or the main characters. Specify what exactly you liked and what you didn't like, and why you think so.