Kevin Muramatsu - Gun Digest Remington 552 Assembly/Disassembly Instructions
Here you can read online Kevin Muramatsu - Gun Digest Remington 552 Assembly/Disassembly Instructions full text of the book (entire story) in english for free. Download pdf and epub, get meaning, cover and reviews about this ebook. year: 2011, publisher: F+W Media, genre: Detective and thriller. Description of the work, (preface) as well as reviews are available. Best literature library LitArk.com created for fans of good reading and offers a wide selection of genres:
Romance novel
Science fiction
Adventure
Detective
Science
History
Home and family
Prose
Art
Politics
Computer
Non-fiction
Religion
Business
Children
Humor
Choose a favorite category and find really read worthwhile books. Enjoy immersion in the world of imagination, feel the emotions of the characters or learn something new for yourself, make an fascinating discovery.

- Book:Gun Digest Remington 552 Assembly/Disassembly Instructions
- Author:
- Publisher:F+W Media
- Genre:
- Year:2011
- Rating:3 / 5
- Favourites:Add to favourites
- Your mark:
Gun Digest Remington 552 Assembly/Disassembly Instructions: summary, description and annotation
We offer to read an annotation, description, summary or preface (depends on what the author of the book "Gun Digest Remington 552 Assembly/Disassembly Instructions" wrote himself). If you haven't found the necessary information about the book — write in the comments, we will try to find it.
This short eBook teaches you how to take apart and reassemble your Remington 552 with confidence. Thanks to clear Assembly/Disassembly instructions and crisp photography - aided by gun expert J.B. Woods sage advice - youll save an expensive trip to the gunsmith by getting to know your gun inside and out!
Kevin Muramatsu: author's other books
Who wrote Gun Digest Remington 552 Assembly/Disassembly Instructions? Find out the surname, the name of the author of the book and a list of all author's works by series.


Gun Digest Remington 552 Assembly/Disassembly Instructions — read online for free the complete book (whole text) full work
Below is the text of the book, divided by pages. System saving the place of the last page read, allows you to conveniently read the book "Gun Digest Remington 552 Assembly/Disassembly Instructions" online for free, without having to search again every time where you left off. Put a bookmark, and you can go to the page where you finished reading at any time.
Font size:
Interval:
Bookmark:

Remington
Model 552
Similar/Identical Pattern Guns
The same basic assembly/disassembly steps for the Remington Model 552 also apply to the following guns:
Remington Model C Remington Model BDL
Remington Model GS
| Data: | Remington Model 552 |
| Origin: | United States |
| Manufacturer: | Remington Arms Company Bridgeport, Connecticut |
| Cartridge: | 22 Short, Long or Long Rifle |
| Magazine capacity: | 20 Short, 17 Long, 15 Long Rifle |
| Overall length: | 42 inches |
| Barrel length: | 25 inches |
| Weight: | 5 pounds |
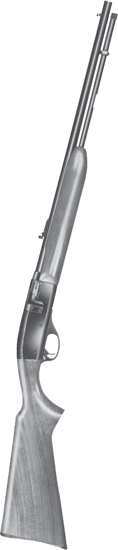
The Model 552 was introduced in 1958, and it was intended to be the 22-caliber counterpart of the centerfire Model 742. It does have similar looks and handling qualities, though its lighter, of course. The gun has been offered in a carbine version with a 21-inch barrel (552C), and a Gallery Special in 22 Short chambering. Currently, only the Deluxe BDL version is being made.
Disassembly:
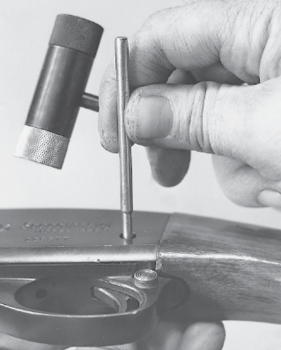
Remove the inner magazine tube and cycle the bolt to cock the hammer. With a non-marring tool such as a brass or bronze drift punch, push out the large cross pin at the rear of the receiver and the smaller cross pin at the center of the receiver. It may be necessary to tap the drift with a small hammer to start the pins out.
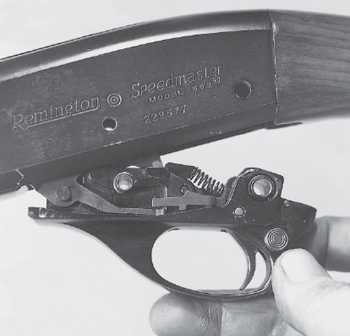
Remove the trigger group downward and toward the rear.
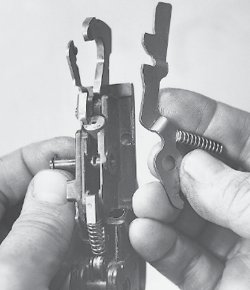
Restrain the hammer against the tension of its spring, pull the trigger, and ease the hammer down to the fired position. Remove the small spring clip from the right end of the front cross pin sleeve and push the sleeve out toward the left. This will free the carrier and its spring for removal from the right side of the group. Caution:The carrier spring is strong and is under some tension, so restrain the carrier and ease it off.
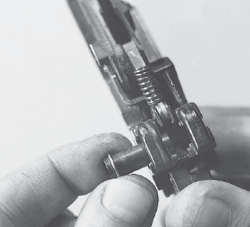
Pull the trigger and hold it back to relieve the tension on the rear cross pin sleeve; then push it out toward the left with its spring clip left in place.
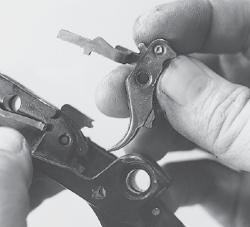
Removal of the cross pin sleeve will allow the trigger top to move further to the rear, relieving the tension of the trigger/sear spring. Flex the spring away from its stud on the back of the sear and remove the spring upward.
Drift out the trigger cross pin and remove the trigger, with its attached connector bar, upward. The two leaves of the connector are riveted at the top of the trigger and removal in normal takedown is not advisable.
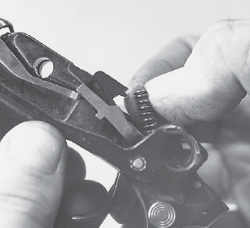
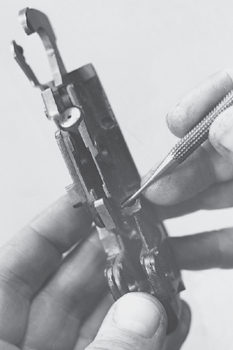
Insert a small drift punch on the right side of the trigger group, as shown, and push out the sear pivot toward the left. The sear is then removed upward.
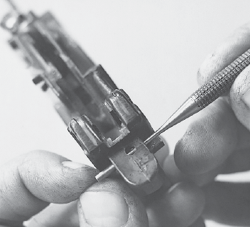
Push out the small cross pin at the extreme rear of the trigger group and remove the safety spring and ball upward. The safety can then be slid out toward either side. Caution:The spring is under some tension, so hold a fingertip over the top of the hole when removing the drift punch to control it. If the detent ball cant be shaken out the top after removal of the spring, wait until the safety is taken out, and then insert a small drift punch from the top and push it out into the safety channel. Take care that this small steel ball isnt lost.
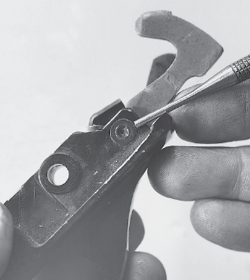
A large cross pin with an enlarged head on the left side pivots and retains both the hammer and the disconnector, and the pin is riveted over a washer on the right side of the trigger group (illus.). Because of the riveting, a drift punch of smaller diameter than the pin body must be used. Be sure the disconnector is well supported when driving out the pin, to avoid damage. Caution:Removal of the disconnector will also release the hammer spring and plunger, so take care to restrain them and ease them out.
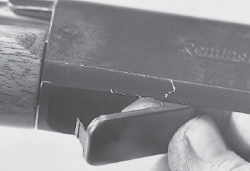
Slide the receiver coverplate on the underside about a quarter inch toward the rear, and insert a finger inside the receiver from the rear to tip its front end outward. Pivot it over toward the rear and remove it.
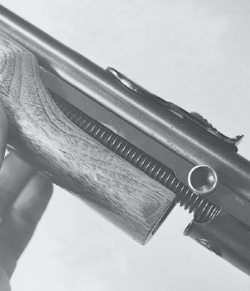
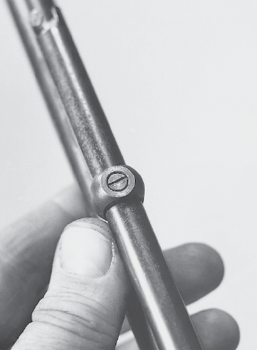
With a coin or a specially shaped screwdriver, remove the large screw on the underside of the forend. Move the rear of the forend slightly downward to clear the forward extension of the receiver, and slide the forend forward on the magazine tube. It is not removed at this point.
Move the barrel assembly forward out of the receiver.
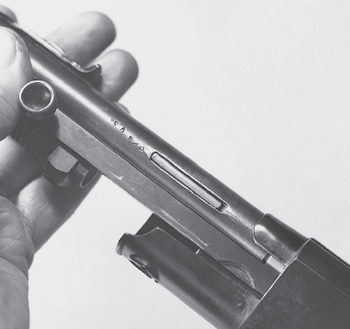
Restrain the tension of the bolt spring by holding onto the action bar, and carefully detach the rear vertical lug of the action bar from its recess in the side of the bolt. Remove the bolt toward the rear and ease the action bar forward, relieving the tension of the spring.
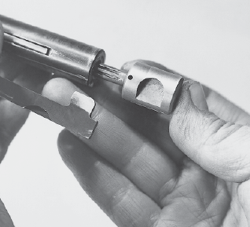
Remove the small screw on the underside of the front magazine tube hanger and slide the outer magazine tube out toward the front.
Removal of the magazine tube will release the forend piece, action bar and bolt spring to be taken off downward. The front magazine tube hanger has a threaded mounting post and is unscrewed from the underside of the barrel. The steel support piece at the front of the forend can be slid out forward.
Font size:
Interval:
Bookmark:
Similar books «Gun Digest Remington 552 Assembly/Disassembly Instructions»
Look at similar books to Gun Digest Remington 552 Assembly/Disassembly Instructions. We have selected literature similar in name and meaning in the hope of providing readers with more options to find new, interesting, not yet read works.
Discussion, reviews of the book Gun Digest Remington 552 Assembly/Disassembly Instructions and just readers' own opinions. Leave your comments, write what you think about the work, its meaning or the main characters. Specify what exactly you liked and what you didn't like, and why you think so.