Kevin Muramatsu - Gun Digest Browning T-Bolt Assembly/Disassembly Instructions
Here you can read online Kevin Muramatsu - Gun Digest Browning T-Bolt Assembly/Disassembly Instructions full text of the book (entire story) in english for free. Download pdf and epub, get meaning, cover and reviews about this ebook. year: 2011, publisher: F+W Media, genre: Detective and thriller. Description of the work, (preface) as well as reviews are available. Best literature library LitArk.com created for fans of good reading and offers a wide selection of genres:
Romance novel
Science fiction
Adventure
Detective
Science
History
Home and family
Prose
Art
Politics
Computer
Non-fiction
Religion
Business
Children
Humor
Choose a favorite category and find really read worthwhile books. Enjoy immersion in the world of imagination, feel the emotions of the characters or learn something new for yourself, make an fascinating discovery.

- Book:Gun Digest Browning T-Bolt Assembly/Disassembly Instructions
- Author:
- Publisher:F+W Media
- Genre:
- Year:2011
- Rating:5 / 5
- Favourites:Add to favourites
- Your mark:
Gun Digest Browning T-Bolt Assembly/Disassembly Instructions: summary, description and annotation
We offer to read an annotation, description, summary or preface (depends on what the author of the book "Gun Digest Browning T-Bolt Assembly/Disassembly Instructions" wrote himself). If you haven't found the necessary information about the book — write in the comments, we will try to find it.
This short eBook teaches you how to take apart and reassemble your Browning T-Bolt with confidence. Thanks to clear Assembly/Disassembly instructions and crisp photography - aided by gun expert J.B. Woods sage advice - youll save an expensive trip to the gunsmith by getting to know your gun inside and out!
Kevin Muramatsu: author's other books
Who wrote Gun Digest Browning T-Bolt Assembly/Disassembly Instructions? Find out the surname, the name of the author of the book and a list of all author's works by series.


Gun Digest Browning T-Bolt Assembly/Disassembly Instructions — read online for free the complete book (whole text) full work
Below is the text of the book, divided by pages. System saving the place of the last page read, allows you to conveniently read the book "Gun Digest Browning T-Bolt Assembly/Disassembly Instructions" online for free, without having to search again every time where you left off. Put a bookmark, and you can go to the page where you finished reading at any time.
Font size:
Interval:
Bookmark:

T-Bolt
Similar/Identical Pattern Guns
The same basic assembly/disassembly steps for the Browning T-Bolt also apply to the following gun:
| (Classic) | (Reintroduced) |
| Browning T-2 T-Bolt | Browning T-Bolt Sporter Browning T-Bolt Target/Varmint |
| Data: | Browning T-Bolt |
| Origin: | Belgium |
| Manufacturer: | Fabrique Nationale, Herstal (for Browning Arms Company, Morgan, Utah) |
| Cartridge: | 22 Long Rifle |
| Magazine capacity: | 5 rounds |
| Overall length: | 39 inches |
| Barrel length: | 22 inches |
| Weight: | 5 pounds |
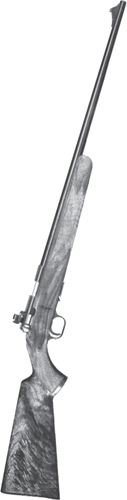
The unusual straight pull bolt of this fine little gun is a masterpiece of good engineering, and works beautifully. Unfortunately, the average American shooter has never been fond of unusual actions, and the T-Bolt was imported for less than ten years, from 1965 to 1973. In addition to the plain T-1 model, a T-2 was offered, with 24-inch barrel and fancy stock. The gun was also available in a left-hand version. An accessory single-shot adapter would allow the use of 22 Short or Long, as well as Long Rifle. Except for the reversal of some directions in the left-hand model, the instructions will apply to all of them. In 2006, Browning reintroduced the T-Bolt rifle, manufactured using more modern technology, and has since expanded the line to rifles with heavy, target-style barrels, composite or wood stocks, and stainless steel actions. There is little difference in methods of disassembly or reassembly.
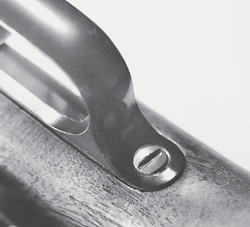
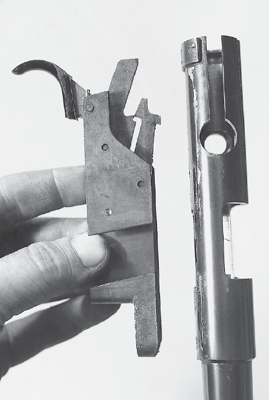
Remove the magazine, and remove the main stock mounting screw, on the underside just forward of the magazine well. Separate the action from the stock.
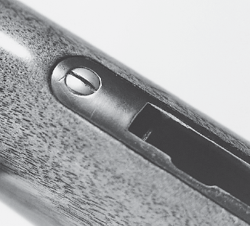
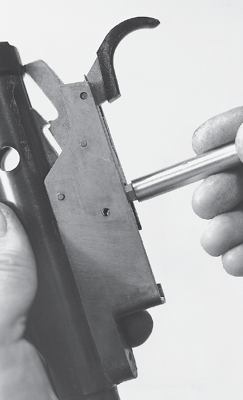
Removal of the wood screw at the rear of the trigger guard unit will allow the guard to be taken off downward.
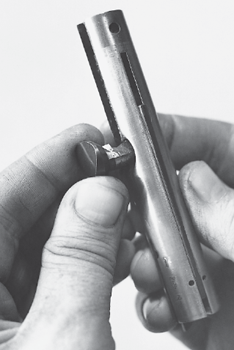
To remove the bolt, hold the trigger to the rear, and move the bolt out the rear of the receiver.
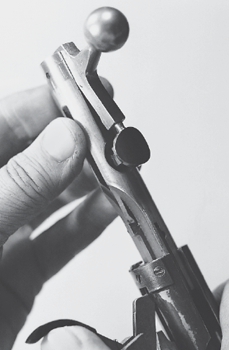
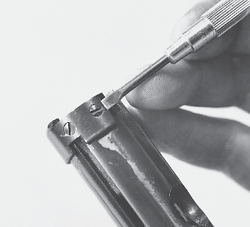
With the bolt handle in the closed (locked) position, push the vertical pin at the rear of the bolt upward, and remove it.
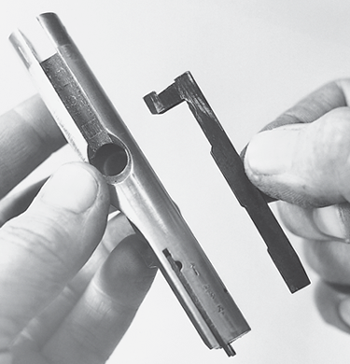
Remove the bolt handle toward the rear.
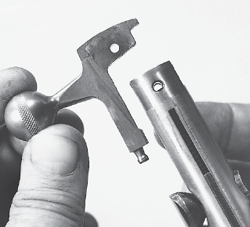
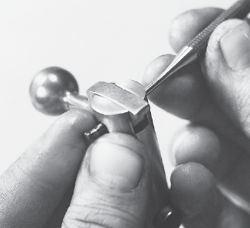
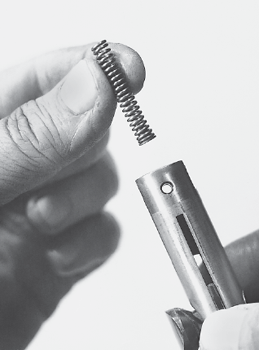
Remove the striker spring and its plunger toward the rear.
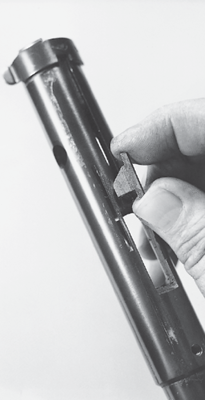
Turn the locking block (cross-bolt) slightly to raise the firing pin out of its inside shoulder, and remove the locking block toward the right.
Remove the firing pin from its channel in the top of the bolt.
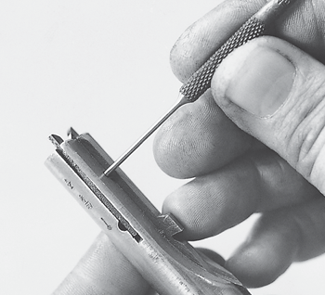
The twin extractors are retained by two vertical roll pins at the front of the bolt. Use a roll pin punch to drift out the pins, and remove the extractors from each side, along with the single transverse coil spring that powers both.
Push out the magazine catch cross pin, and remove the magazine catch and its coil spring downward.
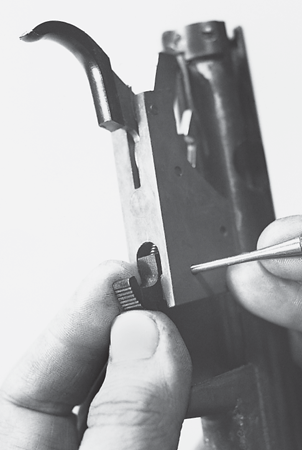
Removal of the magazine catch will give access to the magazine housing screw, which is taken out downward.
Remove the magazine housing downward.
Push out the cross pin at the top of the magazine housing, and remove the sear upward and toward the front.
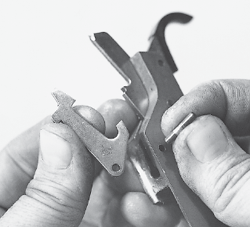
Note the relationship of the trigger and its spring before removal, to aid in reassembly. Push out the cross pin at the lower rear of the magazine housing, and remove the trigger and its spring toward the rear and downward. Take care that the trigger spring isnt lost. Restrain it, and ease it out.
The trigger stop pin can also be drifted out, but can be left in place, as it retains no part.
The ejector is easily pushed from its slot in the underside of the receiver for removal.

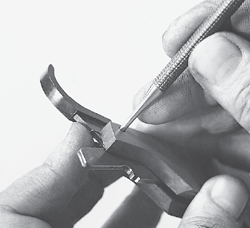
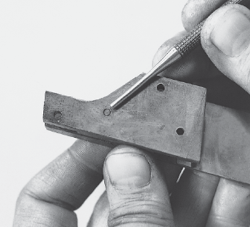
Removal of the two screws in the outer band of the safety catch at the rear of the receiver will allow the catch to be taken off.Caution:Removal of the safety will release the safety positioning plunger and spring, so restrain them and ease them out.
When replacing the ejector in its slot in the underside of the receiver, be sure its vertical face is toward the front, and its angled end toward the rear, as shown.
When replacing the trigger and its spring, taking out the trigger stop pin will make this operation easier. Insert the cross pin from the right, just far enough to hold the spring in position, then put in the trigger, and move the cross pin the rest of the way across. Be sure the front arm of the spring is against its shoulder or shelf inside the housing.
Font size:
Interval:
Bookmark:
Similar books «Gun Digest Browning T-Bolt Assembly/Disassembly Instructions»
Look at similar books to Gun Digest Browning T-Bolt Assembly/Disassembly Instructions. We have selected literature similar in name and meaning in the hope of providing readers with more options to find new, interesting, not yet read works.
Discussion, reviews of the book Gun Digest Browning T-Bolt Assembly/Disassembly Instructions and just readers' own opinions. Leave your comments, write what you think about the work, its meaning or the main characters. Specify what exactly you liked and what you didn't like, and why you think so.