Publisher: Amy Marson Creative Director: Gailen Runge Editors: Alice Mace Nakanishi and Joanna Burgarino Cover/Book Designer: April Mostek Production Coordinator: Zinnia Heinzmann Photography by Diane Pedersen, Christina Carty-Francis, and Nissa Brehmer, of C&T Publishing, unless otherwise noted For further information and similar projects, see the book listed after each artists bio. Published by C&T Publishing, Inc., P.O. Box 1456, Lafayette, CA 94549 Night Skies Beth Ferrier 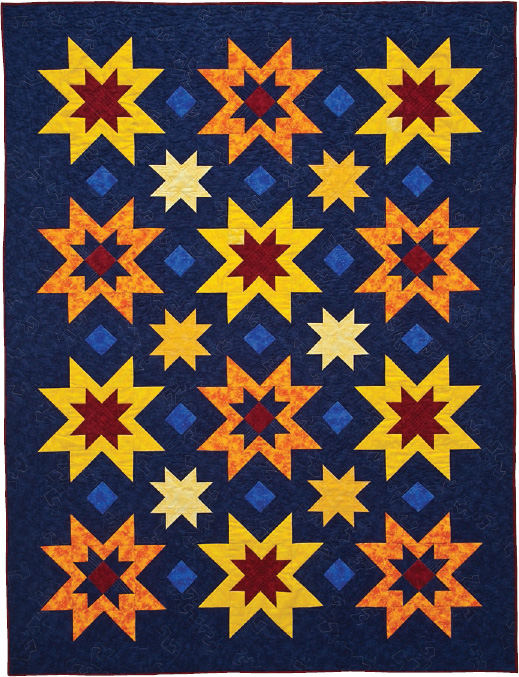 FINISHED QUILT: 64 84Large, simple blocksput together using some of the best sneaky piecing tricks aroundmake this quilt an easy weekend project. Make it for one of the superstars in your life. Designed, pieced, and quilted by Beth Ferrier
  BETH FERRIER is an accomplished quilter who describes her style as rebellious traditional. She is forever in search of easy and simply elegant solutions to quilting challenges. Everything she designs is geared toward teaching skill-expanding tips and techniques.
Beth lives in Green Bay, Wisconsin. WEBSITE: applewoodfarmquilts.com This project originally appeared in Sneaky Piecing by Beth Ferrier, available from C&T Publishing.  MaterialsYardage is based on 40-wide fabric unless otherwise noted. Yardage amounts have been rounded up to include a little wiggle room. BACKGROUND FABRIC: 4 yards* for pieced blocks DARK RED FABRIC: 1 yard for pieced blocks and binding BRIGHT BLUE FABRIC: yard for pieced blocks LEMON YELLOW FABRIC: yard for pieced blocks YELLOW FABRIC: yard for pieced blocks DARK YELLOW FABRIC: yard for pieced blocks ORANGE FABRIC: yard for pieced blocks BACKING FABRIC AND BATTING: Sized for quilt ZIP-TOP BAGS: 7 gallon size, labeled 17 ROTARY CUTTER, MAT, AND RULER (a 12 square ruler is handy) TEMPLATE PLASTIC: 3 square (Place in Bag 3.)* Requires 41 usable fabric width.CuttingWOF = width of fabricAs you cut, youll organize your cut pieces into bags as indicated. BACKGROUND FABRIC Cut 3 strips 9 WOF. Subcut: 12 squares 9 9. Place in Bag 1. Cut 13 strips 4 WOF.
Subcut: 4 segments 4 40. Place in Bag 7. From each of 2 remaining strips, subcut: 1 segment 4 36. Place in Bag 7. 1 square 4 4. Place in Bag 5. From each of 2 remaining strips, subcut: 1 segment 4 24. Place in Bag 7. 3 squares 4 4. Place in Bag 5. Cut 5 strips 6 WOF. Place in Bag 5. Cut 5 strips 6 WOF.
Subcut: 34 rectangles 6 4. Place 24 in Bag 6 and 10 in Bag 7. Cut 6 strips 2 WOF. Subcut: 70 squares 2 2. Place 46 in Bag 3 and 24 in Bag 2. DARK RED FABRIC Cut 1 strip 4 WOF. Subcut: 6 squares 4 4. Place in Bag 4. 4 squares 2 2.
Mark the diagonal on the wrong side. Place in Bag 2. Cut 1 strip 3 WOF. Subcut: 6 squares 3 3. Place in Bag 3. Cut 2 strips 2 WOF. Subcut: 20 squares 2 2. Place in Bag 2. Cut 8 strips 2 WOF for the binding. Place in Bag 7. LEMON YELLOW FABRIC Cut 1 strip 4 WOF. Place in Bag 7. LEMON YELLOW FABRIC Cut 1 strip 4 WOF.
Subcut: 3 squares 4 4. Place in Bag 7. 10 squares 2 2. Mark the diagonal on the wrong side. Place in Bag 6. Cut 1 strip 2 WOF. Subcut: 14 squares 2 2. Place in Bag 6. BRIGHT BLUE FABRIC Cut 2 strips 3 WOF. Place in Bag 6. BRIGHT BLUE FABRIC Cut 2 strips 3 WOF.
Subcut: 17 squares 3 3. Place in Bag 3. YELLOW FABRIC Cut 3 strips 4 WOF. Subcut: 24 squares 4 4. Mark the diagonal on the wrong side. Place in Bag 1. Cut 1 strip 5 WOF. Place in Bag 2. Cut 2 strips 2 WOF. Place in Bag 2. Cut 2 strips 2 WOF.
Subcut: 24 squares 2 2. Place in Bag 4. DARK YELLOW FABRIC Cut 1 strip 4 WOF. Subcut: 3 squares 4 4. Place in Bag 7. 10 squares 2 2. Mark the diagonal on the wrong side. Place in Bag 6. Cut 1 strip 2 WOF.
Subcut: 14 squares 2 2. Mark the diagonal on the wrong side. Place in Bag 6. ORANGE FABRIC Cut 3 strips 4 WOF. Subcut: 24 squares 4 4. Mark the diagonal on the wrong side. Place in Bag 1. Cut 1 strip 5 WOF.
Subcut: 6 squares 5 5. Place in Bag 2. Cut 2 strips 2 WOF. Subcut: 24 squares 2 2. Place in Bag 4. Construction Unless otherwise noted, all seam allowances are , and pieces are sewn right sides together. Seams are always pressed away from the background fabric (AFTB).BIG GEESE UNITS Using the Five-Square Geese Method (next page) and the pieces in Bag 1, make 24 orange/background and 24 yellow/background Flying Geese units. Place in Bag 5. Make 24 of each. SMALL GEESE UNITS Using the Five-Square Geese Method (next page) and the pieces in Bag 2, make 24 background/orange Flying Geese. SMALL GEESE UNITS Using the Five-Square Geese Method (next page) and the pieces in Bag 2, make 24 background/orange Flying Geese.
These units should measure 2 4. Repeat Step 1 to make 24 dark red/yellow Flying Geese. Press the seams toward the dark red fabric. Place the Step 1 and Step 2 units in Bag 4.SQUARE-IN-A-SQUARE BLOCKS Using the Square-in-a-Square Method (next page) and the Bag 3 pieces, make 17 bright blue/background Square-in-a-Square blocks. These should measure 4 4. Place in Bag 4.Five-Square Geese Method Each goose is made up of 2 small triangles and a large triangle. Place in Bag 4.Five-Square Geese Method Each goose is made up of 2 small triangles and a large triangle.
The small triangles are half-squares; the larger one is a quarter-square. By changing the position of the background fabric, we can have either Flying Geese blocks (with the background fabric as the small triangles) or star points (with the background as the large triangle). Position 2 small squares on opposite corners of the large square, right sides together, so that the lines drawn on the wrong sides connect. Yep, its okay that the points overlap. Stitch a seam on each side of the diagonal line. Cut on the line and press the seams away from the background fabric.
You now have 2 funny-shaped hearts. 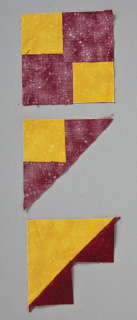 Place small squares in opposing corners, stitch, and cut apart. Place one of the remaining small squares on each of the heart shapes, positioned so that the drawn line splits the cleavage of the heart. Sew a seam from each side of the line. Cut along the line and press the seam allowances away from the background fabric. Square-in-a-Square Method Fold the center square in half to make a rectangle, giving it a good crease. Square-in-a-Square Method Fold the center square in half to make a rectangle, giving it a good crease.
Lay it on the stack of triangles so that the fold touches the point at the top and the short side is even with the bottom. Carefully flop the square open; it will be centered on the triangles. See those darned dog ears sticking out on either side of the square? Chop em off! You now have 4 triangles, perfectly trimmed to fit the center square, making this block a snap to sew. Cool beans! 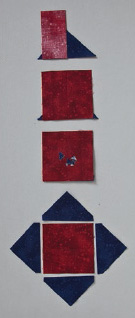
Next page
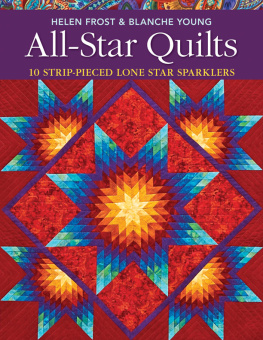

 FINISHED QUILT: 64 84Large, simple blocksput together using some of the best sneaky piecing tricks aroundmake this quilt an easy weekend project. Make it for one of the superstars in your life. Designed, pieced, and quilted by Beth Ferrier
  BETH FERRIER is an accomplished quilter who describes her style as rebellious traditional. She is forever in search of easy and simply elegant solutions to quilting challenges. Everything she designs is geared toward teaching skill-expanding tips and techniques.
 MaterialsYardage is based on 40-wide fabric unless otherwise noted. Yardage amounts have been rounded up to include a little wiggle room. BACKGROUND FABRIC: 4 yards* for pieced blocks DARK RED FABRIC: 1 yard for pieced blocks and binding BRIGHT BLUE FABRIC: yard for pieced blocks LEMON YELLOW FABRIC: yard for pieced blocks YELLOW FABRIC: yard for pieced blocks DARK YELLOW FABRIC: yard for pieced blocks ORANGE FABRIC: yard for pieced blocks BACKING FABRIC AND BATTING: Sized for quilt ZIP-TOP BAGS: 7 gallon size, labeled 17 ROTARY CUTTER, MAT, AND RULER (a 12 square ruler is handy) TEMPLATE PLASTIC: 3 square (Place in Bag 3.)* Requires 41 usable fabric width.CuttingWOF = width of fabricAs you cut, youll organize your cut pieces into bags as indicated. BACKGROUND FABRIC Cut 3 strips 9 WOF. Subcut: 12 squares 9 9. Place in Bag 1. Cut 13 strips 4 WOF.
 Make 24 of each. SMALL GEESE UNITS Using the Five-Square Geese Method (next page) and the pieces in Bag 2, make 24 background/orange Flying Geese. SMALL GEESE UNITS Using the Five-Square Geese Method (next page) and the pieces in Bag 2, make 24 background/orange Flying Geese.
 Place small squares in opposing corners, stitch, and cut apart. Place one of the remaining small squares on each of the heart shapes, positioned so that the drawn line splits the cleavage of the heart. Sew a seam from each side of the line. Cut along the line and press the seam allowances away from the background fabric. Square-in-a-Square Method Fold the center square in half to make a rectangle, giving it a good crease. Square-in-a-Square Method Fold the center square in half to make a rectangle, giving it a good crease.