When you make a game in Unity, youll come into contact with projects, assets, and scenes. These are high-level concepts that every developer needs to know about upfront.
Project Wizard and Project Panel
Lets start with projects: Unity is a project-based application. In practice this means every time you make a new game, youll make a new project. In Unity, 1 project = 1 game. It doesnt matter whether your game is 2D or 3D, a project is simply a container for all your game files and data. It corresponds to a folder on your hard drive, and that folder houses all the files for your game project during its development. To create a new project in Unity, click the File New Project option from the application menu. This is the equivalent of saying I want to make a new game. Do not however press the keyboard shortcut Ctrl+N , because this creates a new scene and not a new project. In Unity, a scene refers to a level. That is, a complete environment in the game.
Note
You can also open an existing project with File Open Project . Unity version 3.4 upward ships with a demo project known as AngryBots, as shown in Figure . This is a 3D game but is nonetheless worth examining in more depth if youre new to Unity.
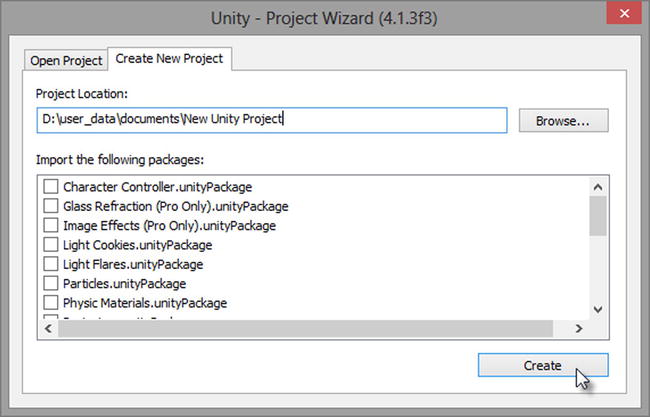
The Project Wizard dialog appears (see Figure ). This dialog allows you to specify the root location for the project. You can also choose to import a range of asset packages. These are pre-made files and data that can make your life easier, saving you from having to re-invent the wheel later on. But for 2D games we can usually leave all these asset packages uncheckedwe wont need them here. Once youre happy with the settings, click the Create button to generate a new project.
Figure 1-1.
The Project Wizard dialog displays settings for creating a new project
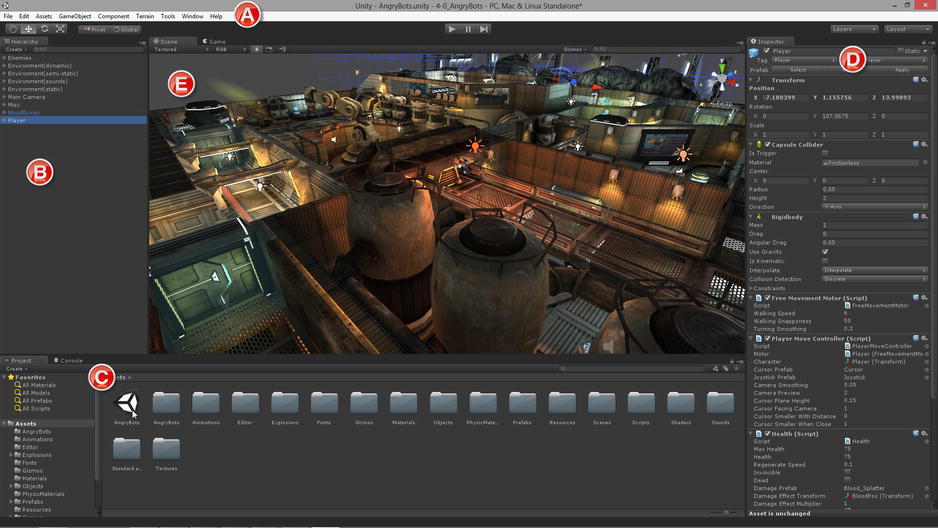
Once the project is generated, Unity displays the default interface. This is where well spend a lot of time making games. Running along the bottom of the interface is the Project Panel (see C in Figure ). This acts much like a folder view, showing the contents of the Project folder on the hard drive. For new projects, this panel typically begins completely empty. But as we add our own meshes, images, and other data, it populates with items. You can open the Project folder directly from the Project Panel in either Windows Explorer on Windows orFinder on Mac. To do that, right-click the mouse inside the Assets Panel (inside the Project Panel) and select Show in Explorer from the context menu.
Figure 1-2.
The Unity interface for Unity 4 in its default layout: A) The application menu B) The Scene Hierarchy C) Project Panel D) Object Inspector E) Scene Viewport
Note
You can make the Project Panel, or any panel, larger by hovering the cursor over it and pressing the spacebar. This maximizes the panel to the size of the editor window. You can toggle the panel back to its original size by a second spacebar press.
The project folder typically contains four subfolders: Library, Assets, ProjectSettings , and Temp . The Project Panel in the Unity interface displays the contents of only the Assets folder, because this is where our game files will be stored when imported. The other three folders contain meta-data, and they should be managed by the Unity application exclusively. It is highly recommended never to manually remove or edit files from anywhere inside the Project folder or its subfolders. Doing so could lead to corrupted or damaged projects if the files are not copied in the proper way. Im simply discussing the Project folder here so you know where it is, and its general structure.
Assets and Project Files
The project is the home of all your game files; all the files that make up your game. These may include meshes, textures, movies, animations, sounds, music, text data, and more. These files are together named Assets (plural) by the Unity engine. Each file is a unique asset (singular). When you want to put a mesh or object or file inside your game, youll need to import it first as an asset of the project. Only assets in the Project Panel can be included in your game. You can import assets into the Project using either of two methods. You can select Asset Import New Asset from the application menu (See Figure ) or, you can drag and drop files from Windows Explorer or Finder directly into the Project Panel. The former method allows you to import only one file at a time, while the latter allows multiple files to be imported together.


