If you are an Annies customer and have a question about the instructions on a pattern you have purchased, please visit:
http://www.anniescatalog.com/pages/customer_care/pattern_services.html
Contents
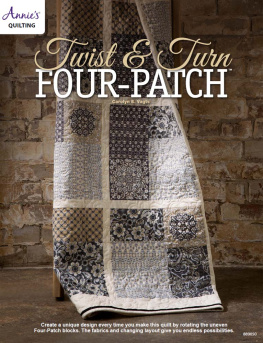
DESIGNED & QUILTED BY CAROLYN S. VAGTS FOR THE VILLAGE PATTERN CO.
SPECIFICATIONS
Skill Level: Beginner Quilt Size: 58" 75"
Block Size: 6" 6" finished Number of Blocks: 83
MATERIALS
yard light aqua print*
yard each 2 aqua prints*
yard each 2 black/green prints*
yard white solid*
3 yards black/white/green large floral*
Backing to size
Batting to size*
Thread
Basic sewing tools and supplies
*Bellisimo fabric collection from Benartex; Tuscany Cotton Batting from Hobbs used to make sample.
CUTTING
From light aqua print:
Cut 7 (1" by fabric width) I/J flange strips.
From aqua prints:
Cut 4 (3" by fabric width) C strips each fabric (8 total).
From black/green prints:
Cut 4 (3" by fabric width) D strips each fabric (8 total).
From white solid:
Cut 9 (2" by fabric width) strips.
Subcut strips into 140 (2") B squares.
From black/white/green large floral:
Cut 6 (6" by fabric width) strips.
Subcut strips into 35 (6") A squares.
Cut 7 (3" by fabric width) G/H strips.
Cut 2 (11" by fabric width) strips.
Subcut strips into 6 (11") squares and 2 (5") squares. Cut each 11" square on both diagonals to make 24 E triangles and each 5" square in half on 1 diagonal to make 4 F triangles.
Cut 7 (2" by fabric width) binding strips.
COMPLETING THE SNOWBALL BLOCKS
Draw a diagonal line from corner to corner on the wrong side of each B square.
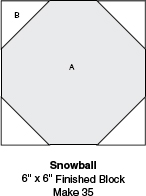
To complete one Snowball block, select one A and four B squares.
Referring to Figure 1, place the B squares right sides together on each corner of A and stitch on the marked lines. Trim seams to "; press B to the right side to complete one block.

Repeat steps 2 and 3 to make a total of 35 Snowball blocks.
COMPLETING THE FOUR-PATCH BLOCKS
Sew a C strip to a D strip with right sides together along length to make a C-D strip set; press. Repeat to make a total of eight C-D strip sets.
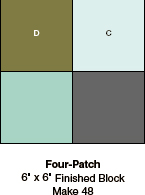
Subcut the C-D strip sets into 96 (3" 6") C-D units as shown in Figure 2.

Join two C-D units to complete one Four-Patch block as shown in Figure 3; press. Repeat to make a total of 48 Four-Patch blocks.

COMPLETING THE QUILT
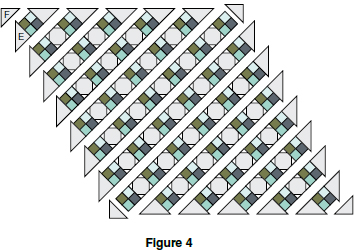
Arrange and join the Four-Patch and Snowball blocks in diagonal rows with the E and F triangles, alternating blocks in rows referring to Figure 4; press.
Join the rows to complete the quilt center; press.
Using a straightedge and rotary cutter, trim the quilt edges, leaving 1" from the joining seams as shown in Figure 5.

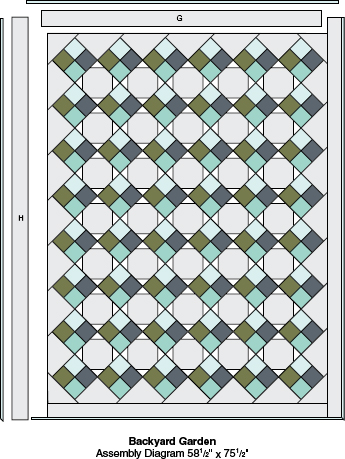
Join G/H strips on short ends to make a long strip; press. Subcut strip into two each 3" 53" G strips and 3" 76" H strips.
Sew G strips to the top and bottom, and H strips to opposite sides of the trimmed center; press.
Create a quilt sandwich referring to Quilting Basics on last page.
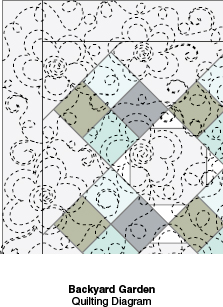
Quilt as desired.
Join I/J strips on short ends to make a long strip; press. Subcut strip into two each 1" 76" I strips and 1" 59" J strips.
Fold each I and J strip in half with wrong sides together to make flange strips; press.
Pin and then baste an I flange strip to opposite long sides of the quilt center, matching raw edges as shown in Figure 6.

Repeat step 10 with the J strips on the top and bottom, folding the corners at a 45-degree angle to simulate a mitered corner as shown in Figure 7.

Bind referring to Quilting Basics on last page to finish. 
The following is a reference guide. For more information, consult a comprehensive quilting book.
Quilt Backing & Batting
We suggest that you cut your backing and batting 8" larger than the finished quilt-top size. If preparing the backing from standard-width fabrics, remove the selvages and sew two or three lengths together; press seams open. If using 108"-wide fabric, trim to size on the straight grain of the fabric.
Prepare batting the same size as your backing. You can purchase prepackaged sizes or battings by the yard and trim to size.
Quilting
Press quilt top on both sides and trim all loose threads.
Make a quilt sandwich by layering the backing right side down, battingand quilt top centered right side upon flat surface and smooth out. Pin or baste layers together to hold.
Mark quilting design on quilt top and quilt as desired by hand or machine. Note: If you are sending your quilt to a professional quilter, contact them for specifics about preparing your quilt for quilting.
When quilting is complete, remove pins or basting. Trim batting and backing edges even with raw edges of quilt top.
Binding the Quilt
Join binding strips on short ends with diagonal seams to make one long strip; trim seams to " and press seams open (Figure A).
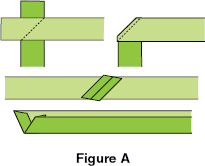
Fold 1" of one short end to wrong side and press. Fold the binding strip in half with wrong sides together along length, again referring to Figure A; press.
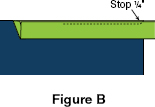
Starting about 3" from the folded short end, sew binding to quilt top edges, matching raw edges and using a " seam. Stop stitching " from corner and backstitch (Figure B).
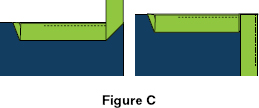
Fold binding up at a 45-degree angle to seam and then down even with quilt edges, forming a pleat at corner, referring to Figure C.
