Books by Frank Walters The Affinity Photo Beginner's Guide - First 10 Skills The Affinity Bible - Part I The Affinity Bible - Part II Learn Affinity Photo Top 10 Artistic Techniques Learn Affinity Photo Top 10 Most Popular Techniques Learn Affinity Photo Top 10 Portrait Techniques Fictional Titles: The Rooted Ocean Series - Submerged, Immersed, Engulfed (Author: Charlotte Birch) The Drakkoyyn Series - Emergent Fire (Author: Aldane Walker) The Girl Who Woke the Dragons (Author: John Zakour) To Be Published in January 2019 The Book of GIMP A Step-by-step Guidebook - Perfect for Beginners Our Shorter GIMP Tutorials Learn GIMP for New Users 12 Basic Skills
Learn GIMP Top 10 Artistic Techniques Learn GIMP Top 10 Professional Techniques Learn GIMP Top 10 Most Popular Techniques
How to Use This Book
This book is a step-by-step tutorial book on how to use GIMP 2.10. The techniques you will learn will give you a base from where to launch your skills. Every tutorial has been created using high quality images and easy-to-follow steps that will help you on your journey from lost beginner to experienced user. Please be aware that we have not filled this book with extra editorial information.
This book is strictly a tutorial book on how to do different techniques. We purposefully limited our text to include only the information you need to perform each technique(s). So, where we say to add this or that specific information, you should know that you are totally free to add any data you want to experiment with and to make your learning more immersive. Once you understand the concepts of each technique and feel you have a firm grip on its application, then we hope we will have opened the doors of understanding (this program) wide open for you. Learning, we feel, is best done 'on the job'. Please Use Our Photos - If You'd Like To We've uploaded all the photos used in this book onto our Facebook page (address seen on Copyrights page).
If you'd like to use our photos, please find these images under the category - Learn GIMP (on our FB page). Save-As-You-Go We highly suggest you periodically save your progress as you proceed through a specific technique. That way, if you make a mistake too big to correct, you can then re-open the image you are working on at the point when you saved it. Personally, this is a huge time saver for our editors. We practice this skill on every image we work with. Using Our Photos If you are going to use the photos we uploaded to our Facebook page, then we highly recommend that you download all of the images onto your desktop and place them in a single folder.
That way, as you progress through this tutorial book, you can find each image we use in a very easy and stress-free manner.
The Basics
How to Set-up GIMP Having a good understanding of the tools youll be using in Gimp is the most fundamental skill you should learn. In this chapter, we will look at the following three items. As a First Skills book, this guide will only cover the basics of the UI. We will not be going into depth. Why? Because all you really need is the basics when you are new to Gimp.
It is in the working with your different images and making them more beautiful when you will learn how to use the different tools as effectively as you can. We will be covering some of the deeper functions of the tools in chapters 3-9 and in further books where well address different techniques and strategies to great editing.
- The basic layout of Gimp
The first thing you should do after you have downloaded Gimp to your computer is to click on the menu item Windows at the top of the UI and choose Single Window Mode. Here is a screenshot of how to do this:

Once you have done this, you might see the UI in the middle of the screen with toolbars on either side of the main campus, like this:

One trick to make your life easier while using Gimp is to set these toolbars (right & left sides) up so that they will be your default toolbars (i.e. they will always pop-up when you open Gimp).
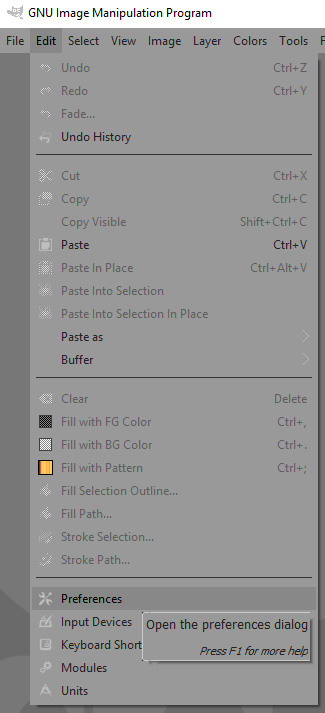
When you choose Preferences, a pop-up window will appear where you need to click on Windows Management .

When you choose Preferences, a pop-up window will appear where you need to click on Windows Management .
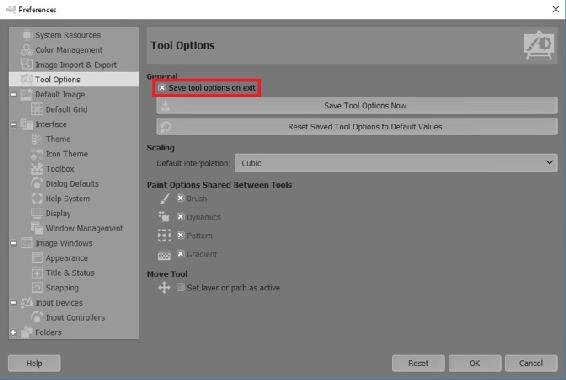
When you open this up, make sure the box is checked next to the Save windows positions on exit line (see orange square). Normally, this is already checked. If you are using an older version of Gimp, just make sure this is checked. 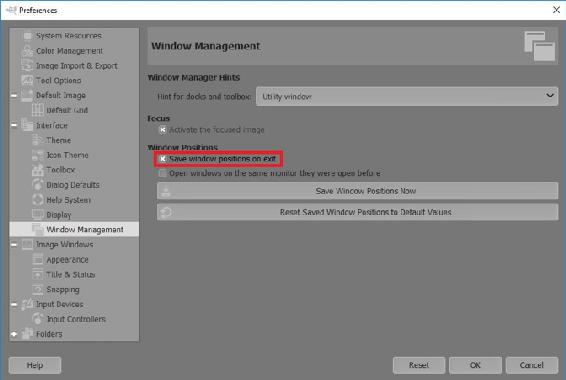 Next step is to click on Tool Options and click on the box next to Save tool options on exit and then press OK .
  Now, whenever you open GIMP on your computer, every time it will open, youll see it exactly how it is now.
Like most software programs, you will now need to reboot GIMP in order for the changes to take effect.
Simply Quit GIMP and reload it to your desktop. 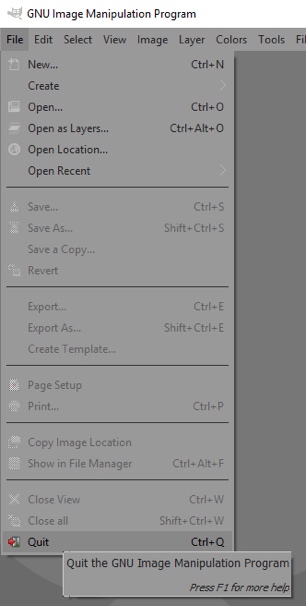 When its reloaded, it should look something like this:
 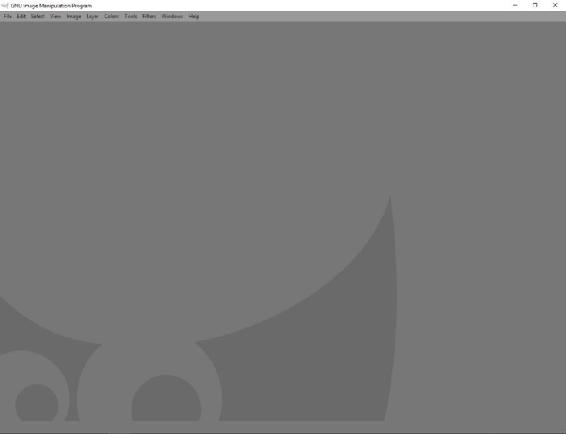 With this opened, lets take a look at the different parts of the User Interface (UI). Some of you may already have some toolboxes on the left and right sides of the main canvas, but if you dont follow along. If you do, read what we have here for this step and see if theres anything here that can help you.




![Hammel - The artists guide to GIMP effects creative techniques for photographers, artists, and designers ; [covers GIMP 2.8]](/uploads/posts/book/138245/thumbs/hammel-the-artist-s-guide-to-gimp-effects.jpg)



 This work is copyrighted material. KuhlmanPublishing All rights reserved. No portion of this book may be reproduced in any form without written permission from the publisher, except as permitted by U.S. Copyright law.
  Once you have done this, you might see the UI in the middle of the screen with toolbars on either side of the main campus, like this:
  One trick to make your life easier while using Gimp is to set these toolbars (right & left sides) up so that they will be your default toolbars (i.e. they will always pop-up when you open Gimp).
  When you choose Preferences, a pop-up window will appear where you need to click on Windows Management .
  Next step is to click on Tool Options and click on the box next to Save tool options on exit and then press OK .
  Now, whenever you open GIMP on your computer, every time it will open, youll see it exactly how it is now.
 When its reloaded, it should look something like this:
  With this opened, lets take a look at the different parts of the User Interface (UI). Some of you may already have some toolboxes on the left and right sides of the main canvas, but if you dont follow along. If you do, read what we have here for this step and see if theres anything here that can help you.