The cornerstone of file management in Windows is the built-in File Explorer utility, which packs a lot of information and features into a relatively compact space. It often is the first place to go when you want to work with files and folders on your PC or on any of the devices that are connected to your PC.
In this chapter, well go over the geography of a File Explorer window and how the different parts are used. In later chapters, well be delving into some of File Explorers features in greater detail.
Anatomy of a File Explorer Window
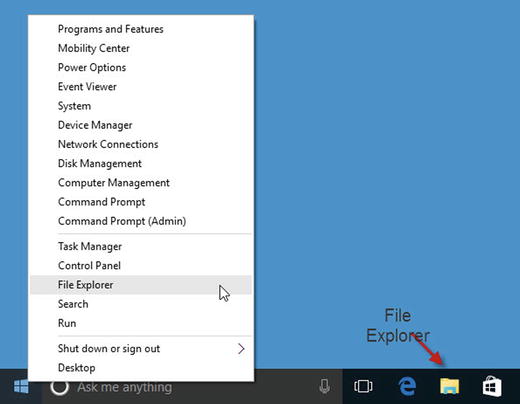
Youll find File Explorers icon (it looks like a folder) in the Windows Taskbar at the bottom of the screen. Youll also find File Explorer listed in the menu when you right click or long tap the Windows logo in the lower left corner of the screen (Figure ).
Figure 1-1.
Two ways to access File Explorer
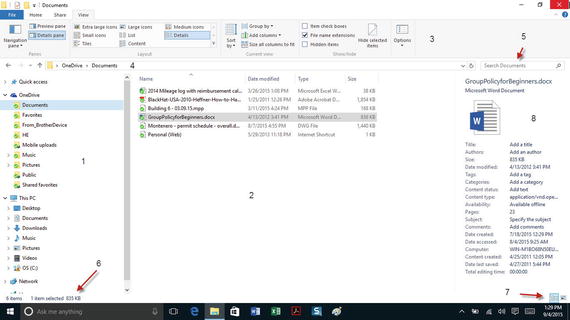
When File Explorer opens, youll see a window that looks a lot like the one shown in Figure .
Figure 1-2.
Parts of a (Windows 10) File Explorer window
Navigation Pane
This is where you choose the location that you want to access. This may include folders stored directly on your PC or on devices that are connected to your PC, such as external storage devices or networked folders. Tap or click an item to select it, or tap or click the arrow next to an item to expand it.
Contents Pane
When you select a folder item in the navigation pane, youll see the contents of that folder displayed in the contents pane. Depending on how File Explorers view is configured, the right pane may display the contents of the selected location using variable-sized icons or as a list with column headings that show file details.
Ribbon
Here youll find a set of tabs labeled File, Home, Share, and View, which provide access to common operations or tasks that you can perform on a selected item or items. The tab selected and options displayed in the ribbon will often change depending on the location or type of file or folder selected.
If you dont see the Ribbon, click the downward-pointing arrowhead near the upper right of the File Explorer window. When the Ribbon is visible this changes to point upward, allowing you to rehide the Ribbon.
Address Bar
This displays the path to your current location. Click or tap part of the path to jump to that specific location, or use the arrow keys to the left (Back, Forward, and Up) to navigate instead. You can also type in a new location here.
Search Box
Enter a word or phrase (or part of one) here to search for it in the selected location. (For more on searching, see , Searching for Files.)
Status Bar
Displays the number of items in a location, or the number and size of items selected.
View Options
These two buttons, located at the lower right corner of the File Explorer window, let you easily switch the layout of the contents pane between the aforementioned details (left button) and large icons (right button) views.
More View Options
The View tab (shown in Figure ) gives you myriad additional options to customize how the contents of the selected folder are displayed.
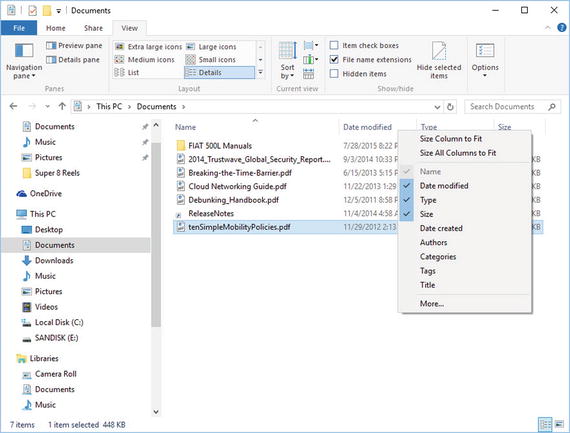
Also, when viewing the contents of a folder in the Details view, as shown, clicking on a column heading (Name, Date, Type, Etc.) will sort the column alternately in ascending or decending order. In addition, by right clicking or long tapping a column heading, you can display additional headings or remove existing ones by adding or removing a check mark from the items that you want (Figure ).
Figure 1-3.
Customizing File Explorers Details view
Preview/Details Pane
When a file is selected, this displays either properties of the selected file (details pane) or lets you view the contents of the file without having to open it first (preview pane).
The details/preview pane is not visible by default. To display it, select the View tab in the Ribbon and tap or click either Details Pane or Preview Pane (see Figure ). Notice that both panes cant be active at the same time.
Now that weve gone over the anatomy of a File Explorer window, lets run down the locations that youre likely to encounter in the Navigation pane.
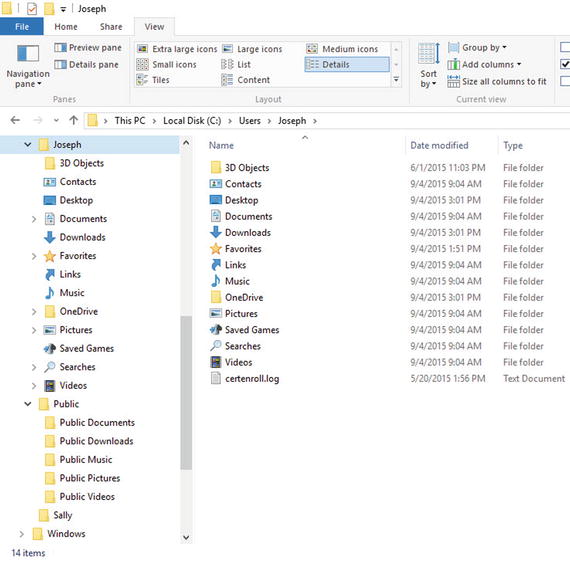
This PC
Here youll find a collection of folders that reside on your PC that are intended to help you store and organize different types of files. Programs will typically use these folders as default locations to store the files that they create.
Desktop
This represents files and folders you place on your Desktopthat is, atop the background wallpaper you see on your screen.
Documents
A place to store files created in programs such as Microsoft Word, Microsoft Excel, and similar programs.
Downloads
The default storage location for files downloaded from the Internet (typically via a Web browser such as Internet Explorer or Google Chrome).
Music
A place for music and other audio files. Music programs such as iTunes and similar programs store their files here.
Pictures
A place for digital photos and other graphics images.
Videos
A place for video files.
OS/Local Disk C:
Typically labeled either OS or Local Disk C:, this represents your PCs internal storage. You can access the Windows operating system and program files from here, as well as all of the file storage locations just outlined (more on this later in this chapter). However, in the course of normal file management, you generally wont need to get to your file storage folders this way because theyre accessible elsewhere in This PC.
If you have any external/removable storage devices such as USB Flash/hard drives or optical disc drives (DVD/Blu-Ray), youll see them listed under This PC along with a drive letter label (often D: or E:). Notice that you wont see an optical drive appear in the Navigation pane unless theres a disc inserted, but if you highlight This PC, the optical drive will appear in the Contents pane whether theres a disc inserted or not.
