Index
[]AccessAccess Assistance pageMicrosoft Office Onlineascending sorts
Index
[]basics offorms
Index
[]calculationscreatingdatabasesreportssubformscreating formsDesign view
Index
[]data sourcedatabase objectsdatabases
Index
[]exporting
Index
[]FAQs (frequently asked questions)fieldsfooterslayouts
Index
[]
Index
[]headers
Index
[]imagesimporting
Index
[]
Index
[]labelslayoutslinksList view
Index
[]Microsoft OfficehelpMicrosoft Wordmodifying Autoform or Form Wizard designforms
Index
[]
Index
[]operatorsoverview of example databaserelational databases
Index
[]parts ofreports
Index
[]
Index
[]recordsreportfootersheaders
Index
[]sortingstyles
Index
[]# (pound sign)
Index
[]templatesToolbox
Index
[]
Index
[]
Index
[]wildcards
Index
[]
A.1. Installing Access 2003
Like all Microsoft Office programs, Access is pretty simple to install. The hardest part may be typing that 25-digit Product Key number (and making sure you don't lose it in case you ever have to reinstall). If you have Microsoft Office 2003 on your computer, you probably already have Access 2003. To check, click Start menu  All Programs
  Microsoft Office, and see if Access is on the submenu.
Note: To install Access 2003, your computer has to run on Windows 2000 or Windows XP. If you're on Windows 2000, Microsoft recommends installing Service Pack 3 and any subsequent updates first. Choose Start

All Programs

Windows Update to check for and install updates. You can also search for updates at www.microsoft.com/windows.
A.1.1. Installing Office
If you're upgrading or installing Office 2003, you're best off doing a full install or upgrade, which gives you a clean, fresh copy of all Office programs, auxiliary programs, and files. Nothing breaks up your workflow like getting an error message saying that Access needs you to install additional software.
To install all Office programs and components:
Exit all running programs, and then insert the Office 2003 CD .
The CD launches its own setup and install program. (If it doesn't, double-click the Setup icon.) You may see messages like "Preparing to Install."
In the first Setup screen, type your Product Key .
If you make a mistake, you get to keep trying.
Next, the Setup program asks for your name and initials. When you're done typing them, click Next .
Access (and other Office programs) uses this as the Author information in the File  Properties box for all files you create. Microsoft pledges not to reveal any personal information you type into its software.
Turn on "I accept the terms in the License Agreement" and click Next again. On the next screen, select an installation type .
Install Now (or Upgrade Now) is your best bet, especially if you choose the option to remove older versions, which saves space on your computer's hard drive.
When the setup program lets you know it's done, click OK .
A.1.2. Installing Access Only
If you didn't install Access when you first installed Office, you can simply add it, as long as you have the CD and Product Key. Here's how to get Access onto your computer.
Insert the Office 2003 CD. Next, choose Start  Control Panel
  Add or Remove program .
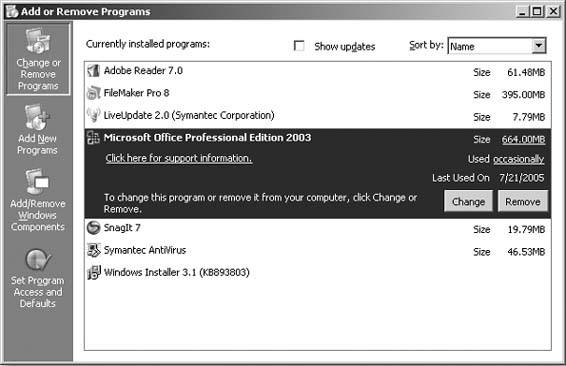
The Add or Remove Programs window opens ().
In the left panel, click the Add New Programs icon. In the panel that opens, click the CD or Floppy button .
Your computer locates the Office 2003 CD. The Run Installation Program box should open and show SETUP.EXE. If so, click Finish. If not, click Browse, and choose your CD drive.
When the setup program launches, follow the installation instructions above and choose the Custom Install option. Click Next .
You'll see a screen that lets you choose which Office components to install. Click the plus (+) signs to expand each heading and see all the individual programs, plug-ins, and example files you can choose to install or remove.
Figure A-1. You can add Office programs you haven't installed before, or remove ones you never use, by running the Office Setup program. To get started, click Start

Control Panel

Add or Remove Programs.
Tip: This book refers to some examples in the Northwind sample database, so make sure you install that database along with Access.
When you're done customizing, click Next .
The setup program installs Access. Click OK to close Setup and get back to work.
A.2. Access Help
In Access, help is never far away. Some forms of help show up unbidden, like the Tip of the Day that pops up every time you open the program, and the screen tips that appear when you point to a button or toolbar. In addition to the help that's right on the screen in front of you, help documents are stored on your computer, and Microsoft Office Online features an entire Web site full of resources.
In this appendix, you'll see how to visit the online support site, download Access templates, get advanced training through tutorials, and post questions for other people who use Access, including experts designated as Microsoft Most Valued Professionals (MVPs) because of their wealth of experience with products like Access.
A.2.1. Where to Look for Help
The best answer is usually the one you get first, so here (in order from quickest and simplest to most time-consuming and complex) are the ways you can summon Access's help system (see ).
A.2.1.1. Screen tips
The quickest way to get help on a feature is to point to it. A small, yellow screen tip identifies the toolbar or icon under your mouse pointer. Often, that's enough of a clue. If it's not, type the name of the feature in the menu bar search field or Office Assistant, as described next.
A.2.1.2. Menu bar
The box at the upper right of ), showing the list of related help documents on your computer (and on Microsoft's Web site, if you're connected to the Internet).
A.2.1.3. Office Assistant
So many people complained about "Clippy," the annoyingly helpful Office Assistant character, that Microsoft no longer has him appear automatically. You have to turn him on by choosing Help 





 All Programs