Lee Stemkoski and Evan Leider 2017
LEE STEMKOSKI and Evan Leider , Game Development with Construct 2 , 10.1007/978-1-4842-2784-8_10
10. Airplane Assault
Lee Stemkoski 1 and Evan Leider 2
(1) DEPT OF MATH & CS, ADELPHI UNIVERSITY DEPT OF MATH & CS, Garden City, New York, USA
(2) NY, USA
In this chapter, you will be creating another top-down shooter game called Airplane Assault, shown in Figure , that was inspired by the classic survival-based game 1942.
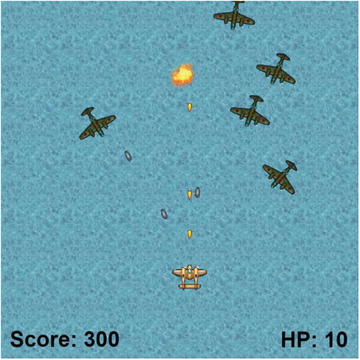
Figure 10-1. The Airplane Assault game
In Airplane Assault, the player controls a plane whose goal is to destroy as many enemy planes as possible for points. The players plane shoots small bullets , and if an enemy is hit, that enemy is destroyed. In contrast to Spell Shooter, the player will have a limited amount of health, which is reduced when hit by an enemy plane bullet. If the players health reaches zero, then the plane will be destroyed, and the game will be over. During gameplay, enemies will spawn every few seconds, move in a random pattern between waypoints, and face and attack the player with their own bullets. The player will need to move around the screen to line up shots and avoid enemy bullets at the same time. This game is endless; the implicit goal of the player is to earn a high score.
The player plane has eight-direction movement , controlled by the arrow keys. Shots are fired by pressing the spacebar. The user interface contains two Text objects that display the players current health points and score.
This chapter assumes you are familiar with the Sprite, TiledBackground, Text, and Keyboard objects; the 8-Direction, Bound to layout, Bullet, and Destroy outside layout behaviors; animations; global and instance variables; and the functions random , floor , and choose . The Flash behavior will be introduced to give the player a moment of invincibility after being hit. The Timer behavior will also be introduced to enable enemy planes to periodically fire at the player. You will learn about the angle function, which makes it easy to determine the angle between two objects or locations. Instance variables will be used in a new way: to add health points to objects.
To begin, download the zip file containing the graphics for this chapter from the book web site. In the layout properties, set the layout Name to Game , and set Size to 800, 800 . As you have in previous projects, set up three layers named Background , Main , and UI . In the project properties, change the window Size to 800, 800 . Add a TiledBackground object named Water using the image water.png , and resize it so it covers the entire layout area.
Player, Waypoint, and Enemy Setup
In this section, you will add the player plane object, the enemy planes that the player must shoot, and the Waypoint objects that determine the path that the enemy planes follow. In the layout, set the active layer to Main . Create a new sprite named Player , with the image player.png , and position it near the bottom of the layout. Change its Angle property to , and position it in the lower center of the layout. Add the behavior 8-Direction and change the property Set angle to No . (The player will face only upward during gameplay.) Also add the behavior Bound to layout.
Next, add a new sprite named Waypoint . This Waypoint object will be almost identical to the Vortex waypoint from the Spell Shooter game, except in Airplane Assault the waypoints will be invisible in the final version. Since a graphic isnt needed, use the image editor tools such as the bucket or paintbrush to fill the image area with a solid color. Change the size of the sprite to 32-by-32 pixels. When you are finished, close the image editor windows. Create another new sprite named Enemy , with the image enemy-plane.png . Add the Bullet behavior, and change the properties Speed to and Set angle to No , since the enemies will be facing the player rather than their direction of movement. Create five additional instances of the Waypoint sprite and two additional instances of the Enemy sprite, organizing them in the layout, as shown in Figure .
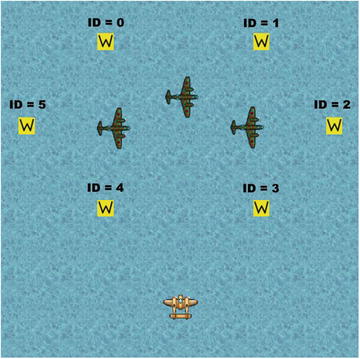
Figure 10-2. The player, enemies, and waypoints with IDs in the layout
Add an instance variable named ID to the Waypoint object, set Type to Number , Initial value to , and Description to Unique identification number . Then, to the Enemy object, add an instance variable named Target , set Type to Number , set Initial value to , and set Description to ID of the Waypoint to move towards . In the layout editor, click a single waypoint in the layout, and in the Properties panel, set the value of ID to . Click another waypoint and set its ID value to . Repeat this for each waypoint in the layout until they each have one of the numbers from 0 to 5 (each number occurring exactly once), as shown in Figure .
Next, you will randomly set the Target values of the enemy airplanes at the beginning of the game as you did in Spell Shooter with the event condition On created. First, in the event sheet, create an event with the condition Enemy - On created, and set the action Enemy - Variables: Set value. Then set Instance variable to Target , and set Value to floor(random(Waypoint.Count)) .
You will now create movement events that rotate and move enemies toward their intended target waypoints, with the For Each and ID comparison conditions. Create a new event with the condition System - Loops: For Each, and select Enemy. Add another condition called Waypoint - Compare instance variable, and check whether the ID is equal to Enemy.Target . In Spell Shooter, you used the Rotate towards position action to rotate sprite images toward vortex waypoints and also to move them toward these waypoints using the Bullet behavior (in that project, the Bullet property Set angle was set to Yes). In Airplane Assault, the enemy plane sprite images will rotate to face the player while they are moving in a different direction toward waypoints. To accomplish this, you will use two actions: Rotate towards position and Bullet: Set angle of motion. With Set angle of motion, you will use the angle function, which takes as input the X and Y coordinates of two locations (a total of four inputs altogether) and returns the angle between those locations. Add the action Enemy - Rotate toward position, set Degrees to , set X to Player.X , and set Y to Player.Y . Add another action Enemy - Set angle of motion, and set Angle to angle( Enemy.X, Enemy.Y, Waypoint.X, Waypoint.Y ) .
Next, you will add the events for when an enemy reaches its destination, at which point they should select their next target (which should involve some randomness). Create a new event with the condition Enemy - On collision with another object, and select Waypoint. To verify that the enemy has collided with its actual target, add a second condition called Waypoint - Compare instance variable, and again check whether the ID is equal to Enemy.Target . Add the action Enemy - Variables: Add to. For Variable

![Lee Stemkoski - Java Game Development with LibGDX: From Beginner to Professional [Lingua inglese]](/uploads/posts/book/153997/thumbs/lee-stemkoski-java-game-development-with-libgdx.jpg)
![Rex van der Spuy [Rex van der Spuy] - Foundation Game Design with HTML5 and JavaScript](/uploads/posts/book/121398/thumbs/rex-van-der-spuy-rex-van-der-spuy-foundation.jpg)
![Ethan Ham [Ethan Ham] - Tabletop Game Design for Video Game Designers](/uploads/posts/book/119417/thumbs/ethan-ham-ethan-ham-tabletop-game-design-for.jpg)

