WINDOWS 10
2021
A Complete Guide to Microsoft Windows 10 with the Latest Tips and Updates
Carson Hill
Copyright
All rights reserved. No part of this book may be reproduced or used in any manner without the prior written permission of the copyright owner, except for the use of brief quotations in a book review.
While the advice and information in this book are believed to be true and accurate at the date of publication, neither the authors nor the editors nor the publisher can accept any legal responsibility for any errors or omissions that may be made. The publisher makes no warranty, express or implied, with respect to the material contained herein.
Printed on acid-free paper.
Printed in the United States of America
2021 by Carson Hill
Table of Contents
CHAPTER ONE
Windows 10: What is new now?
Windows 10 is the succession of the Windows 8.1 operating system developed by Microsoft and intended to continue the Windows NT Family of operating system. The MS Windows 10 Operating System was launched for public utilization on 29 th day of July, 2015.
There are recent updates on this Operating System that allow users; customize their personal computers, be more creative with their PC and increase the Windows security.
Find below the new updates that have been made to the Windows 10 OS;
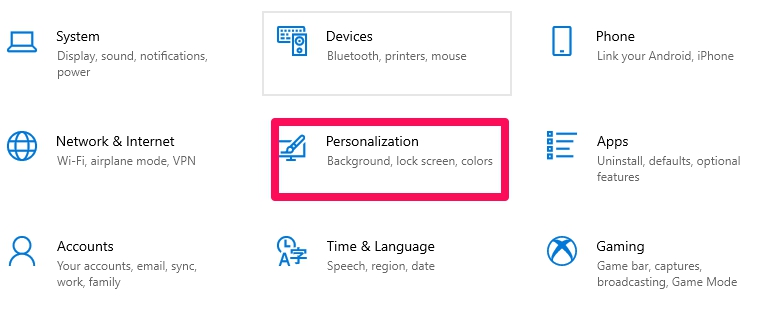
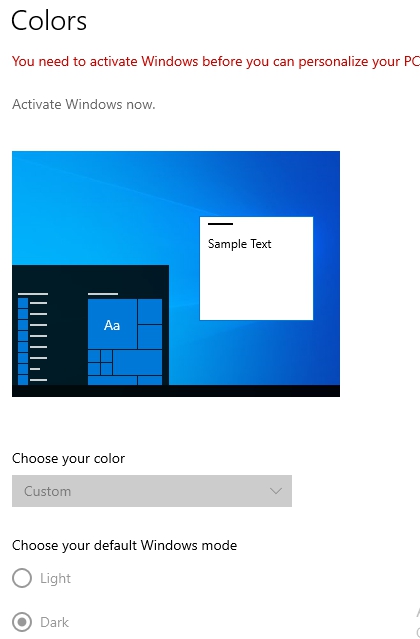
Select your favorite color for Windows: You can select between the light mode option or Dark mode option to make your apps stand out in Windows. To do this, proceed with the prompts below;
At the bottom left, tap on the Start ( icon that looks like window pane) icon

and tap Settings

Select Personalization

and click Color

.
Note: In the above screenshot, you will see the You need to activate Windows before you can personalize your PC prompt, this means that you will not be able to personalize your personal computer if you are yet to activate your Windows. Dont forget that choosing your desired color for Windows is among the ways you can personalize your PC. In the later part of this guide, you will learn about ways you can activate your Windows 10.
Keep regular tabs on your website tabs: If youve got a webpage you usually frequent, you can pin that website on your taskbar for quick reference. From the taskbar, hover the mouse over the website you have pin to see a quick preview of all the tabs that you have opened. In Microsoft Edge (the default browser in Windows), you can pin your most visited website to the taskbar by following the steps below on your Microsoft Edge browser;
Jump between pages of websites you have opened using the Alt + Tab shortcut:
With your fingers, you can press the Alt key, and click on Tab to flip through all the pages you have opened on Windows and on tabs that you have opened in Microsoft Edge browser. Once the pages are displayed, you will be able to move between opened tabs with the aid of the Tab key. Remove your hand from the Alt- key once you have seen the page you want to open.
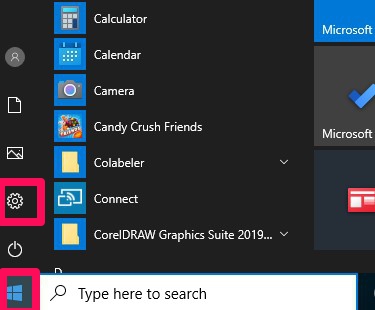
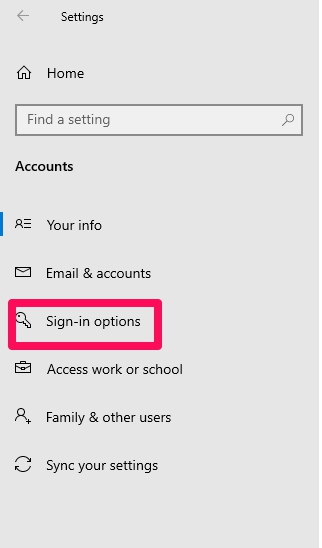
Go Passwordless with Microsoft account on your PC: Improve your devices security by removing the password when you are signing in to Windows on Microsoft accounts on your computer. To do this, follow the steps below;
At the bottom left, click on the Start ( icon that looks like window pane) icon

and tap Settings

Click on Accounts

, tap on the Sign-in options

, then enable ( ON) the Require Windows Hello Sign-in for Microsoft accounts
Access Notification settings from the Taskbar: To decide where your notifications will show up and ways to sort them out, click Notification

at the bottom right-side of the screen and tap Manage Notifications displayed on the taskbar.
Deploy the Snip & Sketch feature to capture, mark up and share pictures: The Screen sketch feature is now referred to as Snip & Sketch. Launch the Snip & Sketch to take a snip of what is on your PCs screen or to mark up an existing image and share it. From the Search space (located at the bottom left anywhere you are on the screen), enter Snip & Sketch (you will start getting suggestions of what you are looking for before you finish typing the word), then choose Snip & Sketch from the result displayed to launch the app. For quick snip, use any of your fingers to click on the Windows logo key

+ Shift + S . The screen of your computer will get dark and the cursor will be displayed as cross. Select a point and left-click the cursor. Then proceed to highlight that area that you wish to capture by moving the cursor. The captured area is displayed right on the screen. The snipped image will be saved to temporal memory area called clipboard, and will be ready for pasting into a document or an email. If you wish to edit the snipped image, click on the notification that shows just after you have made your snip. The Snip & Sketch app gives options to save, copy, or share and also has a pen, eraser and a highlighter, all with variable line widths. Alternatively, you can also download the Skitch App from https://www.techspot.com/downloads/5705-skitch.html. The Skitch app for Windows is best for markup, screenshot and to annotate images with arrows, text and shapes. Many of the screenshots you will see in this guide were taken from my PC using the Skitch App for Windows.


 and tap Settings
 and click Color
  .
.
 .
.
 , tap on the Sign-in options
  , then enable ( ON) the Require Windows Hello Sign-in for Microsoft accounts
 at the bottom right-side of the screen and tap Manage Notifications displayed on the taskbar.
 + Shift + S . The screen of your computer will get dark and the cursor will be displayed as cross. Select a point and left-click the cursor. Then proceed to highlight that area that you wish to capture by moving the cursor. The captured area is displayed right on the screen. The snipped image will be saved to temporal memory area called clipboard, and will be ready for pasting into a document or an email. If you wish to edit the snipped image, click on the notification that shows just after you have made your snip. The Snip & Sketch app gives options to save, copy, or share and also has a pen, eraser and a highlighter, all with variable line widths. Alternatively, you can also download the Skitch App from https://www.techspot.com/downloads/5705-skitch.html. The Skitch app for Windows is best for markup, screenshot and to annotate images with arrows, text and shapes. Many of the screenshots you will see in this guide were taken from my PC using the Skitch App for Windows.